By: CS2103T-T13-3 Since: September 2019 Licence: MIT
1. Introduction
treasurerPro (tP) is an application designed for treasurers of student co-curricular activities (CCAs)/student clubs who prefer to use a desktop app for managing their club expenses. More importantly, tP is optimized for those who prefer to work with a Command Line Interface (CLI) while still having the benefits of a Graphical User Interface (GUI).
If you can type fast, tP can get your expense management tasks done faster than traditional GUI apps. Interested? Let’s move on to Section 2, “Quick Start” to get started. Enjoy!
2. Quick Start
-
Ensure you have Java
11or above installed in your Computer. -
Download the latest
treasurerPro.jarhere. -
Copy the file to the folder you want to use as the home folder for your treasurerPro.
-
Double-click the file to start the app. The GUI should appear in a few seconds.
-
Type the command in the command box and press Enter to execute it.
e.g. typinggo membersand pressing Enter will take you to the Members tab. -
Refer to Section 3, “Features” for details of commands for each tab.
3. Features
This section contains details on the features in the treasurerPro. These features are divided primarily into two categories:
-
Universal commands available within all tabs
-
Commands specific within each tab
Universal commands are displayed first. Tab-specific commands are organised according to the tabs that they belong to.
General Command Format for All Tabs
-
Highlighted words, like
add n/John Doeoradd n/NAMEindicate that they can be entered into the Command Box. -
Words in
UPPER_CASEare the parameters to be supplied by the user e.g. inadd n/NAME,NAMEis a parameter which can be used asadd n/John Doe. -
Items in square brackets are optional e.g
n/NAME [t/TAG]can be used asn/John Doe t/friendor asn/John Doe. -
Items with
… after them can be used multiple times including zero times e.g.[t/TAG]…can be used ast/friend,t/friend t/familyetc. -
Parameters can be in any order e.g. if the command specifies
n/NAME p/PHONE_NUMBER,p/PHONE_NUMBER n/NAMEis also acceptable.
4. Universal Commands for All Tabs
These are commands available for use in the Command Box for all tabs.
4.1. Navigation Between Tabs
Command: go TAB
This command allows you to navigate between tabs.
-
go home -
go members -
go inventory -
go reimbursements -
go cashier -
go overview
Alternatively, you may also choose to click the tabs to switch to them.
4.2. Exiting the Application
Command: exit
This command allows you to exit the application immediately.
Alternatively, you may also click the x button on the top right (for Windows/Linux) or top left (for macOS) to close
the application.
4.3. Undo/Redo the Last Command [coming in v2.0]
Command: undo or redo
This command allows you undo/redo the last command.
5. Application Tab Specific Commands
These are commands that are specific to each tab within treasurerPro.
5.1. Home Tab
This section will contain details on all commands available in the Home tab.
Summary of features in the Home Tab
-
The Home Tab shows a list of all transactions made thus far.
-
Each column shows the date, description, category, amount spent and the person responsible for each transaction.
-
You may add, delete or edit transactions within this tab.
-
Leo, our mascot, helps give replies indicating successful commands executed.
-
Leo will also give replies to guide you when there is a wrong input.
-
You may also sort the list of transactions by descending date, by ascending alphabetical order or descending amount.
-
The amount input for a transaction should be positive if the transaction is considered revenue to the club (that is, it adds money to the club’s funds).
-
The amount input should be negative if the transaction is an expenditure made by the club (that is, it deducts money from the club’s funds).
-
Description and category of a transaction can be empty.
| The amount you may enter is limited to -999999.99 to 999999.99. If more decimal points are entered, it will be rounded off to 2 decimal points. |
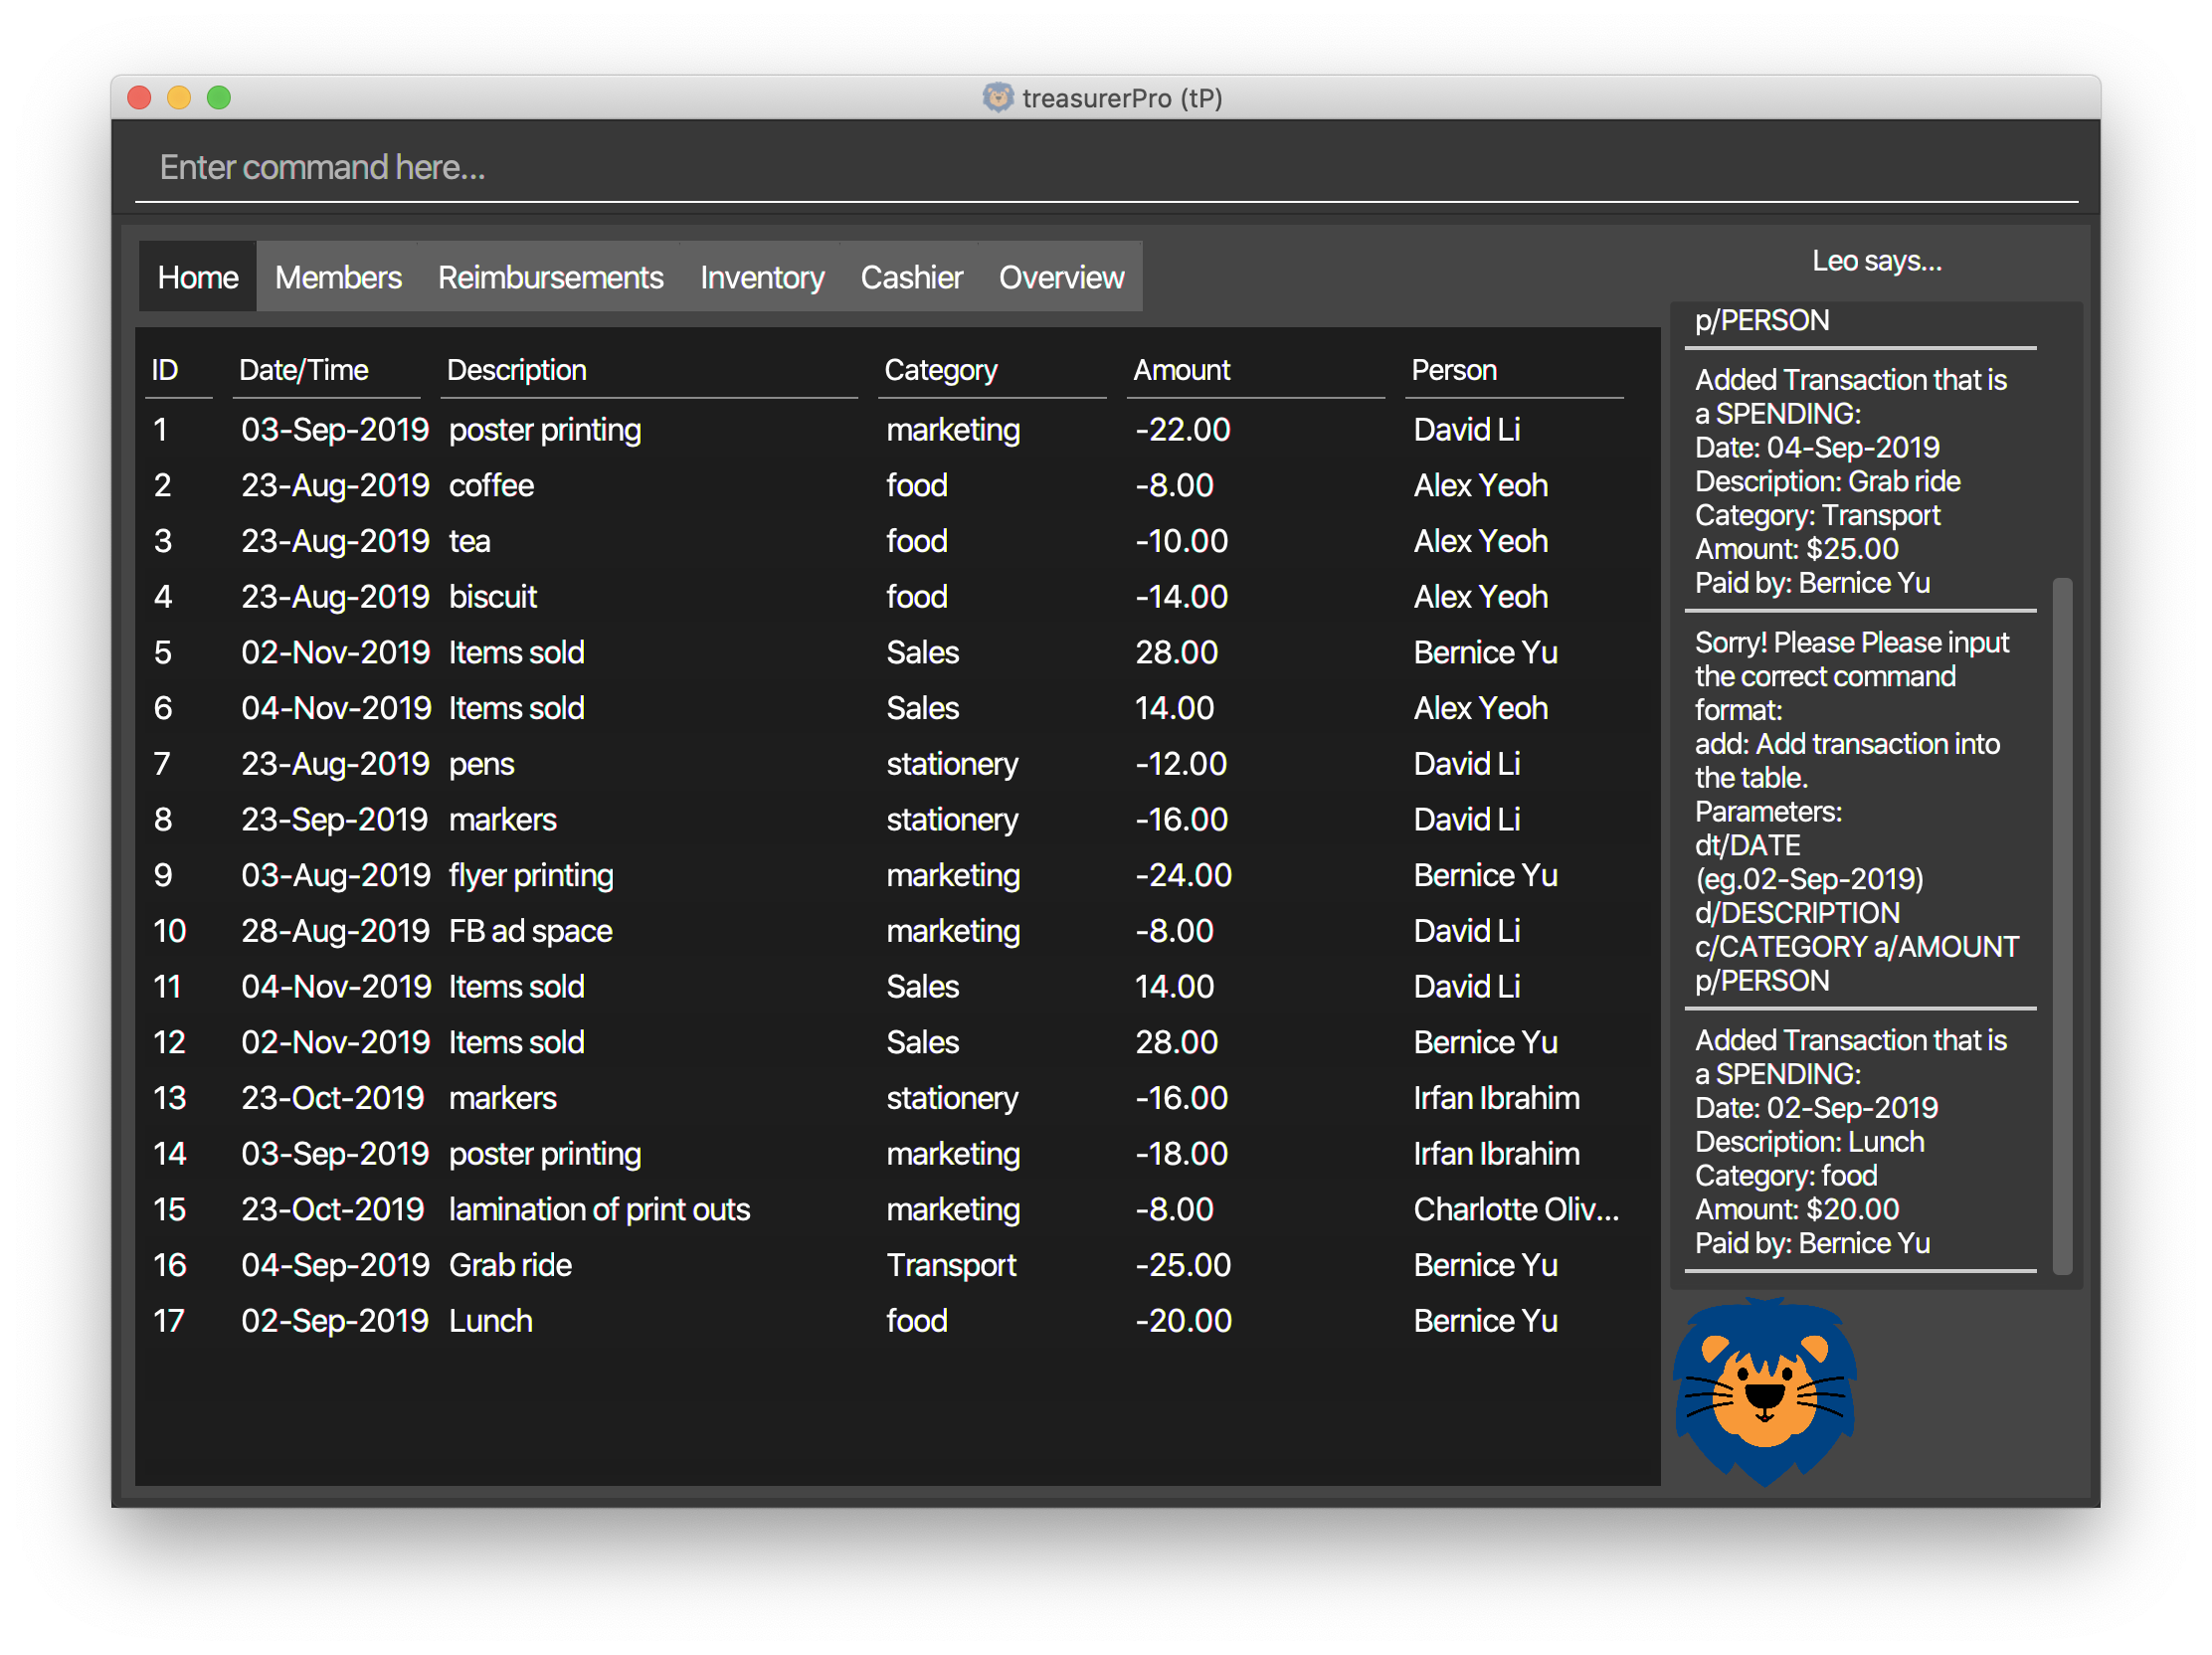
5.1.1. To Add a Transaction in the Home Tab
This command allows you to add a transaction to the table and saves it into the system.
-
Command:
add dt/DATE d/DESCRIPTION c/CATEGORY a/AMOUNT p/PERSON -
Example
-
add dt/24-Aug-2019 d/Printer ink c/Miscellaneous a/3.50 p/Alex Yeoh
-
| The format of the date has to be in dd-MMM-yyyy format and is case-sensitive. (Eg. 24-Aug-2019 or 03-Sep-2019) The person specified must already exist in the Members tab and is case-sensitive. While all field prefixes must be present, the description and category can still be empty. |
| If you are adding a transaction meant to represent sales revenue, the transaction must be positive-valued and under the "Sales" category for it to show up in the Overview Tab correctly. If you are adding a transaction that is considered a spending which requires reimbursement to the member, the transaction must be negative-valued for it to show up in Reimbursements tab automatically. |
-
Steps
-
Type the command with all parameters filled in, as shown in the screenshot below:
-

-
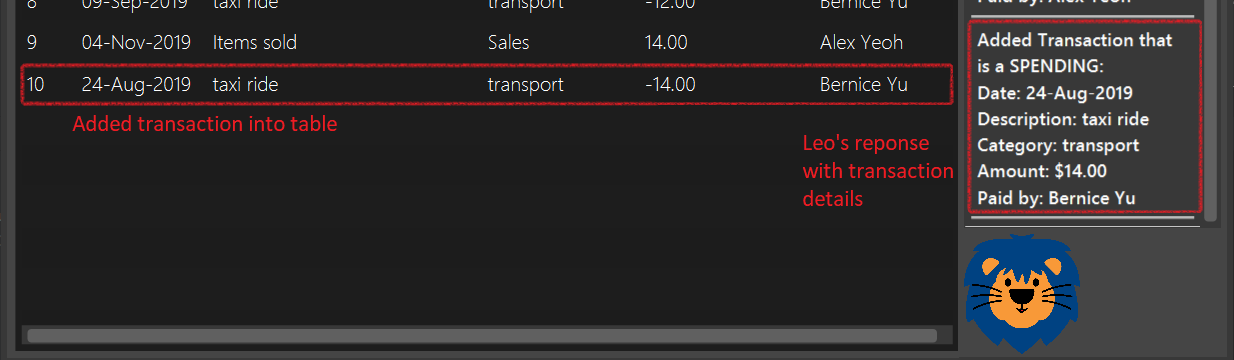
Hit
Enter. If the command is successfully added, Leo will respond with a success message and the transaction will be shown in the table. This is shown in the screenshot below:
If the person’s name does not exactly match a current member in the Members Tab, Leo will respond with an error and the transaction record will not be added.
| There is no character limit for the description or category. If the words appear truncated, the columns in the table can be expanded by dragging the right border of the column. Just be careful not to resize the column to the point that it exceeds the width of the window, which would require restarting treasurerPro to restore the column back to the original size. Alternatively, you may click on the row to have the full details of the transaction displayed as a response from Leo. |
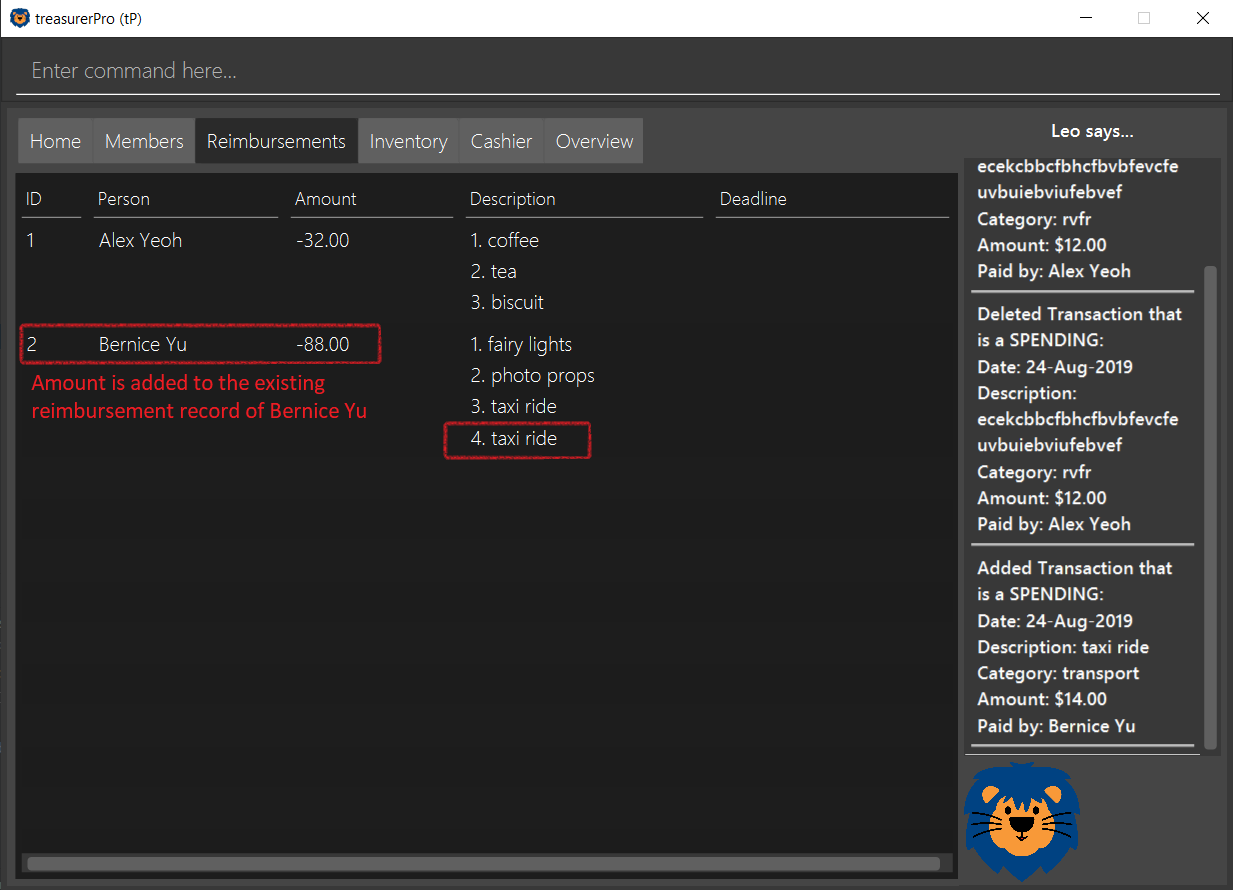
After step 2, if the added transaction contains a negative amount (indicating an expenditure), a corresponding entry will
automatically be shown in the Reimbursement tab, tagged to the member who spent it.
Since reimbursements are aggregated by member, if the member already has other outstanding reimbursements,
it will simply be added to his existing row.
This is shown in the screenshot below:
5.1.2. To Delete Transactions in the Home Tab
This command allows you to delete either all transactions of a person or a single transaction of a specific ID from the table.
-
Command
delete IDordelete p/PERSON -
Examples
-
Delete by ID:
delete 1- Deletes the transaction at the index shown in the table. If the table shows a filtered list of transactions due to the Find command detailed in Section 5.1.5 To Find Transactions that Match Keywords in the Home Tab, the 1st transaction in the filtered list is deleted. -
Delete by Person:
delete p/Alex Yeoh- Deletes all transactions of the person in full list of transactions.
-
-
Steps for Deleting by ID:
-
Type the command with the ID of the transaction to be deleted as shown in the screenshot below:
-

-
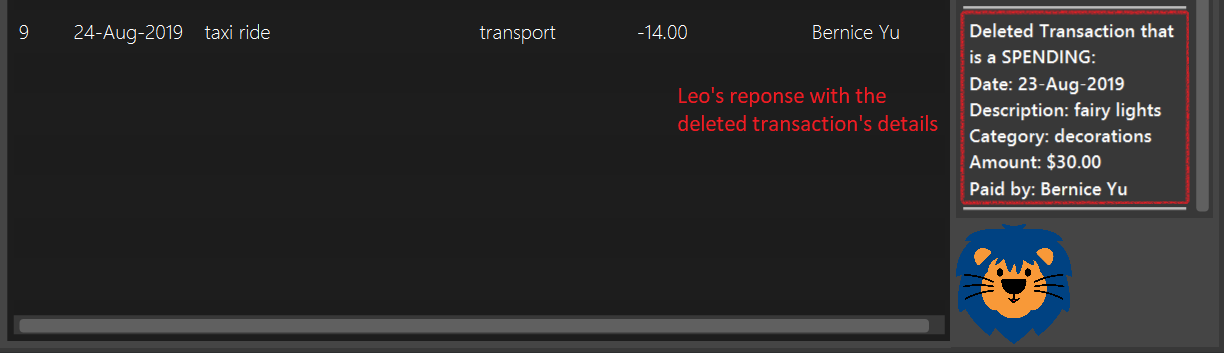
Hit
Enter. Leo will respond with a success message and the transaction will be removed from the table as shown below:
-
Steps for Deleting by Person:
-
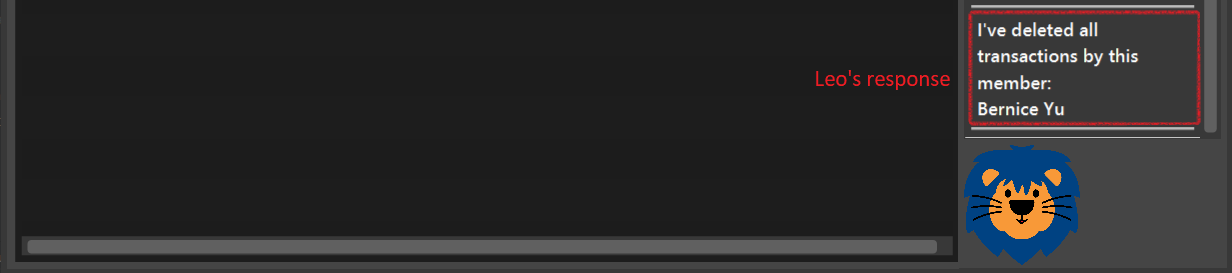
Type the command with the person’s name to delete all transactions related to that person, as shown in the screenshot below:
-

-
Hit
Enter. Leo will respond with a success message and the transaction(s) will be removed from the table as shown in the screenshot below:
For both Delete commands, if the transaction(s) deleted was part of a pending reimbursement record, it will also be
removed from that reimbursement record.
On the other hand, if the person entered is not part of our database as shown
in the Members Tab, Leo will respond with a message to inform you.
If the person does not have any transactions, Leo will also respond with a message to inform you.
5.1.3. To Edit a Transaction in the Home Tab
This command allows you to edit an existing transaction in the table and change its details.
-
Command:
edit ID [dt/DATE] [d/DESCRIPTION] [c/CATEGORY] [a/AMOUNT] [p/PERSON]
| The optional fields above can vary in their order. It is not compulsory to include all of them but you need to include at least one. |
-
Examples:
-
edit 1 p/Bernice Yu dt/23-Aug-2019- Edits the transaction at the index shown in the table. If the table shows a filtered list of transactions due to the Find command detailed in Section 5.1.5 To Find Transactions that Match Keywords in the Home Tab, the 1st transaction in the filtered list is edited.
-
-
Steps:
-
Type the command with the ID of the transaction to be edited, along with the new parameters to be changed, as shown in the screenshot below:
-

| Similar to the Add command, there is no restriction to the number of characters allowed for the description and category. |
-
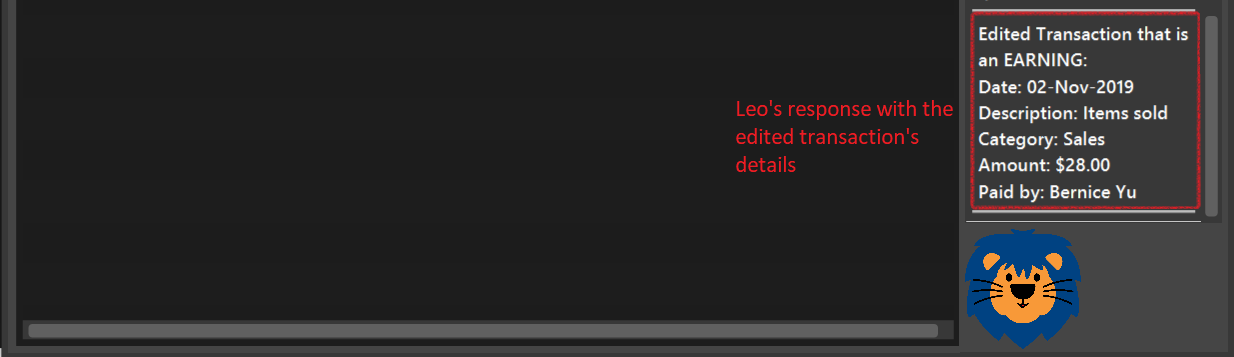
Hit
Enter.
Leo will respond with a success message and the updated transaction will be shown in the table as shown below:
If the person entered into the command is not found in the Members tab, Leo will respond to inform you which is similar to Add command. In addition, if there is no matching transactions, en empty table will be shown.
5.1.4. To Sort Transactions in Different Orders
This command enables you to sort the table of transactions into a specified order for viewing and carrying out of subsequent commands.
-
To sort:
-
By date (from oldest to most recent):
sort date -
By name (from alphabetical order of name):
sort name -
By amount (from smallest to largest in amount):
sort amount -
Undo sort:
sort reset
-
-
Examples:
-
find Alex
sort date- Sorts both the results of thefindcommand shown and the actual transaction list. The Find command is detailed in Section 5.1.5. To Find Transactions that Match Keywords in the Home tab. To view the full sorted list, enterbackcommand which is detailed in Section 5.1.6. To Go Back to Display the Full List in the Home Tab
-
| The Undo Sort command allows you to view the table of transactions in the order originally shown when the application was initially opened. The list can be sorted even if it is empty. |
-
Steps
-
Type any one of the above commands in blue font into the command box.
-
Hit
Enter. The table will now be sorted in the specified order for you.
-
5.1.5. To Find Transactions that Match Keywords in the Home Tab
This command transactions matching the specified keywords for viewing and for carrying out of subsequent commands, based on the filtered table of transactions shown. The subsequent commands will include: delete, edit and sort.
| An Add command after a Find command will cause the table to show all transactions. A Find command will always find from the full list transactions and show the results. |
-
Command:
find KEYWORDS
-
Examples:
-
find Alex Yeoh -
find Alex
-
-
Steps:
Shown below is the table of all transactions:
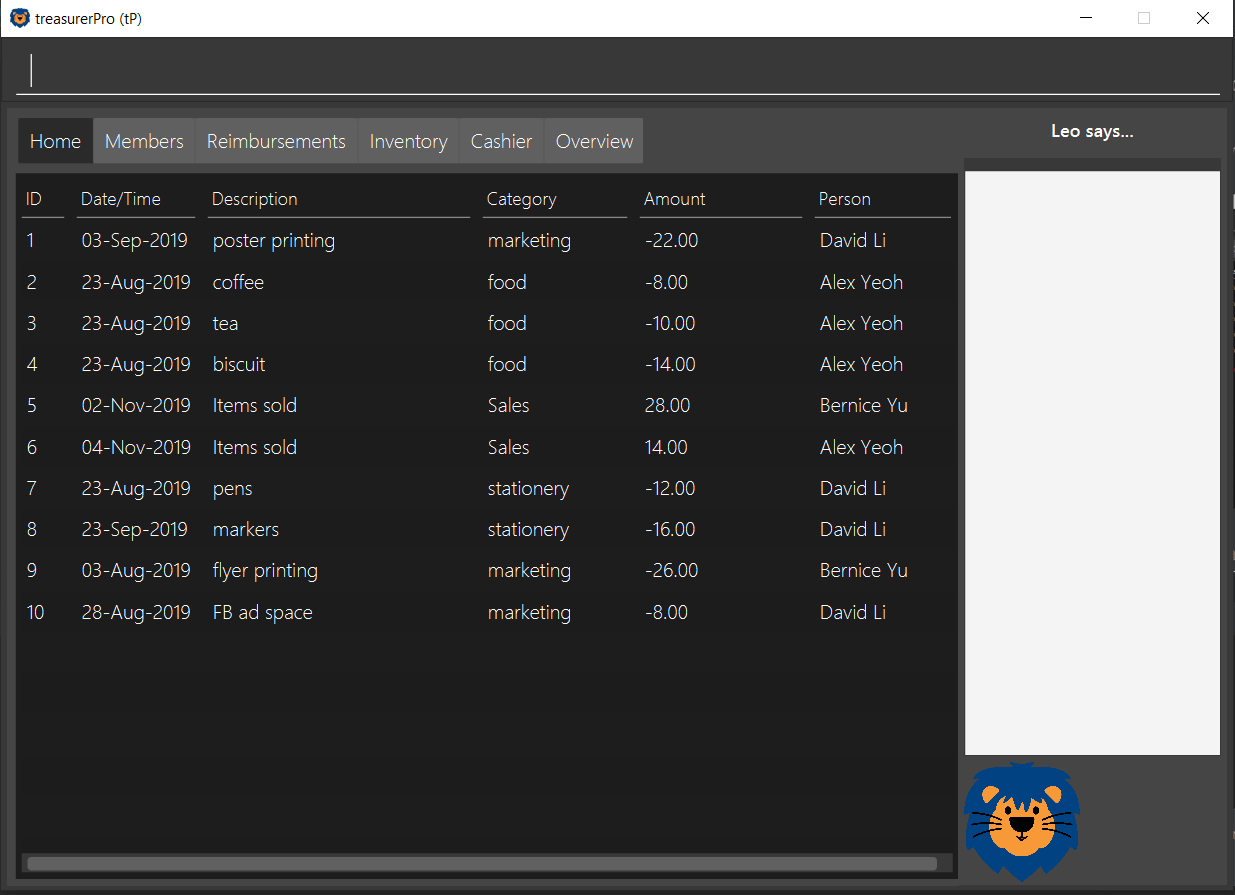
-
Type the command with keyword(s) to find transactions as shown in the screenshot below:

-
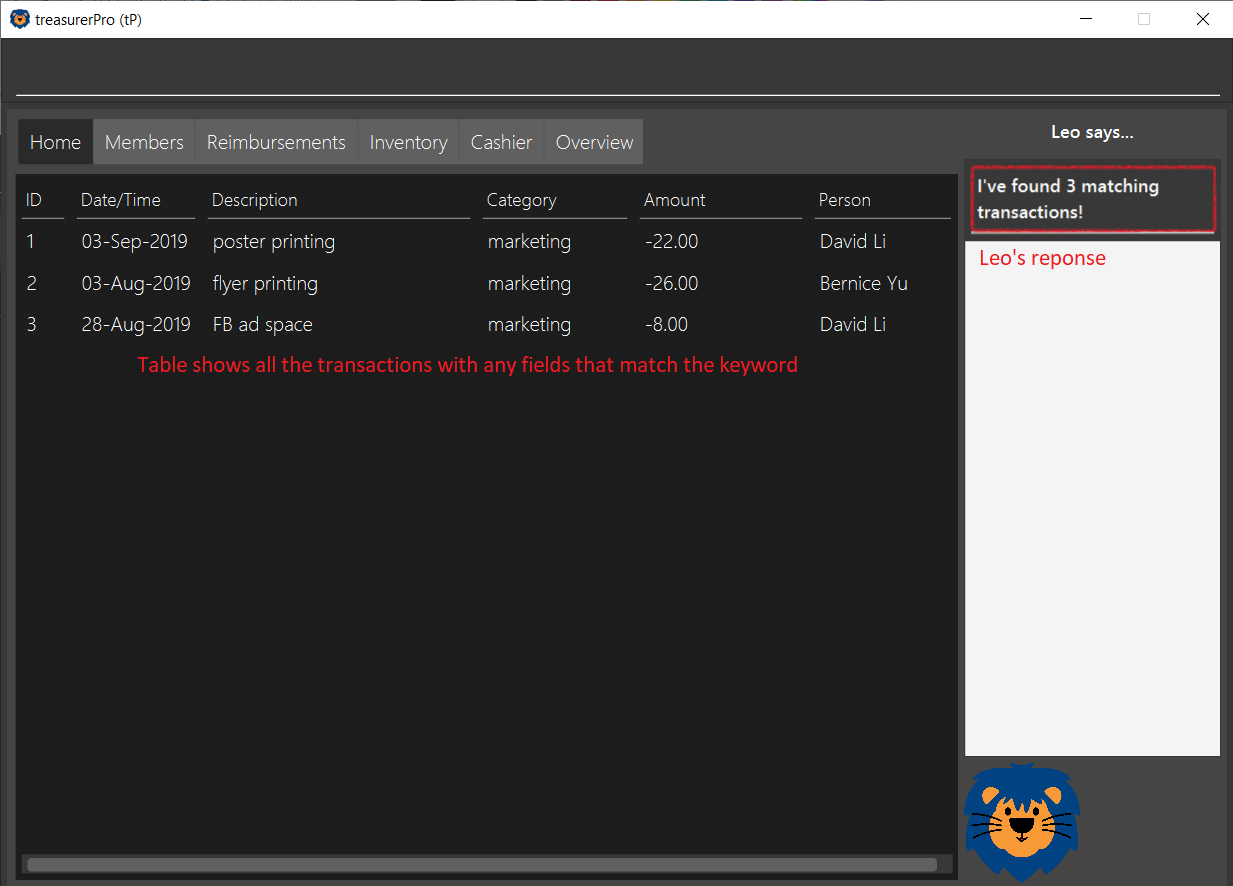
Hit
Enter. Leo will respond with the number of matching transactions, and the table will show only transactions matching the keywords. This is shown in the screenshot below:
-
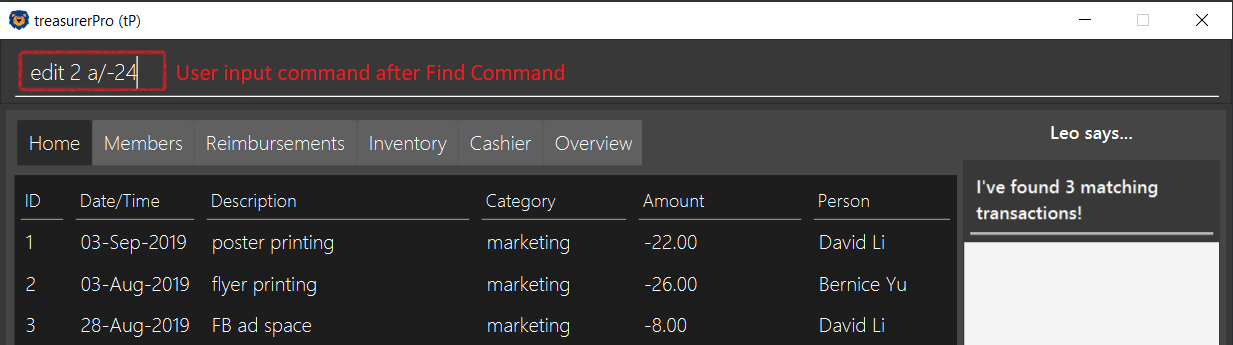
Key in
backand hitEnterto return to the table of all transactions, or enter your next command to be executed. The screenshot below shows the Edit command being input as the next command:
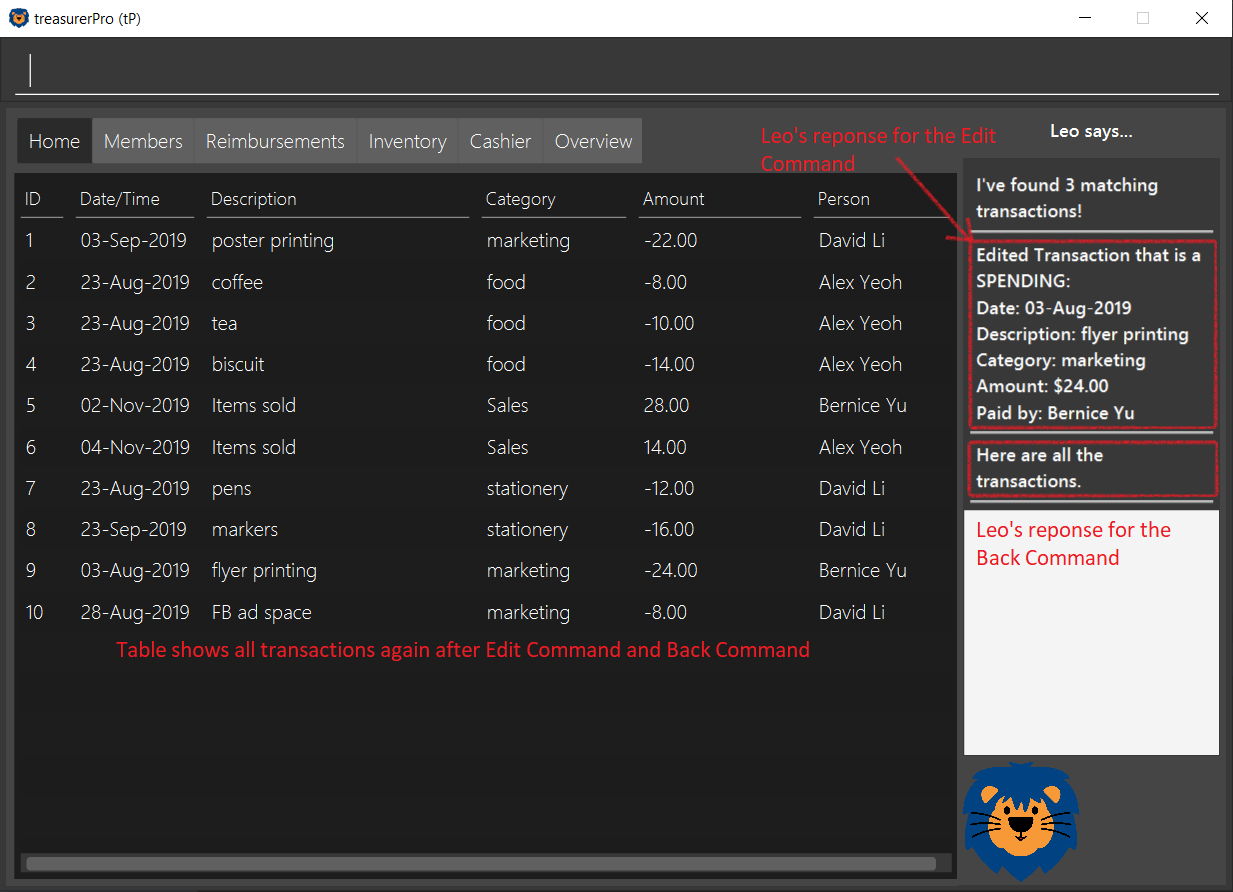
The table will continue to show the filtered table with the transaction edited according to the command, shown in the screenshot above.
As mentioned, if an Add command is entered, the table will automatically reverse back to the previous view to show the full list of all transactions.
All other commands require you to input back to return to the full list of all transactions.
|
The screenshot below shows the table after entering back which shows all the transactions in the table again:
5.1.6. To Go Back to Display the Full List in the Home Tab
This command helps you to display the full transaction list after Find Commands. After a Find Command, you can enter Delete, Edit or Sort Commands before entering the Back Command to display the full list.
| There is no need for you to enter a Back command after an Add Command since the Add command automatically resets the table to show the full list of transactions. |
-
Command:
back -
Steps:
-
Type
backinto the Command Box -
Hit 'enter'. The table should show the full list of transactions.
-
5.2. Members Tab
5.2.1. To Add a Person
The Add command allows you to add a person or member to the database.
-
Command:
add n/NAME p/PHONE_NUMBER e/EMAIL a/ADDRESS [t/TAG]…
| A person can have any number of tags (including 0). |
-
Examples:
-
add n/John Doe p/98765432 e/johnd@example.com a/John street, block 123, #01-01 -
add n/Betsy Crowe t/friend e/betsycrowe@example.com a/Newgate Prison p/1234567 t/criminal
-
5.2.2. To List All Persons
The List command shows you a list of all persons in the database.
-
Command:
list
5.2.3. To Edit a Person
The Edit command enables you to edit an existing person in the database at a specified index.
-
Command:
edit INDEX [n/NAME] [p/PHONE] [e/EMAIL] [a/ADDRESS] [t/TAG]…
-
Examples:
-
edit 1 p/91234567 e/johndoe@example.com- Edits the phone number and email address of the 1st person to be91234567andjohndoe@example.comrespectively. -
edit 2 n/Betsy Crower t/- Edits the name of the 2nd person to beBetsy Crowerand clears all existing tags.
-
5.2.4. To Locate Persons by Name
The Find command enables you to find every person whose name contain any of the inputted keywords.
-
Command:
find KEYWORD [MORE_KEYWORDS]
-
Examples:
-
find John- ReturnsjohnandJohn Doe -
find Betsy Tim John- Returns any person having namesBetsy,Tim, orJohn
-
5.2.5. To Delete a Person
The Delete command enables you to delete the specified person from the database.
-
Command:
delete INDEX
-
Examples:
-
list
delete 2- Deletes the 2nd person in the address book. -
find Betsy
delete 1- Deletes the 1st person in the results of thefindcommand.
-
5.3. Reimbursements Tab
Summary of features in the Reimbursement Tab
-
The reimbursement tab displays all the reimbursements that need to be paid out by the treasurer.
-
Each reimbursement contains:
-
The person’s name
-
The total amount the person needs to be reimbursed
-
The description of the transactions related to the person and deadline for that reimbursement.
-
-
Reimbursement records are automatically extracted from the transactions history.
-
The reimbursement list aggregates transactions by person and displays only one row per person.
-
You can add a deadline to a reimbursement, find a reimbursement by name, mark a reimbursement as done and sort the reimbursements.
-
All reimbursements shown in the Reimbursement Tab are outstanding and have not been paid. Completed reimbursements will not be displayed.
| Reimbursements constitute only transactions resulting in an outflow of cash. This is represented by a negative amount in a transaction, and means that the person tagged to that transaction had paid first, and needs to be reimburesd for their expenditure. |
5.3.1. Adding Deadline to a Reimbursement:
This command allows you to add a deadline to a person’s reimbursement.
| You can set the deadline as any valid day you want. It is your responsibility to set a reasonable deadline. |
-
Command:
deadline p/NAME dt/dd-mmm-yyyy -
Example:
deadline p/Alex Yeoh dt/19-Dec-2019 -
Steps:
-
Type the command with all parameters filled in, as shown in the screenshot below:

-
Hit
EnterIf the deadline is successfully added, Leo will respond with a success message and the deadline will now show for the specified person’s reimbursement.
Otherwise, Leo will show an error message indicating that the person is not in the reimbursement list.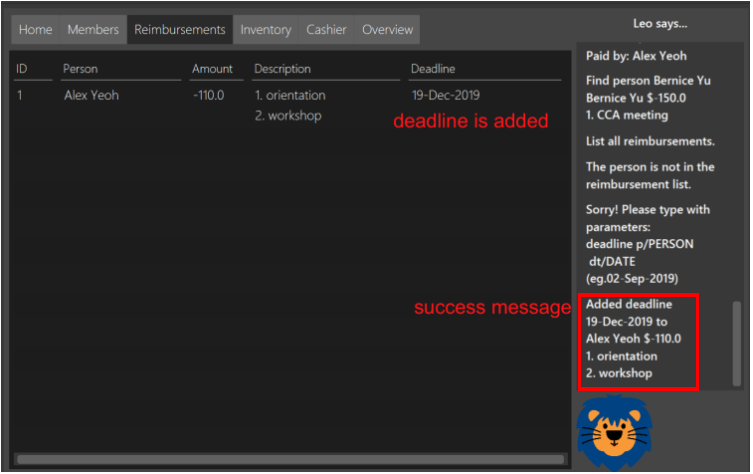
-
You must provide the deadline in the format dd-mmm-yyyy e.g. 19-Dec-2019.If an invalid format is inputted, e.g. 01-AAA-2019 or 19-DEC-2019 or -1-Dec-2019,
Leo will inform you that the input is invalid. |
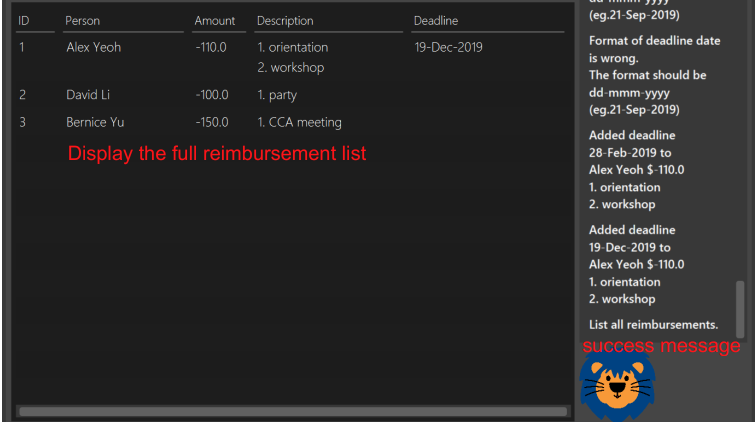
If an invalid date is entered, e.g. 31-Feb-2019, the app will round it to 28-Feb-2019
and adds the rounded date as the deadline. But our app only checks up to 31 in day.
To modify the deadline for a reimbursement, you can use deadline command again
to reassign deadline to a reimbursement.
|
5.3.2. Finding a Reimbursement for a Person:
This command allows you to find the reimbursement for a specified person.
-
Command:
find p/NAME -
Example:
find p/Alex Yeoh -
Steps:
-
Type the command, along with the person’s name you’d like to find into command box:

-
Hit
EnterLeo will respond with a success message and the tab will show the person’s corresponding reimbursement, if it exists.
Otherwise, Leo will show an error message indicating that the person is not in reimbursement list.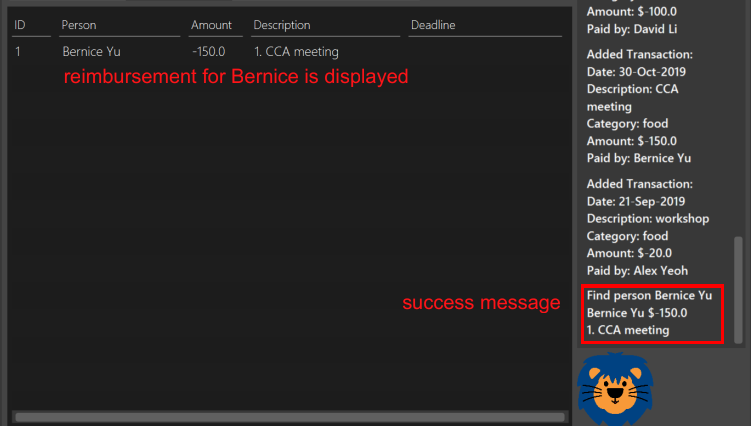
-
5.3.3. Going Back to Display the Full List
This command helps you to display the full reimbursement list after find and deadline commands.
-
Command:
back -
Steps:
-
Type
backinto the Command Box
-
Hit
EnterThe tab will now show the full reimbursement list.
-
5.3.4. Marking a Reimbursement as Done
This command helps you to mark a reimbursement as done and remove it from reimbursement list.
|
Reimbursements only take transactions that have not been paid. The reimbursement status is not shown in the transaction tab. |
-
Command:
done p/NAME -
Example:
done p/Alex Yeoh -
Steps:
-
Type the command, along with the person’s name whose reimbursement is to be marked as done, as shown in the screenshot below:

-
Hit
EnterThe reimbursement for that person will be removed from the tab, as shown below:

-
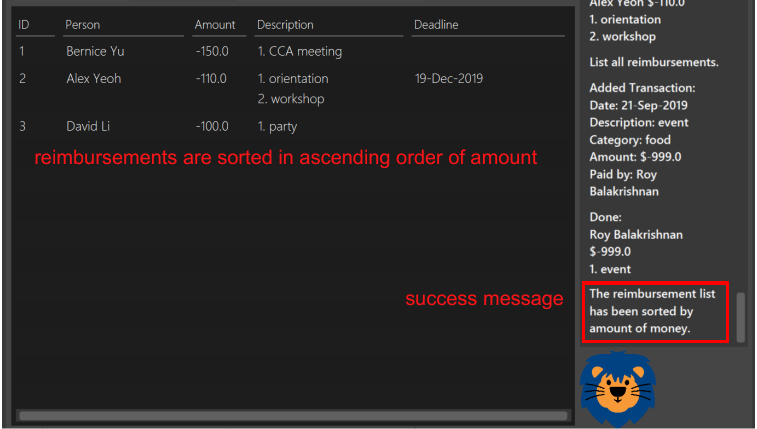
5.3.5. Sorting the List Based on Amount
This command helps you to sort the reimbursement lists based on amount, in descending order.
-
Command:
sort amount -
Steps:
-
Type the command
sort amount, as shown in the screenshot below:
-
Hit
EnterThe reimbursements are sorted in descending order of the amount.
-
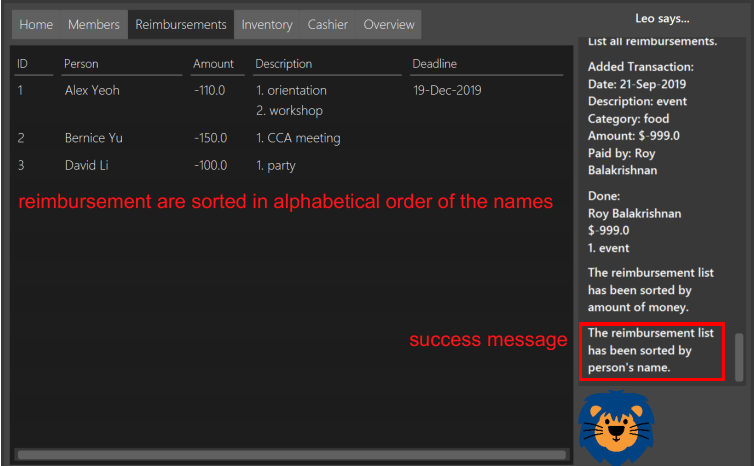
5.3.6. Sorting the list based on name: sort name
This command helps you to sort the reimbursement lists based on name, in alphabetical order.
-
Command:
sort name -
Steps:
-
Type the command
sort name, as shown in the screenshot below:
-
Hit
EnterThe reimbursements are sorted in alphabetical order of person’s name.
-
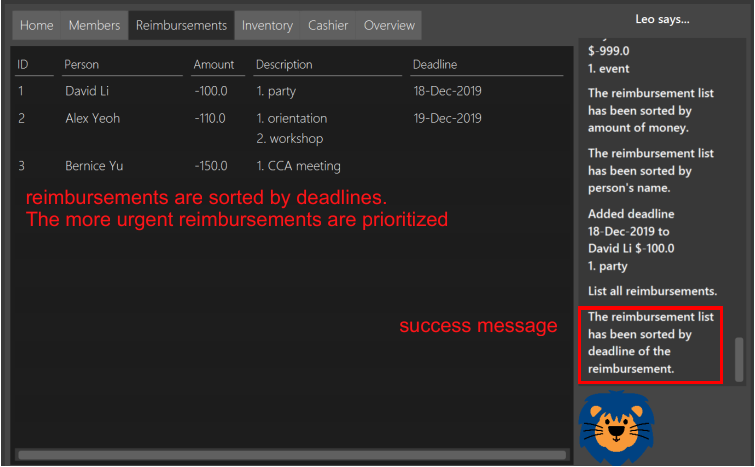
5.3.7. Sorting the list based on deadline: sort date
This command helps you to sort the reimbursement lists based on deadline, in order of the closest date.
-
Command:
sort date -
Steps:
-
Type the command [blue]`sort date `, as shown in the screenshot below:

-
Hit
EnterThe reimbursements are sorted by deadline date.
-
5.4. Inventory Tab
This section will contain details on all commands in the Inventory Tab.
-
The Inventory Tab shows a list of all items owned.
-
Each column shows the description, category, quantity, cost per unit and the price for each item.
-
The price attribute will be used for sales purposes and is optional.
-
You may add, delete or edit items within this tab.
-
Leo, our mascot, helps give replies indicating successful addition, deletion and edit of an item after a command has been input.
-
Leo will also give replies to guide you when there is a wrong input.
-
You may also sort the list of items by ascending quantity or by descending alphabetical order.
-
Description and category can be empty.
-
Cost and price can be 0. Quantity cannot be 0 only when adding. It can be 0 after editing or through sales to represent it being out-of-stock.
|
Due to size limitations, a large number may be truncated when shown in the table. To avoid this, you are advised to key in a number smaller than 10,000. |
5.4.1. Add an Item:
This command allows you to add an item to the table and saves it into the system.
| Description and category can be empty, but their field prefixes (d/ and c/) must be present. Price and cost can be 0, but quality cannot be. |
-
Command:
add d/DESCRIPTION c/CATEGORY q/QUANTITY co/COST_PER_UNIT [p/PRICE] -
Examples:
-
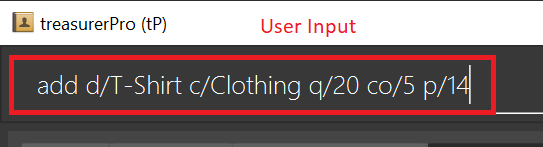
add d/T-Shirt c/Clothing q/20 co/5 p/14 -
add d/Cupcake c/Food q/10 co/2
-
| The attributes can also be inputted in any order. |
-
Steps:
-
Type the command with all parameters filled in, as shown in the screenshot below:
-
-
Hit
Enter
If the command is successfully added, Leo will respond with a success message and the item will be shown in the table. This is shown in the screenshot below:
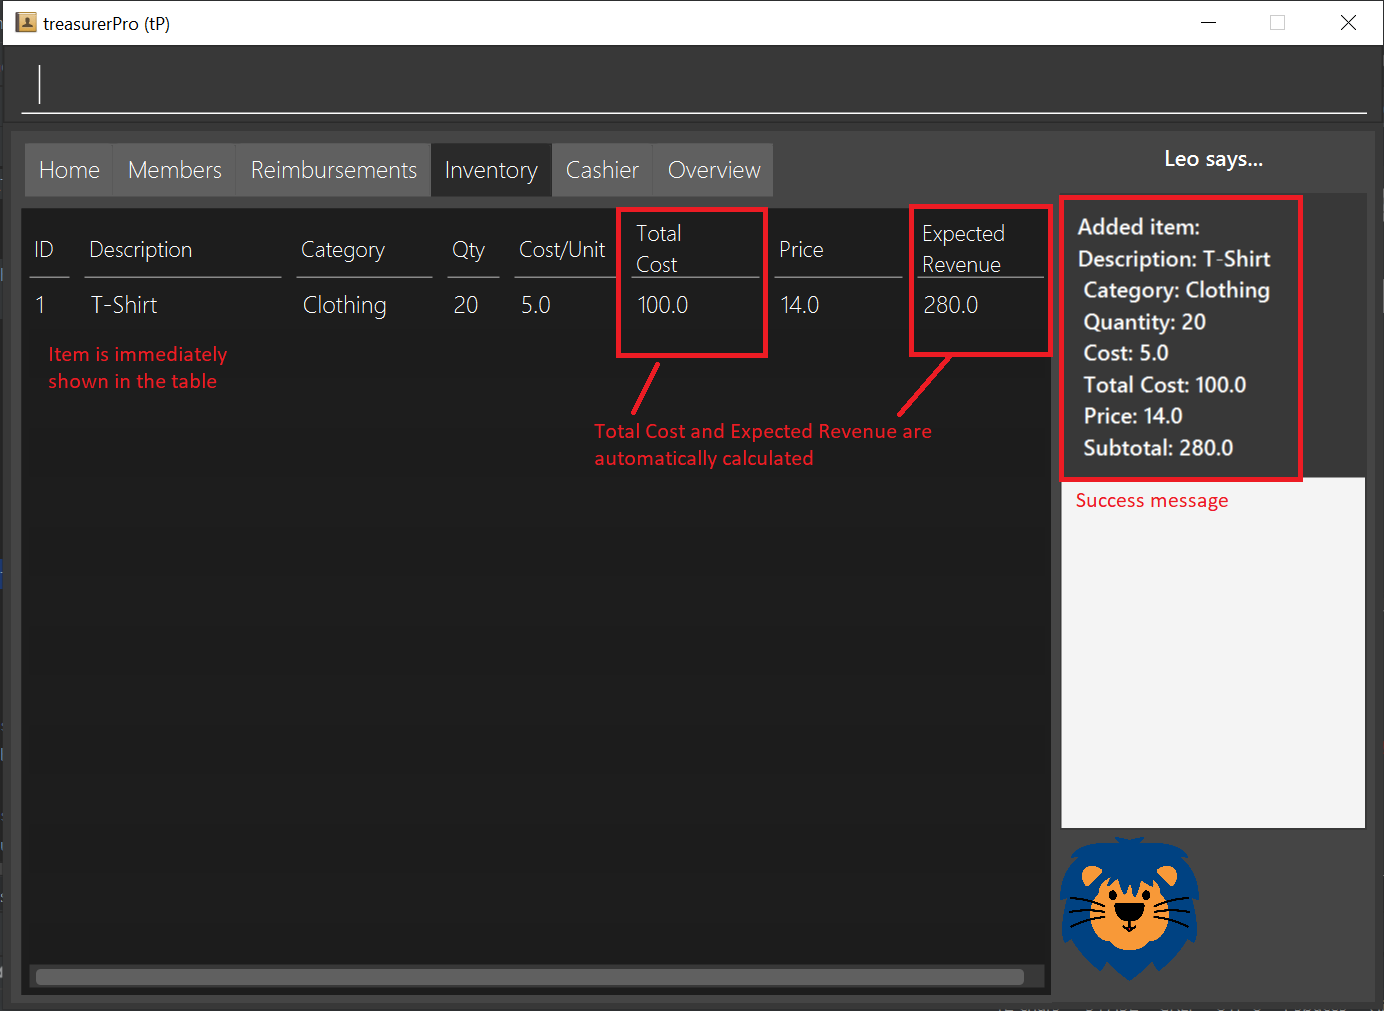
| If the description of the input matches that of an existing item, a new item will not be added. Instead, the quantity will reflect the combined quantity of the input and the existing item, and the price and cost/unit will be updated. However, the category will not change, even if it differs from that of the original item. |
5.4.2. Delete an Item:
This command allows you to delete an item in the table by ID or by description.
| This command is case-insensitive. |
-
Command:
delete IDdelete DESCRIPTION
Example:
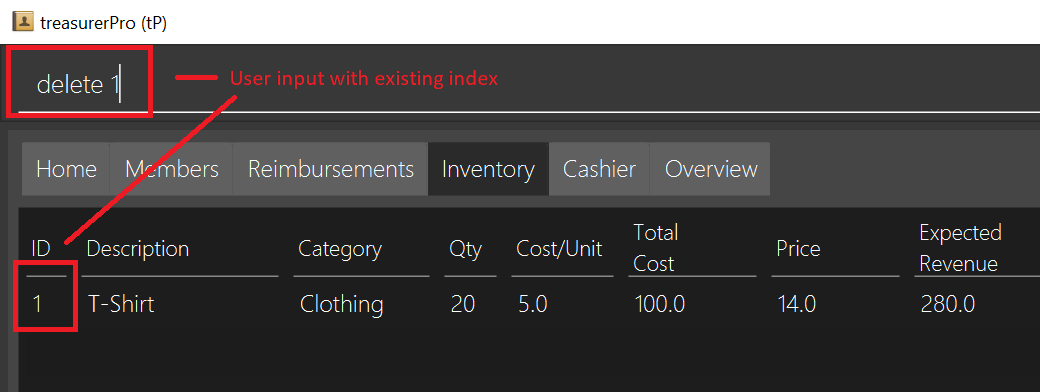
delete 1
delete t-shirt
-
Steps:
-
Type the command with the ID or description of the item to be deleted. An example of deleting using the ID is shown below:
-
-
Hit
Enter
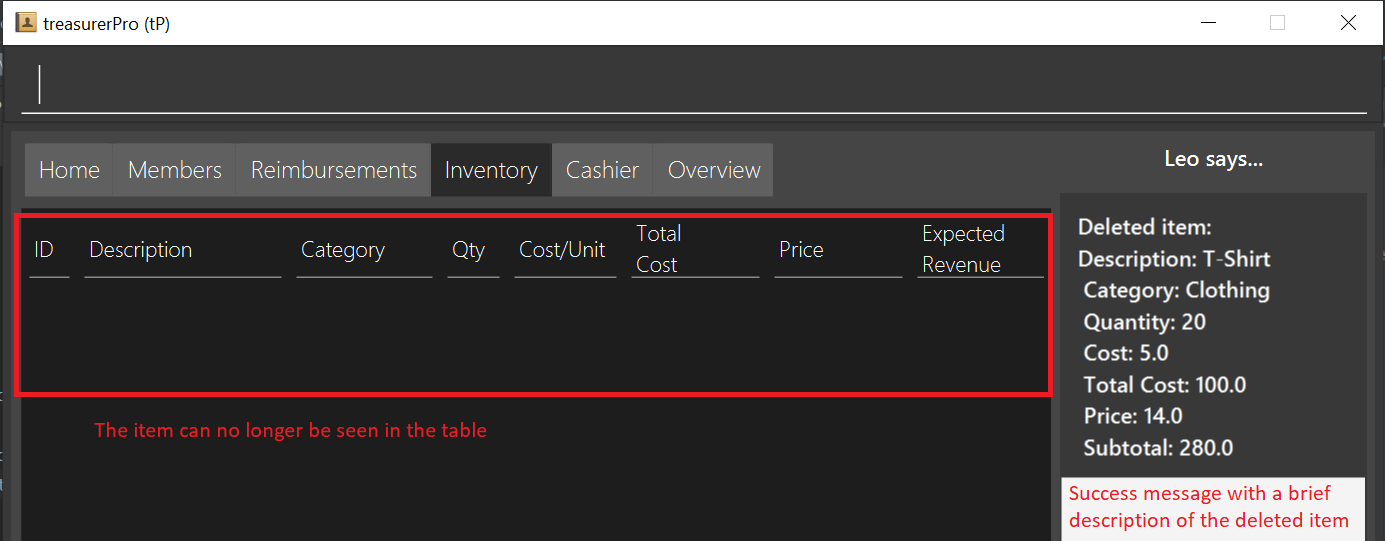
Leo will respond with a success message and the item will be removed from the table as shown below:
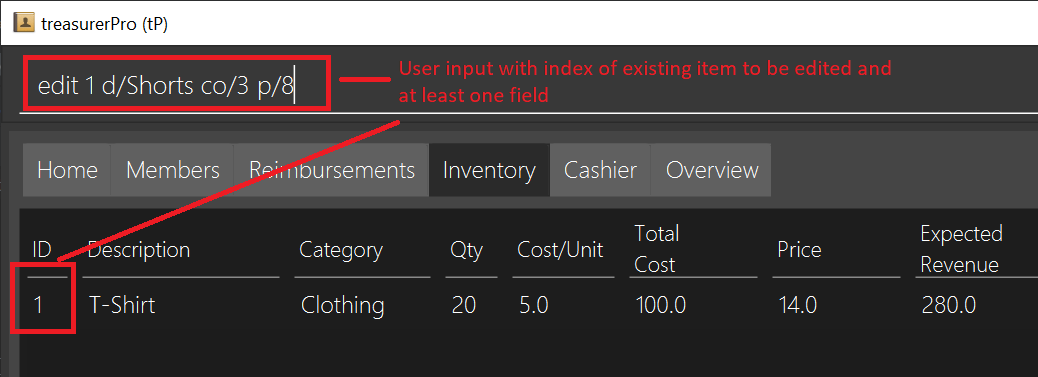
5.4.3. Edit an Item:
This command enables you to edit an existing item in the table.
-
Command:
edit INDEX [d/DESCRIPTION] [c/CATEGORY] [q/QUANTITY] [co/COST_PER_UNIT] [p/PRICE]
| You may edit any combination, permutation and number of the attributes, as long as at least one attribute is present. Quantity can be 0, but all numeric fields must be a positive number lesser than 10,000. |
-
Examples:
-
edit 1 d/T-Shirt q/6 -
edit 1 c/Clothing
-
-
Steps:
-
Type the command with the ID of the item to be edited, along with the new parameters to be changed, as shown below:
-
-
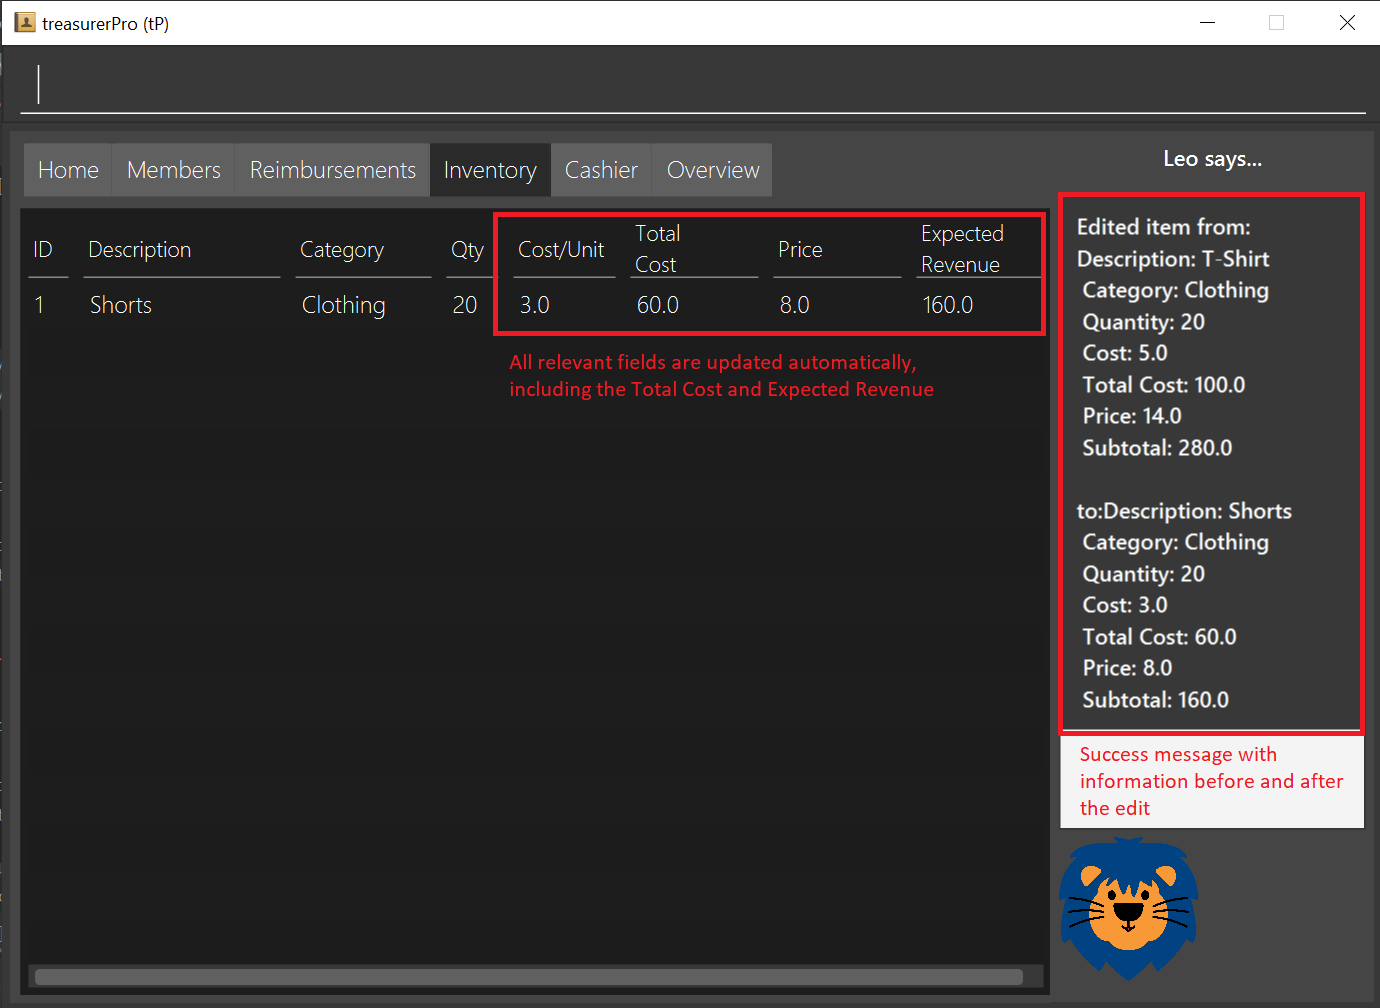
Hit
Enter.
Leo will respond with a success message and the updated item will be shown in the table as shown below:
5.4.4. Sort Items:
This command allows you to sort the table of items into a specified order for viewing.
-
Commands:
-
Sort by description:
sort description -
Sort by category:
sort category -
Sort by quantity:
sort quantity -
Reset:
sort reset
-
| Using the reset command, it can be reset to the initial order of the table when the app was first opened. Leo will still show a success message that the list is sorted even if it is empty. |
5.5. Cashier Tab
This section will contain the details on all commands available on the Cashier Tab.
Summary of Features of the Cashier Tab
-
The Cashier tab allows you to key in, calculate and record the items sold from the inventory.
-
To key in an item, it must first be recorded in the Inventory tab.
-
The columns of this tab will show the description of the item being sold, the price per quantity, the total quantity selected and the subtotal for that row of items.
-
The bottom row will display the name of the cashier who is in-charge of the sales, as well as the total amount of all the sales items in the table.
-
At the side, just like other tabs, our mascot lion 'Leo' will reply to indicate successful addition, deletion and update of items.
-
Upon wrong inputs, Leo will prompt you and guide you along to key in the correct inputs.
-
Upon successful checkout, the Inventory tab will be immediately updated with the remaining stock left in the inventory.
-
After every checkout, the sales made will be recorded as one transaction which will be then labelled as "Items sold" under the category "Sales" and person will be the cashier-in-charge. The Home tab will be updated with this transaction.
-
Whenever there are items on the cart,
Cashier Modewill automatically be turned on. WhenCashier Modeis turned on, you cannot make any modification to existing items in the inventory except for the adding of new items.
| Items with zero price are not available for sale. Such items cannot be added into the table. |
| Due to size limitation, you will not be allowed to add any items into the table if the total amount exceeds $999999.99. You are advised to reduce the quantity of items or checkout separately in another cart. |
| The description and category are case-insensitive. Regardless of the case, as long as the description matches, it can be added to the cart. |
5.5.1. Add a Sales Item to the Table
This command enables you to add a sales item into the table.
-
Command:
add [c/CATEGORY] d/DESCRIPTION q/QUANTITY
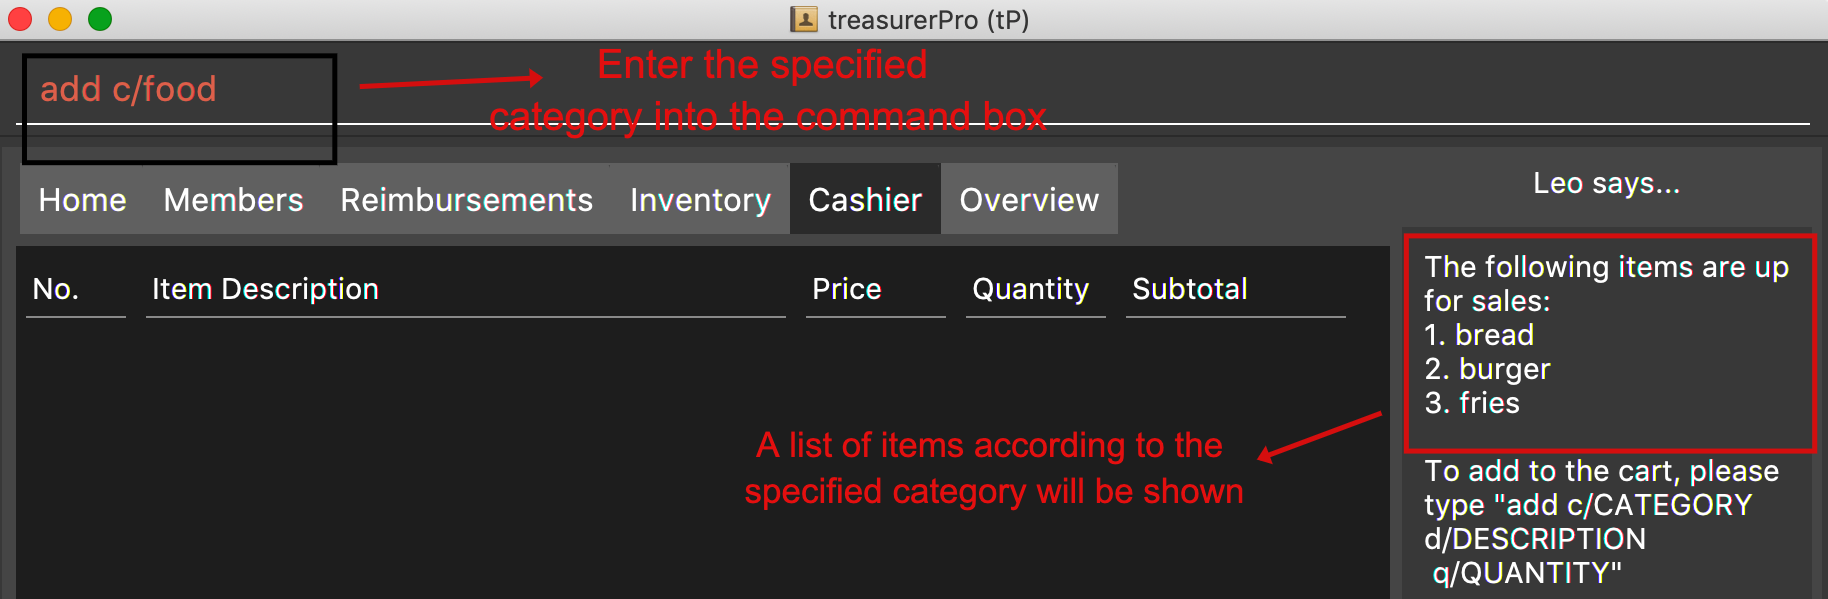
The quantity that you input must be less than or equal to the stock available in the Inventory tab. The category field is optional. If you are unsure about the description of the desired item, you can refer to the Inventory tab or simply key in the category without any other fields. Leo will display all the items in the specified category that are available for sale.
If you input a description of an item that already exists in the inventory, the quantity inputted will be added to the existing quantity. If the total quantity exceed the stock available, the system will warn you and prohibit such addition.
Additionally, if the description is misspelled or does not match any of the items in the inventory, Leo will recommend items with similar description that you might be looking for.
-
Examples:
-
add c/food- Displays all items that are under the 'food' category in the response box -
add c/stationary d/pancake q/3- Adds 3 similar items which have the description "pancake" -
add d/pancake q/3- Adds 3 similar items which have the description "pancake"
-
| The items will only be displayed according to the category in the response box if both description and quantity fields are not specified and the category field is valid. If both description and quantity are specified but description is invalid, only suggestions will be shown in the response box according to the mistyped description. |
| If both category and description are specified and valid, the system will allow the item to be added according the description even if the category of the item does not match with the specified category inputted. |
-
Steps:
-
If you do not remember the exact description of the item to add, you can type the command "add" with a category specified as shown in the screenshot below.
-
Then, you can enter the desired description and quantity according to the items suggested by Leo as shown below.

-
Now, you can hit
Enter.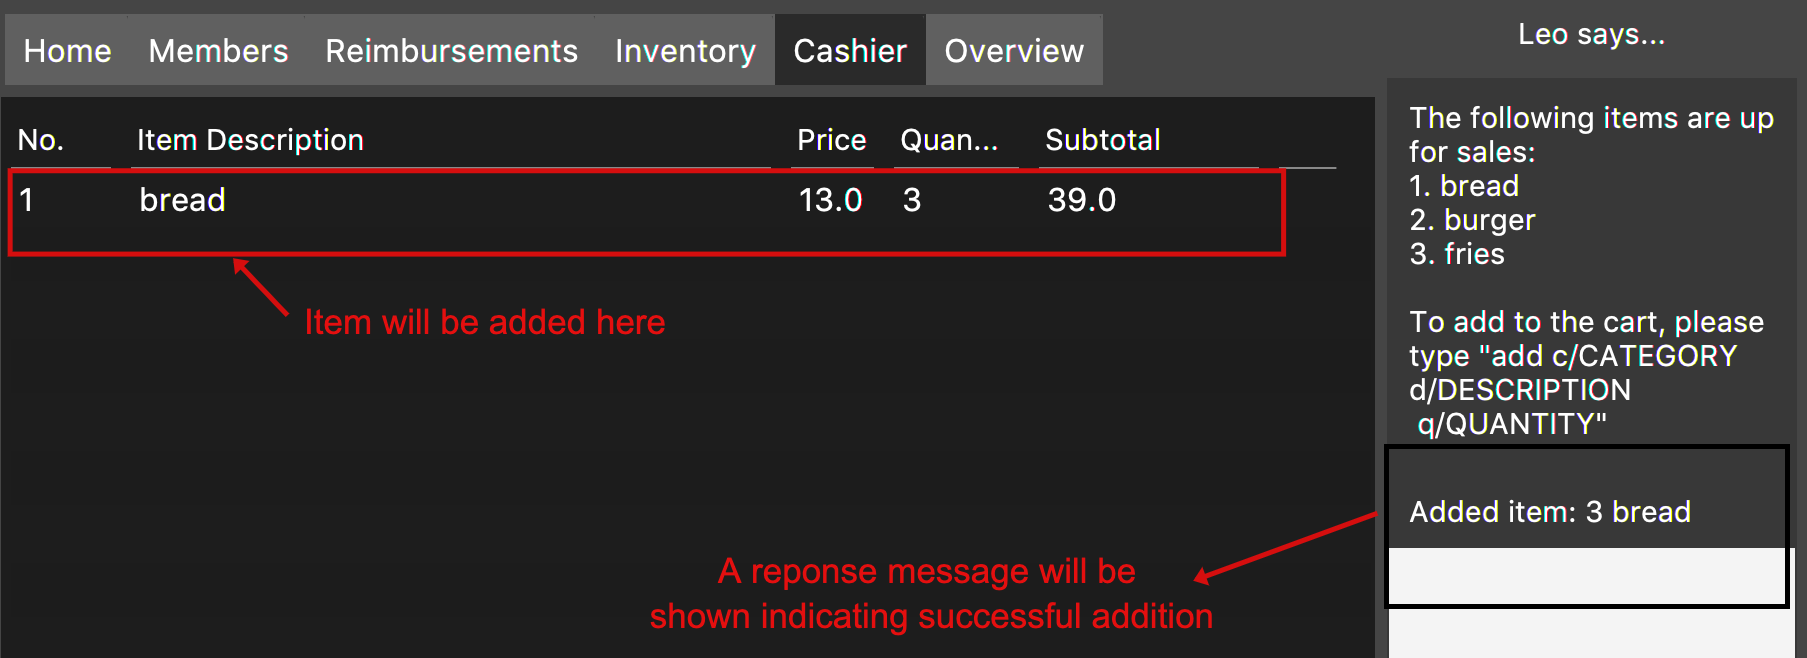
-
Leo will respond to the successful addition with a response message. The newly added item will be shown on the table.
After you have executed this command, Cashier Mode will be immediately turned on. As long as Cashier Mode is turned on,
the system will prohibit you from modifying any existing items in the Inventory tab except adding of items with new description.
This is to ensure no one can tamper with the data in the inventory while a purchase is being made for security reasons.
If you wish to alter any existing items in inventory, please enter the "clear" command on Cashier tab to turn off Cashier Mode.
|
5.5.2. Delete a Sales Item from the Table
This command allows you to delete a sales item from the table.
-
Command:
delete INDEX
| The specified index should correspond to the row index of the item in the table. |
-
Example:
delete 2- Deletes an item in row 2 of the table -
Steps:
-
To delete an item, type the command "delete" with an index specified as shown in the screenshot below.

-
Now, you can hit
Enter.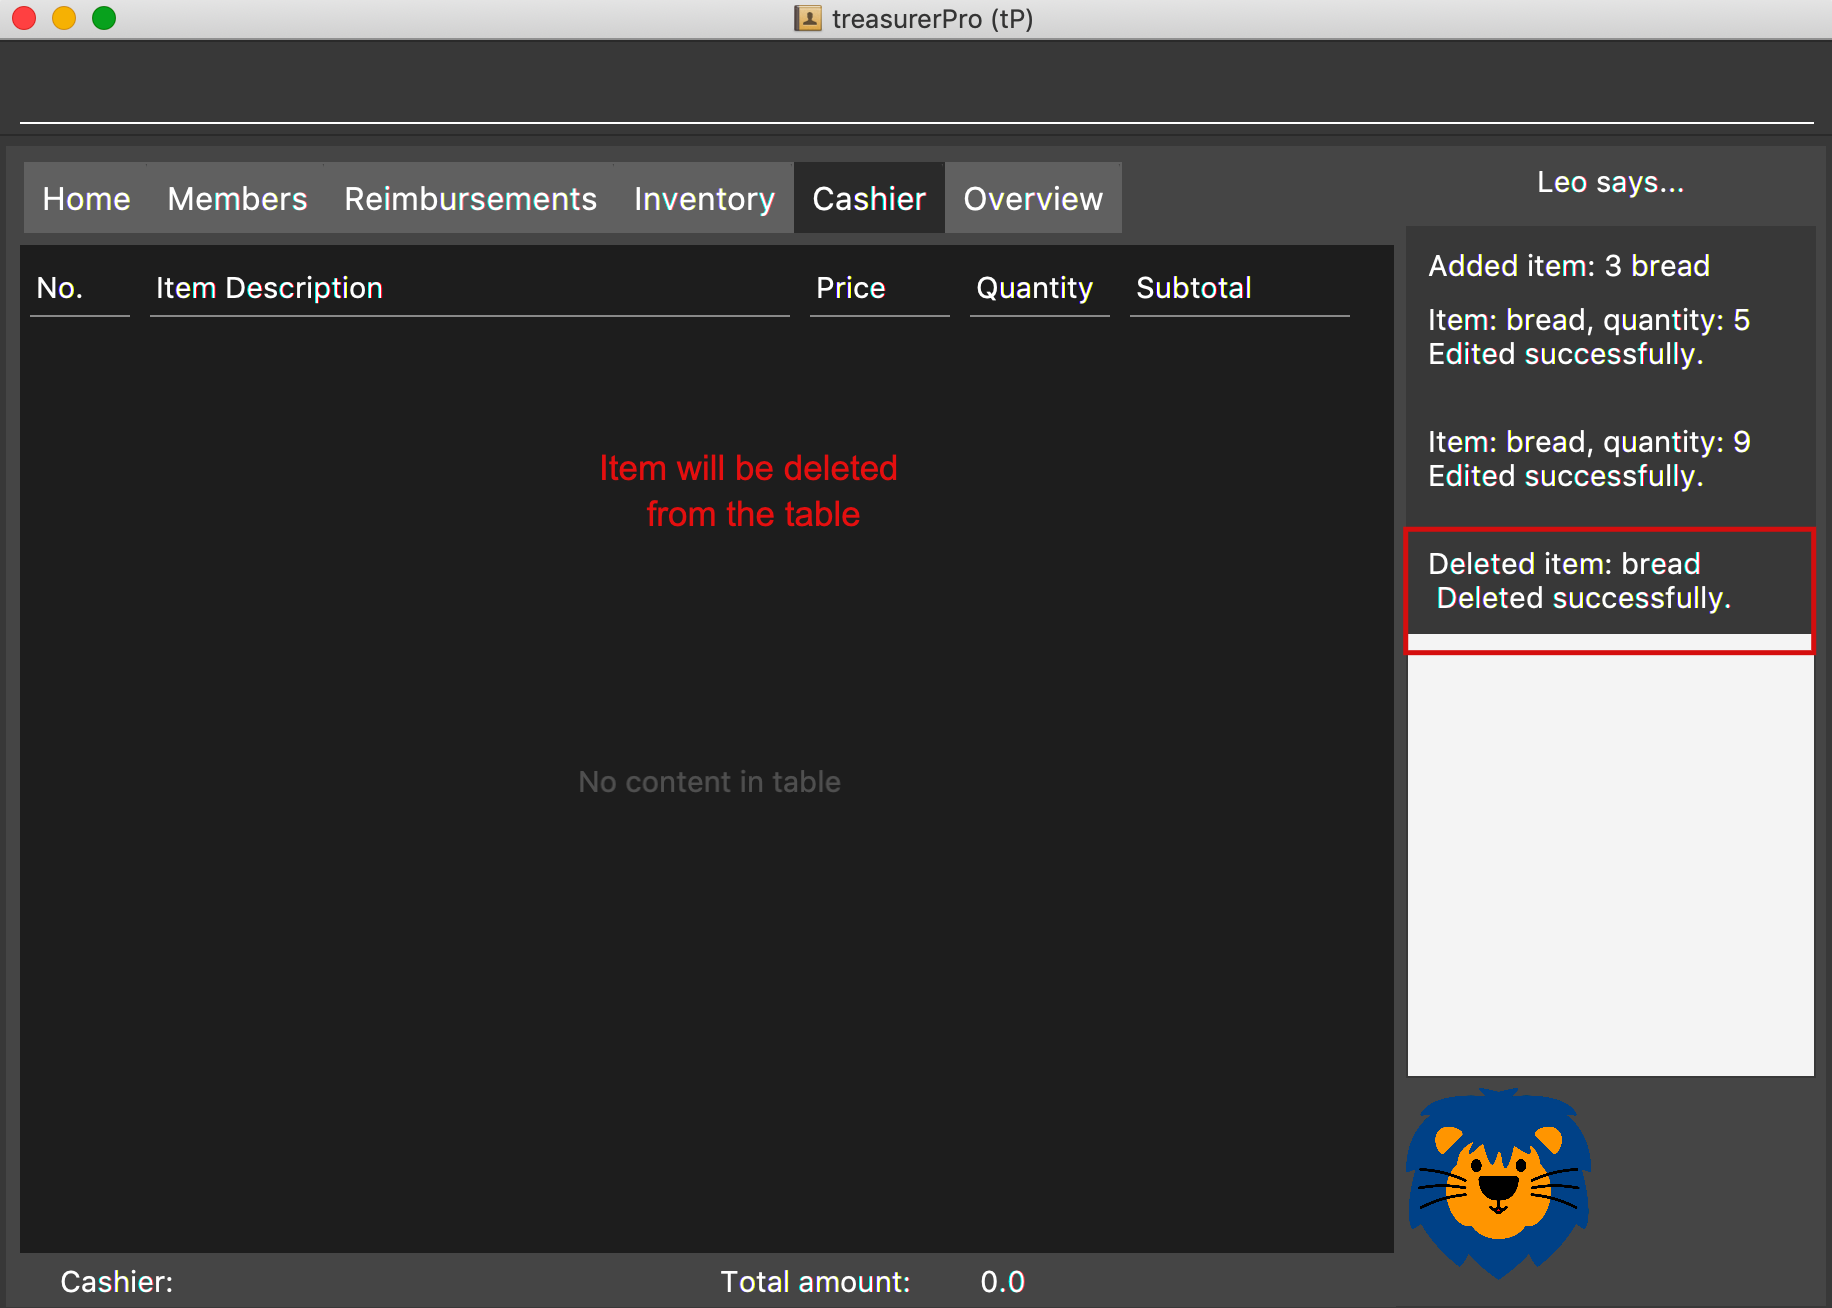
-
Leo will respond to the successful deletion with a response message. The item will be deleted from the table.
After deletion, if there are no more sales item on the cart, Cashier Mode will automatically turn off. You can then
edit existing items in the inventory.
|
5.5.3. Edit the Quantity of a Sales Item
This command allows you to edit the quantity of a sales item that already exists in the table.
-
Commands:
-
edit d/DESCRIPTION q/QUANTITY -
edit i/INDEX q/QUANTITY
-
There are 2 ways to edit an existing item - by its description or its index in the table.
-
If you edit by index, the index must be positive and be within the size of the table. The specified index should also correspond to the row index of the item in the table.
-
If you edit by description, the specified description must already exist in the table.
In addition, the quantity input should not exceed the available stock in the inventory.
If the quantity is invalid, Leo will display the quantity of stock left.
-
Examples:
-
edit i/2 q/6- Updates the quantity of item at row 2 to 6 -
edit d/book q/3- Updates the quantity of an existing item which has the description "book" to 3
-
-
Steps:
1.1 To edit by its index, you can enter the command "edit" with an index and quantity specified as shown in the screenshot below.

1.2 To edit by its description, you can enter the command "edit" with the required description and quantity as shown below.

-
Now, you can hit
Enter.
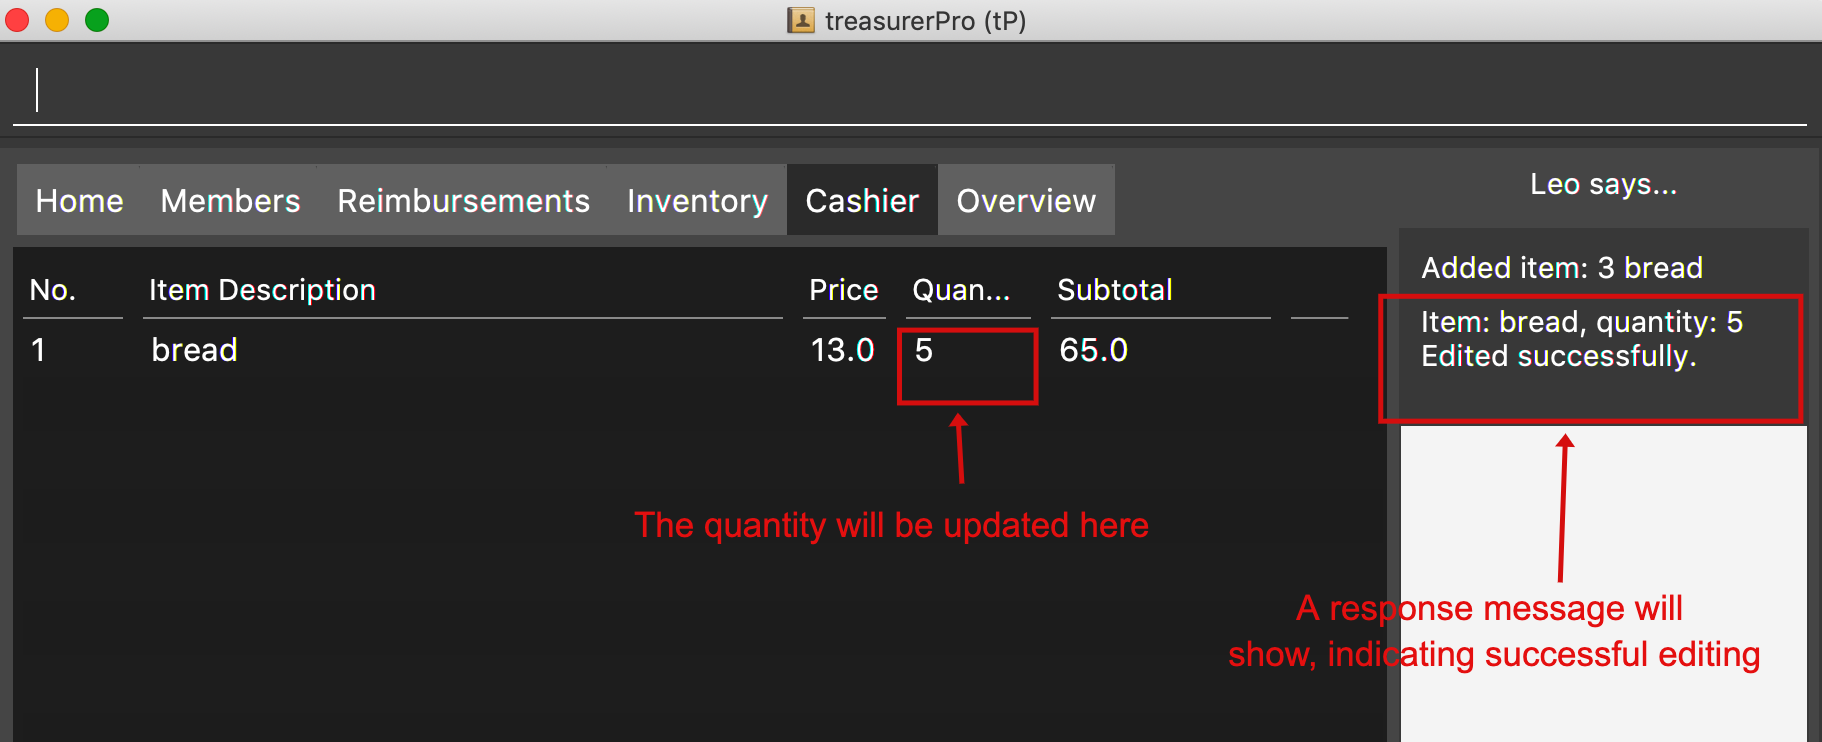
If successfully updated, Leo will respond with a response message. The quantity will now be updated in the table.
5.5.4. Set the Cashier-In-Charge
This command enables you to set the cashier whom is in-charge of the sales.
-
Command:
cashier NAME
The person to be set as the cashier must be an existing member of the club. This means that their details must be found on the Members tab.
If you have yet to record the cashier as a member, please proceed to Members tab
to register him/her as a member before executing this command.
| This step must be executed before checking out. Else, checkout cannot proceed. |
-
Example:
-
cashier David Li- Sets David Li as a cashier
-
-
Steps:
-
To set a cashier, type the command "cashier" with the cashier’s name specified as shown in the screenshot below.

-
Now, you can hit
Enter.
-
If set successfully, Leo will respond with a response message. The cashier will be updated in the bottom row.
5.5.5. Checkout All Sales Items
This command enables you to perform a checkout of all the sales items in the table.
-
Command:
checkout AMOUNT_PAID_BY_CUSTOMER
The amount inputted should be the amount that the customer will be paying. This amount must be greater than or equal to the total amount listed on the bottom row of the table. If the amount paid is valid, Leo will display the total amount and the change that the cashier should return.
After checking out, all items in the table will be cleared and the cashier will be reset.
| You must set the cashier before checking out. Else, checkout cannot proceed. |
-
Example:
-
checkout 850- Customer pays $850 to cashier
-
-
Steps:
-
To checkout, you can type in the command "checkout" and specify the amount that the customer is paying as shown in the screenshot below.

-
Now, you can hit
Enter.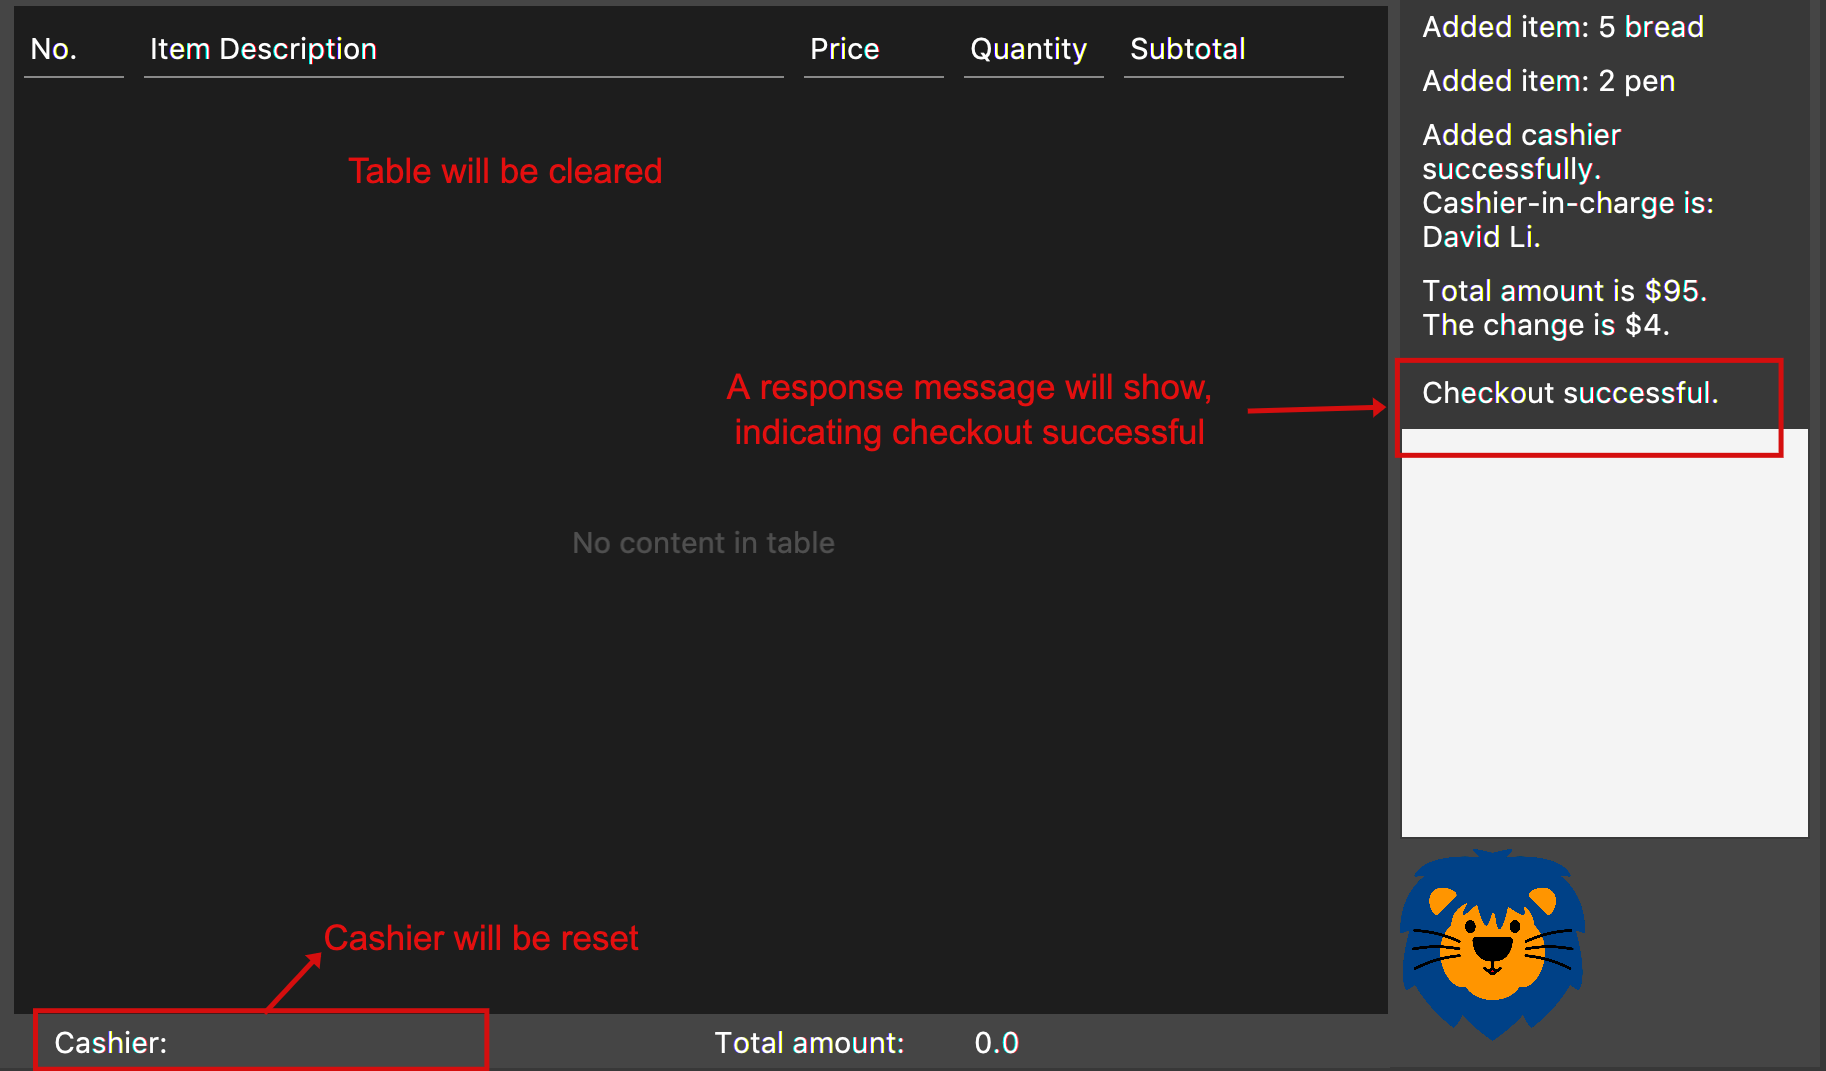
-
If checkout is successful, Leo will respond with a response message. The table will be cleared and the cashier will be reset.
The Home tab will be updated with this transaction and the remaining stock in the Inventory tab will also be updated.
This command checks out and clears all the sales items, turning off the Cashier Mode until a new item is added into the cart.
After turning executing this command, you can now modify the existing items on the Inventory tab.
|
5.5.6. Clears All the Sales Items in the Table
This command clears all the sales items in the table.
-
Command:
clear
After clearing, the cashier will be reset as well.
This command enables you to turn off the Cashier Mode [1].
|
| This command is irreversible. Please use at your own discretion. |
-
Example:
-
clear
-
-
Steps:
-
To clear, you can type the "clear" command word only as shown in the screenshot below.

-
Now, you can hit
Enter.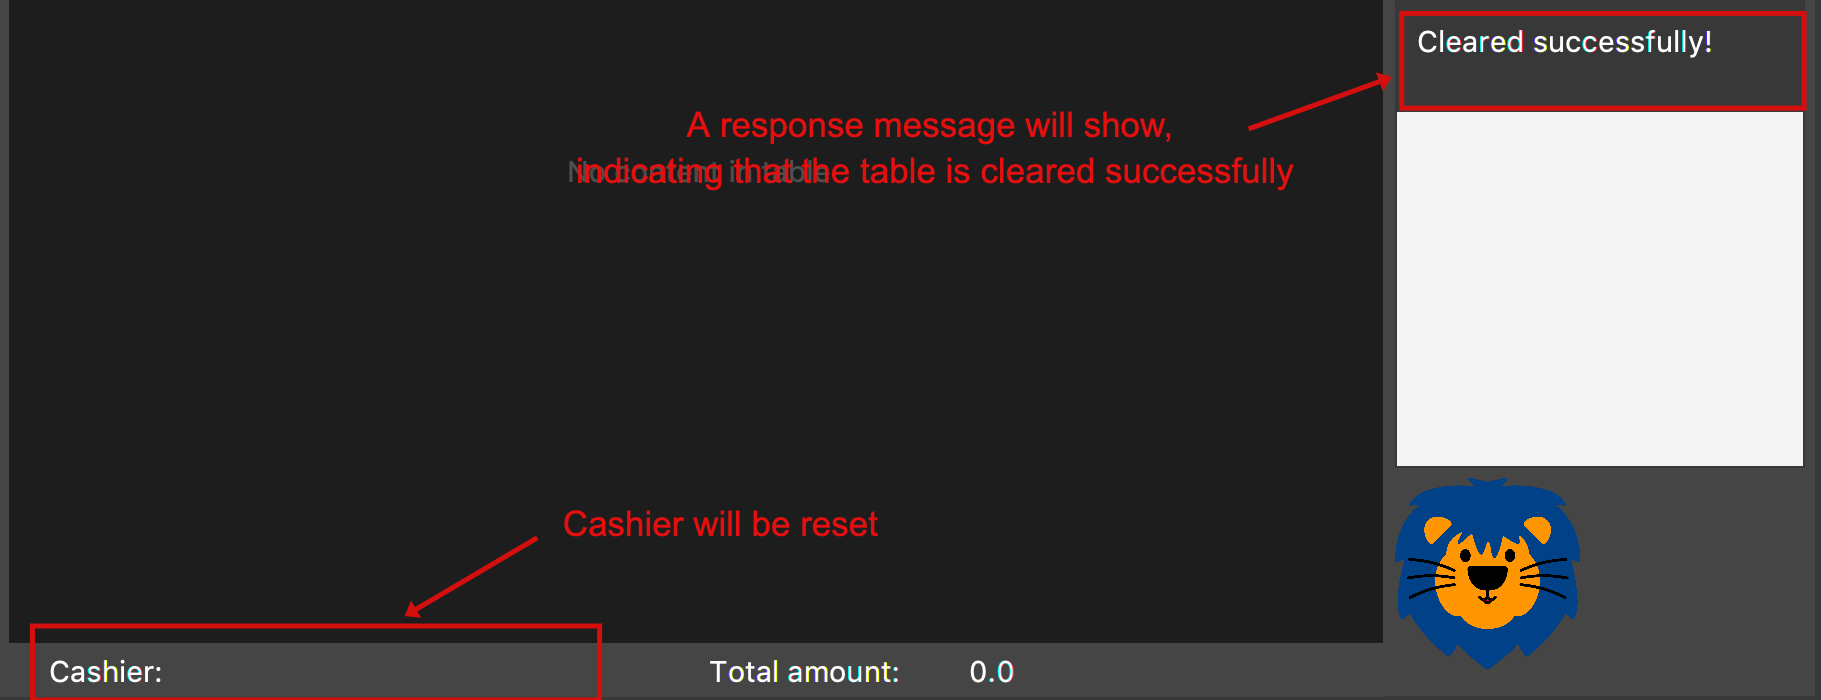
-
If cleared successful, Leo will respond with a response message. The table will also be cleared and the cashier will be reset.
5.6. Overview Tab
Summary of features in the Overview Tab
-
The overview tab displays a variety of statistics for the user.
-
These include:
-
Total expenses made thus far
-
Total inventory value
-
Total sales revenue
-
Remaining budget
-
-
The user may also set financial goals and set up percentage thresholds to receive notifications.
-
Leo will notify the user any time their financial goals have been reached.
5.6.1. Statistics Information
The following describes how the various statistics are calculated:
-
Expense Summary: Total spent represents the sum of all negative transactions (cash outflows) made by the club.
-
Inventory Summary: Inventory value represents the total cost of all goods currently in the inventory.
-
Sales Summary: Total sales represents the sum of all positive transactions (cash inflow) from the Sales category.
-
Budget Overview: Amount remaining represents the budget goal + total sales - expenses.
| It is possible for your remaining budget to exceed your budget goal if your sales revenue is larger than your expenses. |
5.6.2. Set a Financial Goal
This command enables you to set a financial goal.
-
Command:
-
To set budget goal:
set b/AMOUNT -
To set expense goal:
set e/AMOUNT -
To set sales goal:
set s/AMOUNT
-
-
Examples:
-
To set budget goal:
set b/500 -
To set expense goal:
set e/500 -
To set sales goal:
set s/500
-
|
The amount should be non-negative, and the maximum amount you may set is 10,000,000
(10 million). If more than 2 decimal places are specified, the amount will be rounded to 2 decimal places. To reset the goal, simply set it to 0. |
-
Steps:
-
Type the command with the corresponding target and amount.
-

-
Hit
Enter.

Leo displays a confirmation showing that the goal was successfully set.
The user interface reflects this under the respective section.
5.6.3. Set a Notification Threshold
This command allows you to set a percentage threshold for notifications.
For example, an 80 percent threshold will mean that you will receive a notification once you have reached 80% of the
goal set for that particular financial goal.
-
Command:
-
To set budget goal notification:
notify b/PERCENTAGE -
To set expense goal notification:
notify e/PERCENTAGE -
To set sales goal notification:
notify s/PERCENTAGE
-
-
Examples:
-
To set budget goal notification:
notify b/80 -
To set expense goal notification:
notify e/80 -
To set sales goal notification:
notify s/80
-
|
The percentage value should be a whole number from 0 - 100. This feature will not work if no goals have previously been set with the set command, or if the goal is currently
set to 0.To disable notifications for a particular financial goal, simply set its notifications threshold to 0. |
-
Steps:
-
Type the command with the corresponding target and amount.
-

-
Hit
Enter.
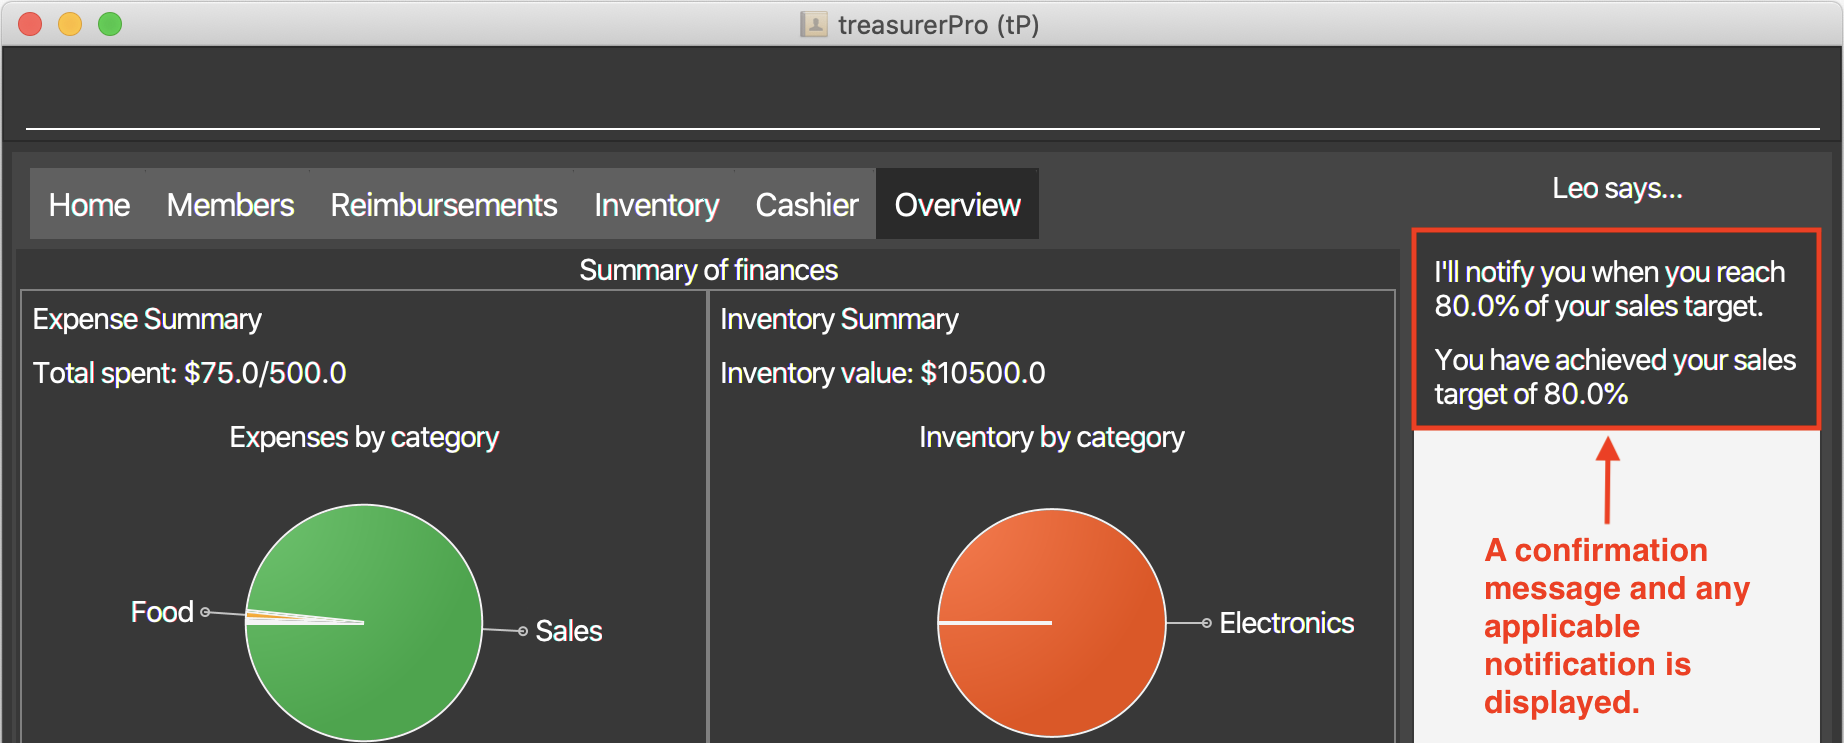
Leo displays a confirmation showing that the notification was successfully set.
Additionally, if the goal is already reached, it will display the notification immediately.
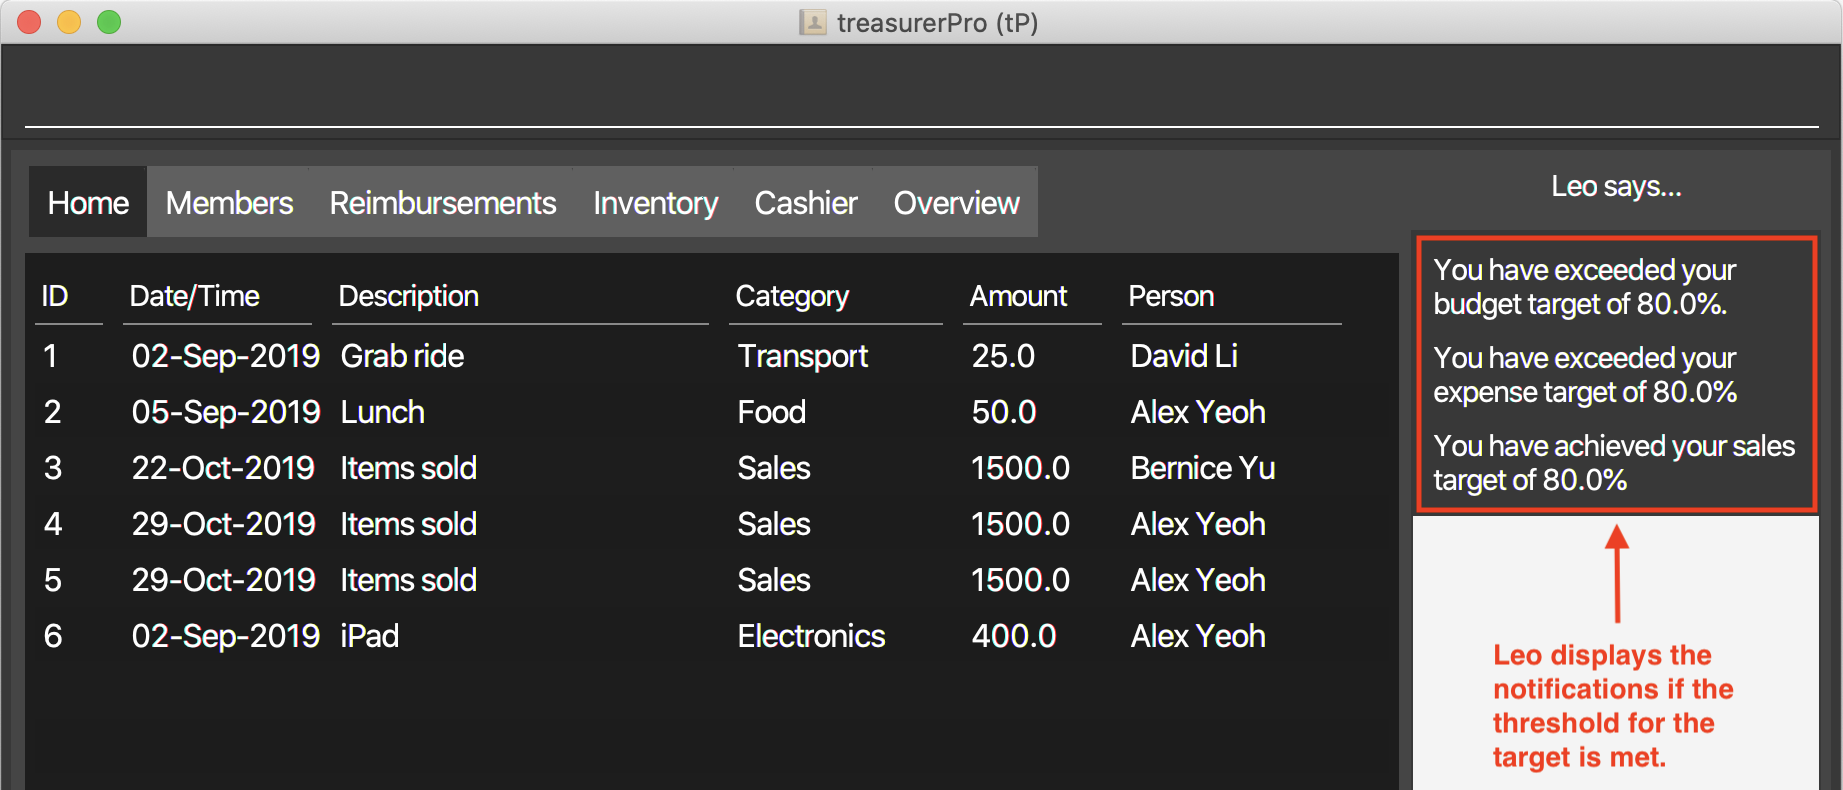
5.6.4. Viewing Notifications
Notifications in treasurerPro are automatically displayed upon app launch by Leo as long as the threshold is met.
Notifications show only once per app run, or whenever a target or threshold is modified.
The following screenshot shows an example of the notifications:
5.7. Saving the data
Data in treasurerPro is saved automatically after executing any command. There is no need to save manually.
6. FAQ
Q: How do I transfer my data to another computer?
A: Install the app in the other computer and overwrite the empty data file it creates with the file that contains the data of your previous treasurerPro folder.
Q: Can I modify the data files myself?
A: No, any external modification to the app’s data files WILL result in loss of all data. You have been warned.
Q: What happens if I accidentally modified the data files?
A: If the transactionHistory.txt file is changed, the Home and Reimbursements tab will start with an empty table.
If the inventoryInformation.txt file is changed, the app will not open. To remedy, delete the txt file.
If the overviewInformation.txt file is changed, the Overview tab lose the notification reminders set.
If the addressbook.json file is changed, the Members tab will start with an empty list.
On the other hand, if the addressbook.json file is deleted and not found, a sample list of members will be populated in
the Members tab.
If the reimbursementInformation.txt file is altered, all deadline data will be lost but the application will still start.
In the scenario that the application cannot start, the cases above do not apply and you are not sure what file is modified,
you would have to delete all the data files which WILL result in loss of all data.
Q: Can I resize the app window?
A: No, you may not resize the app window.
Q: What is Cashier Mode? How can I switch it off?
A: Cashier Mode is a feature implemented for security reasons. It is considered turned on when there are sales items
in the cart on the Cashier tab. While on Cashier Mode, any modification to the inventory is prohibited except adding of
new items.
To switch it off, please enter clear on the Command Line Interface (CLI) of the Cashier tab.
7. Command Summary
7.1. Navigation
-
Go to tab:
go [home] [members] [reimbursement] [inventory] [cashier] [overview]
7.2. Home
-
Add:
add dt/DATE d/DESCRIPTION c/CATEGORY a/AMOUNT p/PERSON -
Delete:
delete IDordelete p/PERSON -
Edits:
edit ID [dt/DATE] [d/DESCRIPTION] [c/CATEGORY] [a/AMOUNT] [p/PERSON] -
Sort By date (from oldest to most recent):
sort date -
Sort By name (from alphabetical order of name):
sort name -
Sort By amount (from smallest to largest in amount):
sort amount -
Undo sort:
sort reset -
Find:
find KEYWORD [MORE_KEYWORDS]… -
Display original list:
back
7.3. Members
-
Add:
add n/NAME p/PHONE_NUMBER e/EMAIL a/ADDRESS [t/TAG]…
e.g.add n/James Ho p/22224444 e/jamesho@example.com a/123, Clementi Rd, 1234665 t/friend t/colleague -
Delete :
delete INDEX
e.g.delete 3 -
Edit :
edit INDEX [n/NAME] [p/PHONE_NUMBER] [e/EMAIL] [a/ADDRESS] [t/TAG]…
e.g.edit 2 n/James Lee e/jameslee@example.com -
Find :
find KEYWORD [MORE_KEYWORDS]…
e.g.find James Jake -
List :
list
7.4. Reimbursement
-
Add deadline:
deadline p/NAME dt/dd-mmm-yyyy -
Find reimbursement by person:
find p/NAME -
Display full list after find/add deadline:
back -
Mark as done:
done p/NAME -
Sort by amount:
sort amount -
Sort by name:
sort name -
Sort by deadline:
sort date
7.5. Inventory
-
Add:
add d/DESCRIPTION c/CATEGORY q/QUANTITY co/COST_PER_UNIT [p/PRICE] -
Delete:
delete INDEX -
Edit:
edit ID [d/DESCRIPTION] [c/CATEGORY] [q/QUANTITY] [co/COST_PER_UNIT] [p/PRICE] -
Sort by category:
sort category -
Sort by description:
sort description -
Sort by quantity:
sort quantity -
Reset sorted list:
sort reset
7.6. Cashier
-
Add sales item:
add [c/CATEGORY] d/DESCRIPTION q/QUANTITY -
Delete sales item:
delete INDEX -
Edit by description:
edit d/DESCRIPTION q/QUANTITY -
Edit by index:
edit i/INDEX q/QUANTITY -
Set cashier-in-charge:
cashier NAME -
Checkout:
checkout AMOUNT_PAID_BY_CUSTOMER -
Clear:
clear
7.7. Overview
-
Set budget goal:
set b/ AMOUNT -
Set expense goal:
set e/ AMOUNT -
Set budget goal:
set s/ AMOUNT -
Set notification for budget goal:
notify b/ AMOUNT -
Set notification for expense goal:
notify e/ AMOUNT -
Set notification for sales goal:
notify s/ AMOUNT
8. Copyright Notice
Leo and the corresponding 'Lion' mascot design is copyright of the AY1920S1-CS2103T-T13-3 group.
Reproduction and distribution without prior permission is prohibited.