1. Introduction
This project portfolio briefly introduces the project, treasurerPro (tP), and showcases my contributions.
1.1. About the Team
Our team consists of five members. Four, including me, are Year 2 Computer Science Undergraduate students, and one is a Year 4 Computer Engineering Undergraduate student.
1.2. About the Project
This project is part of the “CS2103T Software Engineering” module, a project-driven software engineering module currently offered by the National University of Singapore (NUS). We have been tasked with the assignment of morphing or enhancing an existing desktop application called AddressBook over the course of 13 weeks and chose the former. I am proud to present to you the end result of our hard work – treasurerPro.
1.3. About the Product
treasurerPro is a desktop application that enables treasurers or members of Co-Curricular Activities (CCA) clubs to manage their club’s finances, members’ details, reimbursements, and inventory, as well as oversee their financial growth and long-term goals. It can operate entirely using text commands typed into the command box found at the top of the application.
This is the application’s appearance when first opened:
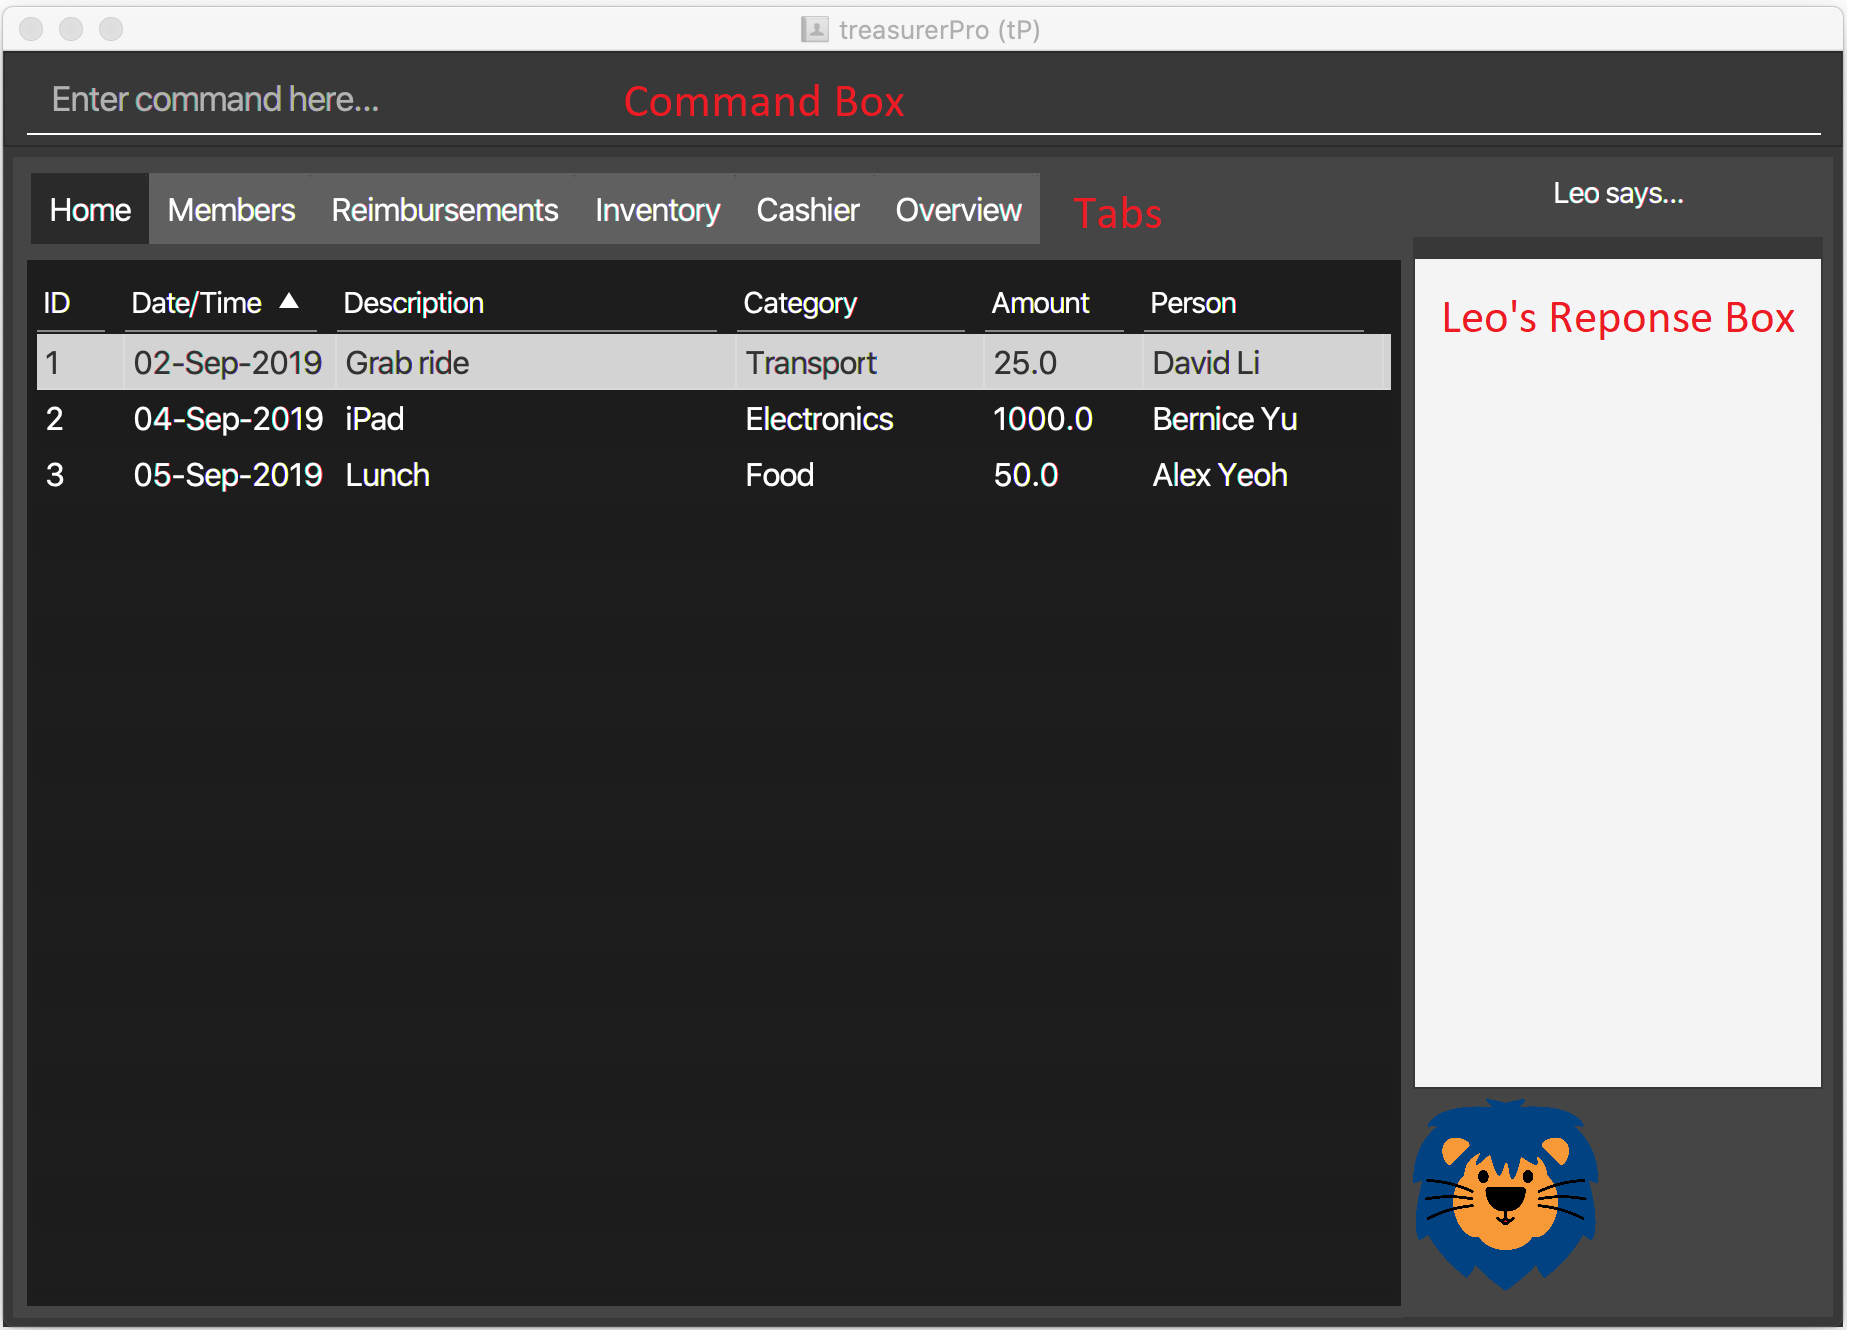
As seen from the above Figure, the application has 6 tabs with unique roles. All tabs are integrated. The 6 tabs are:
-
The Home tab, which keeps track of all transactions made.
-
The Members tab, which records all of the club members’ details.
-
The Reimbursements tab, which keeps track of all reimbursements that must be made to individual members.
-
The Inventory tab, which keeps track of all items bought by the club.
-
The Cashier tab, which simulates a cash register and supports the management of sales.
-
The Overview tab, which presents a summary of the data of the other tabs in easy-to-decipher diagrams and allows you to plan the club’s finances.
1.4. Legend
| This symbol indicates extra information or definition. |
Model :
Text with this font and grey highlight indicates a component, class or object in the architecture of
the application. It also indicates a generic command format for the command box in the User Guide.
command :
Text with this blue font and grey highlight indicates a command that can be inputted by the user.
2. Summary of Contributions
My role is to design and write the code for the Inventory tab. This section will describe my contributions in greater detail.
Please click the following links to view the code I have contributed to the Inventory Tab: Overall Commit Activity and Code, Functional Code , Test Code
2.1. Main Contributions
-
Addition, Deletion and Editing of Items
-
Function: These features allow you to add, delete and update the items in the inventory tab.
-
Justification: These features are essential for the proper management of items in the inventory. They allow you to have full control of the details of the items owned by the club.
-
Highlights: When adding an item with the same description, the quantity of the new input is added to the current quantity and the cost per unit is recalculated appropriately.
-
-
Sorting of Items
-
Function: This feature allows you to sort the list of items in 3 distinct ways – description, category and quantity.
-
Justification: It aids you in re-ordering the list as you please. This can help you with various matters such as spotting items low in quantity and in need of restocking.
-
Highlights: If you change your mind, the
sort resetcommand allows you to revert the list to the order it had been in when the application was first opened.
-
3. Contributions to the User Guide
This section showcases some of my contributions to the User Guide.
{Start of the extract from the User Guide}
5.4.1. Add an Item:
This command allows you to add an item to the table and saves it into the system.
| Description and category can be empty, but their field prefixes (d/ and c/) must be present. |
-
Command:
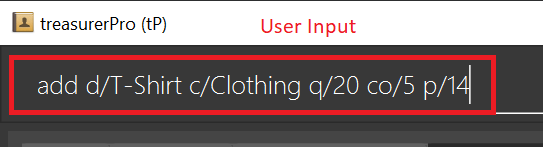
add d/DESCRIPTION c/CATEGORY q/QUANTITY co/COST_PER_UNIT [p/PRICE] -
Examples:
-
add d/T-Shirt c/Clothing q/20 co/5 p/14 -
add d/Cupcake c/Food q/10 co/2
-
| The attributes can also be inputted in any order. |
-
Steps:
-
Type the command with all parameters filled in, as shown in the screenshot below:
-
-
Hit
Enter
If the command is successfully added, Leo will respond with a success message and the item will be shown in the table. This is shown in the screenshot below:

| If the description of the input matches that of an existing item, a new item will not be added. Instead, the quantity will reflect the combined quantity of the input and the existing item, and the price and cost/unit will be updated. However, the category will not change, even if it differs from that of the original item. |
5.4.2. Delete an Item:
This command allows you to delete an item in the table by ID or by description.
| This command is case-insensitive. |
-
Command:
delete ID
delete DESCRIPTION -
Example:
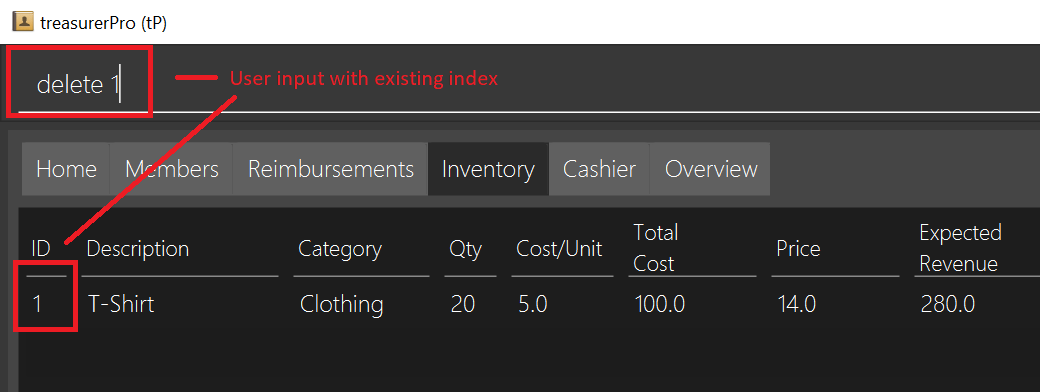
delete 1
delete t-shirt -
Steps:
-
Type the command with the ID or description of the item to be deleted. An example of deleting using the ID is shown below:
-
-
Hit
Enter
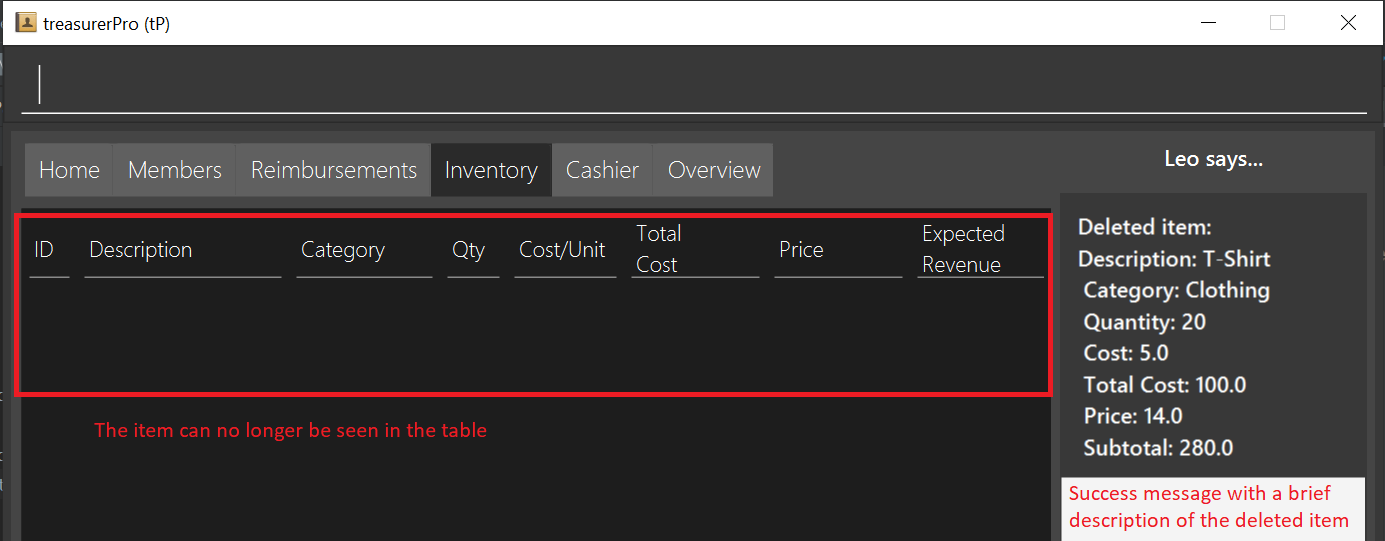
Leo will respond with a success message and the item will be removed from the table as shown below:
{End of the extract from the User Guide}
Contributions to the Developer Guide
This section showcases some of my contributions to the User Guide.
{Start of the first extract from Developer Guide}
Inventory Tab
This tab will help to keep records of all items currently in the club’s possession.
Each item will require an input of its description, category, quantity, and cost per unit. Optionally, if the item is meant for sale, the price can be inputted as well.
The following Class Diagram shows the architectural design of the tab:
![][width="500"](../images/InventoryTabClassDiagram.png)
3.4.1. Add Item Feature
This section explains the implementation of the add command feature of the Inventory Tab,
which allows the addition of items to the inventory. These items are represented by Item objects.
The addition of an Item to the inventory requires an input of the Item’s description, category, quantity, and cost.
The price field is optional and may be added only to an Item meant for sale.
The following Sequence Diagram shows how the AddCommandParser creates an Item:
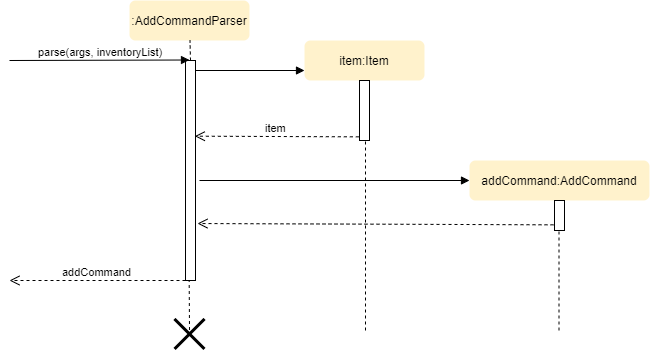
As seen in the above diagram, the parser takes in the user input as well as the existing InventoryList. Within the
parser, it will use the ArgumentTokenizer to tokenize the arguments using the prefixes. This creates an
ArgumentMultimap, allowing the system to retrieve the user input based on the prefixes that precede them. Thus, this
increases the accuracy of the parsing and allows the fields to be in any order in the user input.
If the description of the Item being added matches that of an existing Item, the new Item’s quantity is added to
that of the existing Item and the cost per unit is recalculated. This is handled within the AddCommandParser,
which also checks the validity of the input using the isValidNumericString(string) method.
The code for the AddCommandParser#isValidNumericString(String) can be seen in the code snippet below:

AddCommandParser#isValidNumericString(String) method in the Inventory tab (inventory package)Through this method, the application prohibits the addition of an Item with any value equivalent to or greater than
10,000. This includes the total cost and expected revenue of each Item. It also prohibits non-numeric inputs where
numeric inputs are expected. The AddCommandParser#isValidNumericString(String) method performs the aforementioned
checks and returns a boolean that represents the validity of the input.
After the Item is created and the command is executed, the LogicManager updates the in-app InventoryList via the
ModelManager and saves to the data file via the StorageManager.
The following sequence diagram which is referenced in 2.3. Logic component: Figure 5, shows how the AddCommand works:
![][alt=addSeq](../images/inventoryDG/AddCommandSeqDiagram.png)
For a greater understanding of the flow of events and checks, you may consult the following activity diagram that shows the steps that follow the input of an add command:
![][alt=addFlowChart](../images/inventoryDG/AddCommandFlowChart.png)
3.4.2. Delete Item Feature
This section explains the implementation of the delete command feature of the Inventory Tab, which allows the deletion of items from the inventory. This feature requires only the command keyword and an index or description as input.
The following sequence diagram which is referenced in 2.3. Logic component: Figure 5, shows how the
DeleteCommand works:
![][alt=deleteSeq](../images/inventoryDG/DeleteCommandSeqDiagram.png)
The DeleteCommandParser is responsible for checking the validity of the input, and does not allow any indexes that
are less than 1 or greater than the largest index currently in the list. It can also take in a description as input and
compares it against existing Item s in the InventoryList. This comparison is case-insensitive.
After the command is executed and the Item is deleted, the LogicManager updates the in-app InventoryList via the
ModelManager and saves to the data file via the StorageManager.
{End of the first extract from Developer Guide}
{Start of the second extract from Developer Guide}
3.4.5. Overall Design Considerations
This section explains the design considerations for some crucial implementations in the Inventory Tab.
| Alternative 1 | Alternative 2 | Conclusion and Explanation |
|---|---|---|
Pros: It is relatively fast. Cons: It takes up a lot of memory. |
Each Pros: Keeping one list is better for memory complexity. Cons: Sorting could be slightly slow. |
Alternative 2 has been chosen. The time complexity of sorting is not very high, but it has a much higher advantage in memory complexity. |
An ArrayList is used to store Pros: It retrieves most elements more efficiently. Cons: The head and tail are not retrieved as efficiently. |
A LinkedList is used to store Pros: The head and tail of the list can be retrieved via linear time complexity. Cons: Every other element would be slower to retrieve. |
Alternative 1 has been implemented. An ArrayList has better performance for the get and set methods than a LinkedList for elements not in the head and tail. As it is natural for the number of items in the inventory to be high, and the get and set methods would naturally be
frequently used in the |
{End of the second extract from Developer Guide}