By: CS2103T-T13-3 Since: September 2019 Licence: MIT
1. Setting up
Refer to the guide here.
2. Design
This section will illustrate and detail the overall design of the software for treasurerPro.
2.1. Architecture
This section illustrates the overall architecture of the software for treasurerPro.
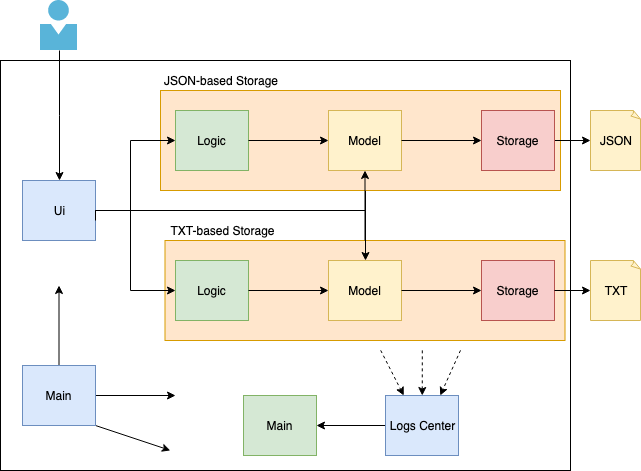
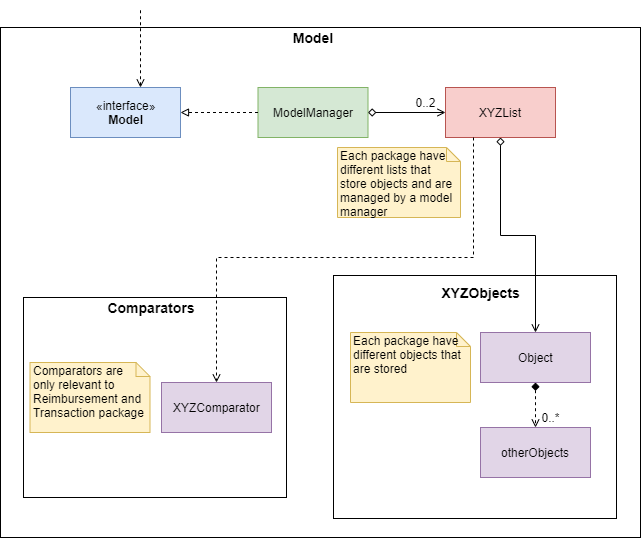
The Architecture Diagram given above depicts the high-level design of treasurerPro.
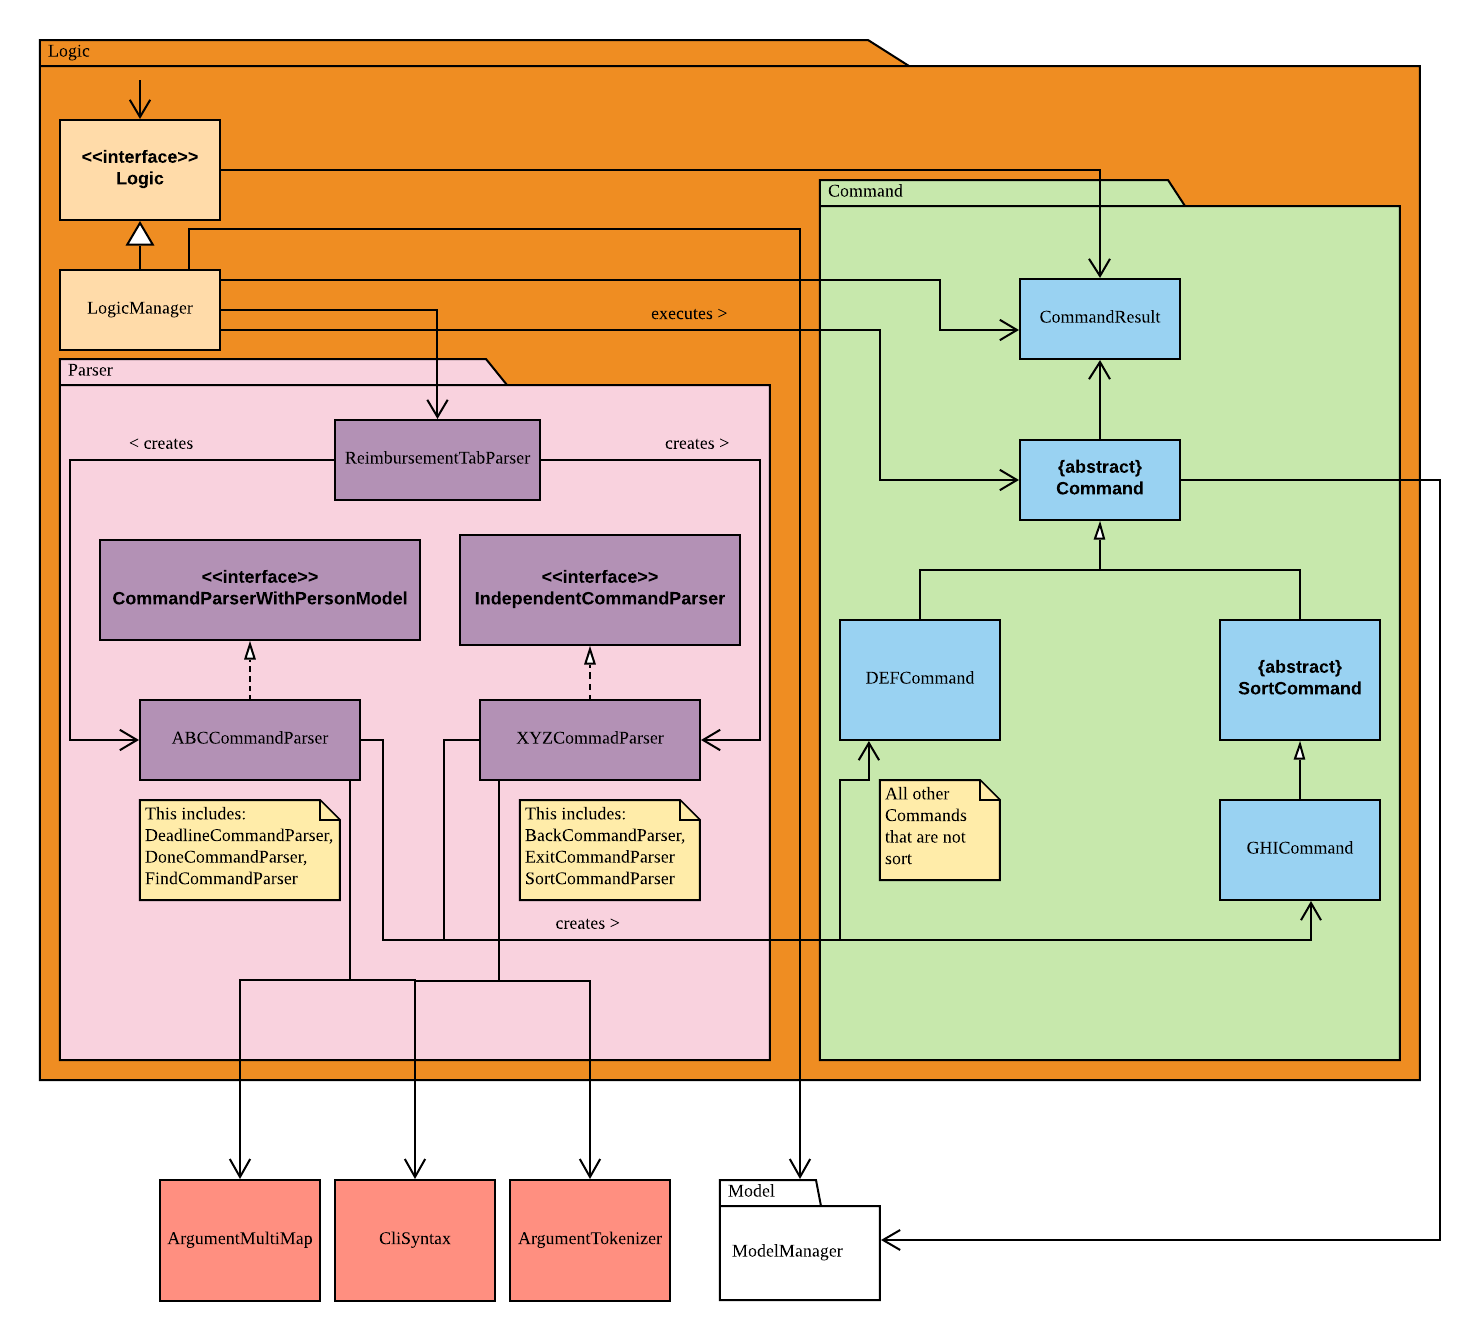
treasurerPro is divided primarily into 6 packages which contain implementation for each tab in the UI:
-
Transaction package: Home tab
-
Person package: Members tab
-
Reimbursement package: Reimbursements tab
-
Inventory package: Inventory tab
-
Cashier package: Cashier tab
-
Overview package: Overview tab
Each package uses either TXT or JSON based storage. Within the package, they share a similar structure, consisting of the following components:
Each of the components:
-
Defines its API in an
interfacewith the same name as the component. -
Exposes its functionality using a
{Component Name}Managerclass.
The details on the structure of these components are located in the next few sections. Alternatively, clicking on the names in the above list will bring you to the respective section.
Apart from the components above, treasurerPro also has the following shared components:
-
Main -
Commons
-
At app launch: Initializes each package in the correct sequence, and connects them up with each other.
-
At shut down: Shuts down each package and invokes cleanup method where necessary.
Commons represents a collection of classes used by multiple other components.
The following class plays an important role at the architecture level:
-
Log Center: Used by many classes to write log messages to the App’s log file.
How the architecture components interact with each other
Commands in treasurerPro are tab-specific.
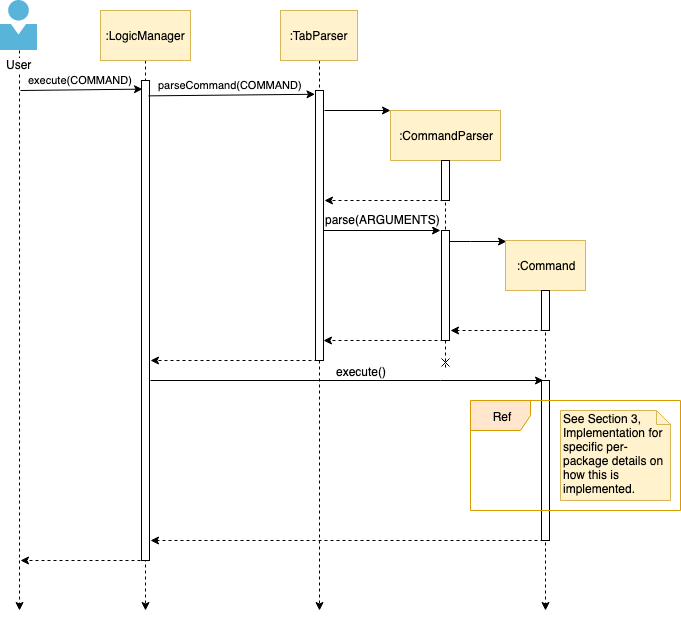
The Sequence Diagram below shows how the components interact with each other for the scenario where the user issues the command delete 1 in the Transactions tab.
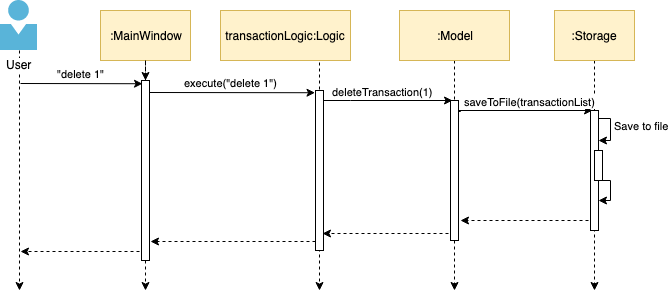
delete 1 command within the Home tab.A command inputted by the user is received by MainWindow, and forwarded to the respective Logic according to the tab the user is currently on.
Further details of the interactions between Logic, Model and Storage are given below.
2.2. UI component
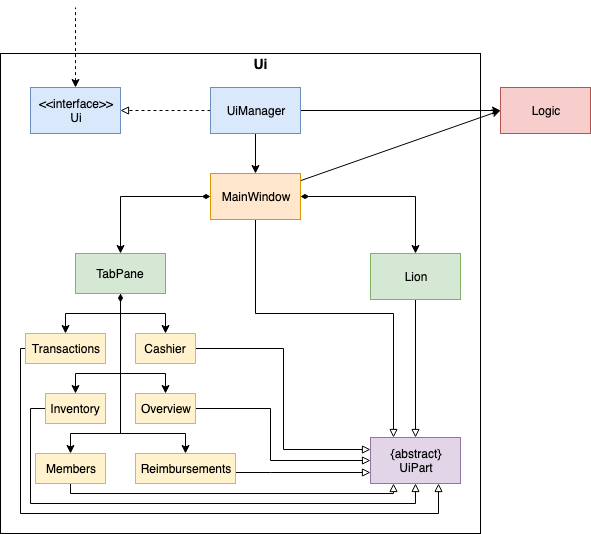
API : Ui.java
The UI component consists of a MainWindow that holds both a TabPane and a Lion.
The TabPane holds multiple Tab objects, for example, Transactions and Cashier.
The Lion consists of a ScrollPane that holds messages that are to be displayed to the user.
All these, including MainWindow, inherit from the abstract UiPart class.
The UI component uses JavaFx UI framework.
The layout of these UI parts are defined in matching .fxml files that are in the src/main/resources/view folder.
For example, the layout of the MainWindow is specified in MainWindow.fxml
The UI component:
-
Executes user commands using the respective package’s
Logiccomponent. -
Updates itself with modified data whenever changes are made by the user.
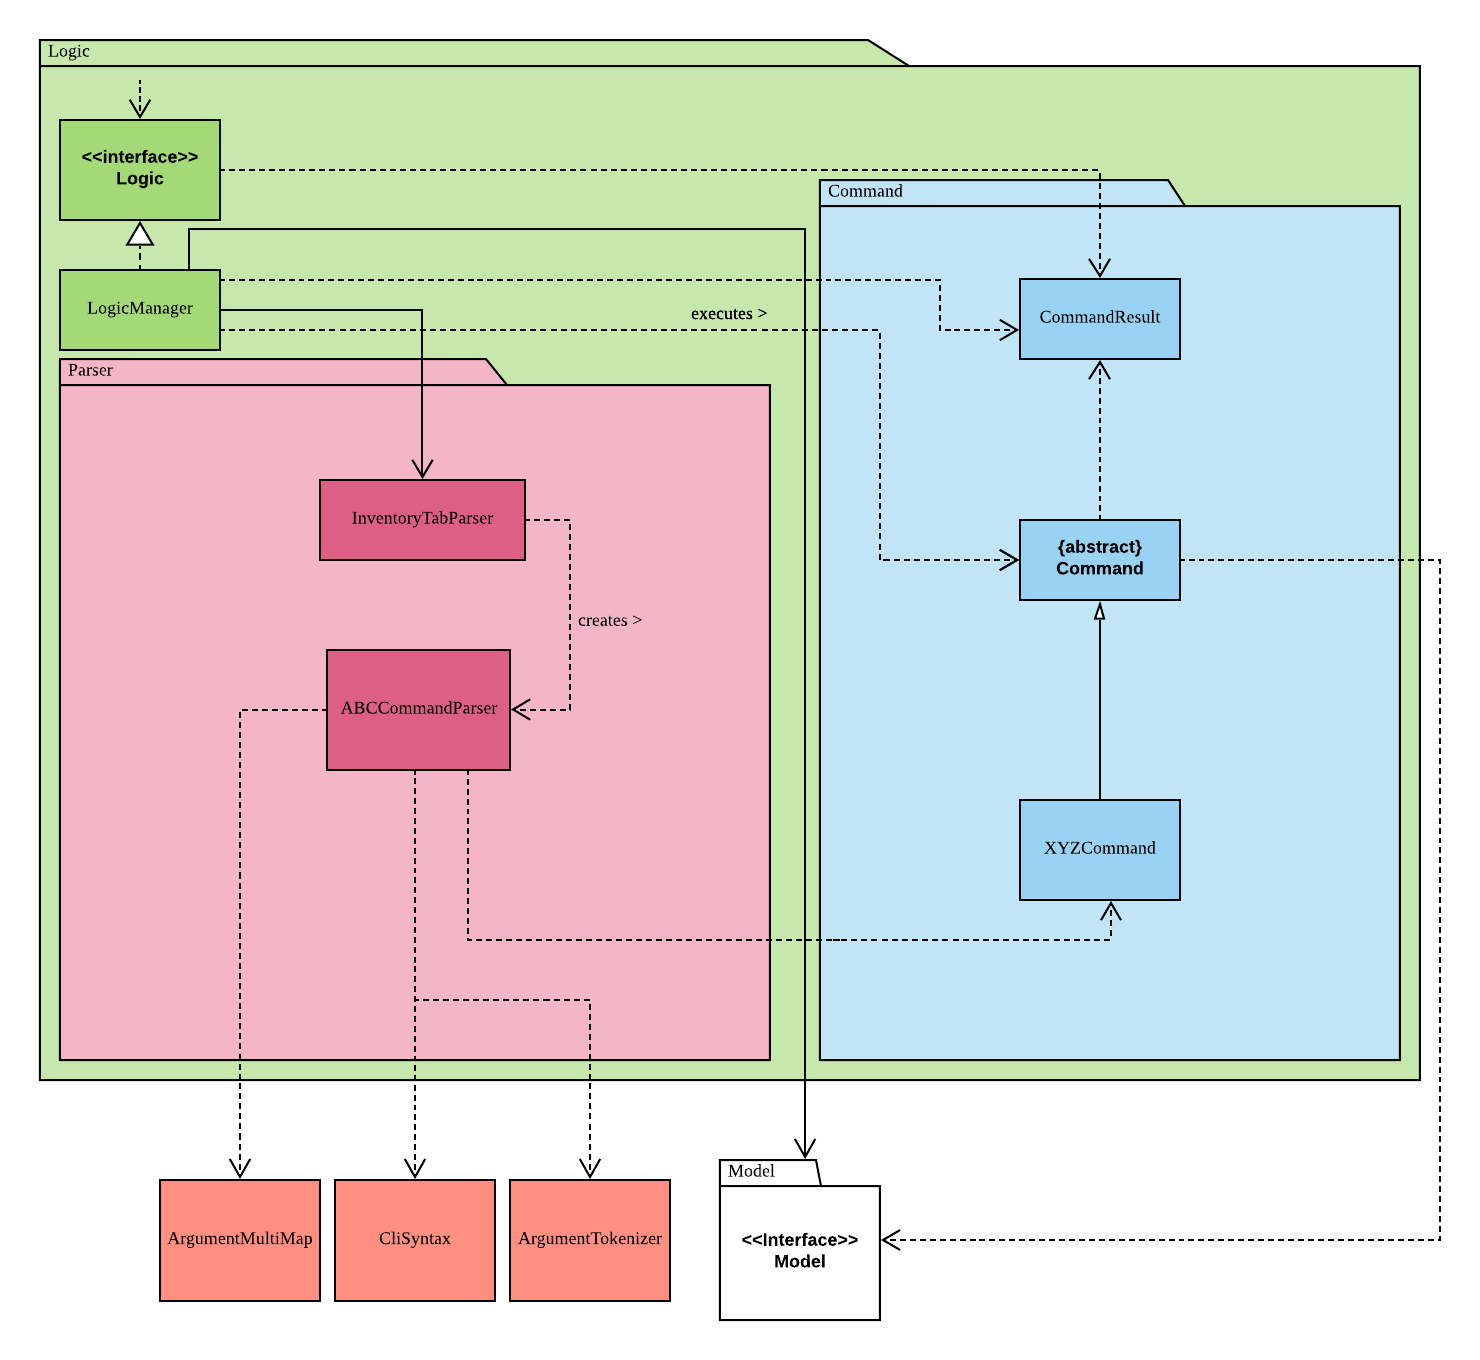
2.3. Logic component
This section will show the structures of the Logic component of the different tabs.
The diagram below shows a generalised view of the Logic component within the packages.
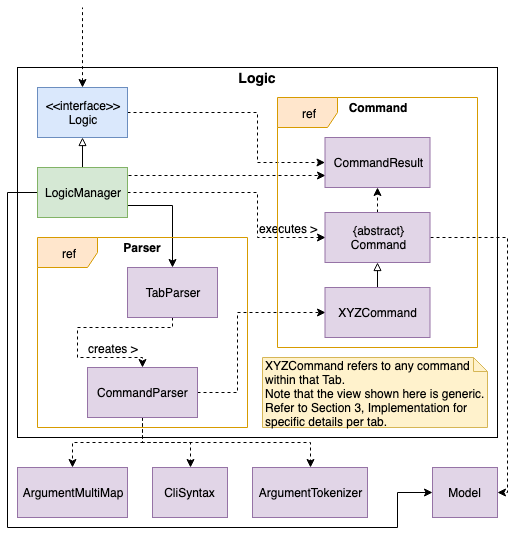
Logic ComponentAn outline of how a command is processed through Logic is as follows:
-
Logicuses the tab’sParserclass to parse the user command. -
This results in a
Commandobject which is executed by theLogicManager. -
The command execution can affect the
Model(e.g. adding a person, transaction). -
The result of the command execution is encapsulated as a
CommandResultobject which is passed back to theUi(not depicted).
A general Sequence Diagram depicting the above outline is shown below:
Logic.Further details on the implementation of the Parser and Command can be found below in Section 2.3.1. Home and Reimbursements Tab,
Section 2.3.2. Inventory and Cashier Tab and Section 2.3.3. Members Tab below.
2.3.1. Details on Logic Implementation for the Home and Reimbursements Tab
This section will show further details of the Logic component of the Home tab and Reimbursements tab.
Given below is a Class Diagram showing the structure of Parser within the Logic component which is a reference for Figure 4, “Structure of the Generalised Logic Component”:
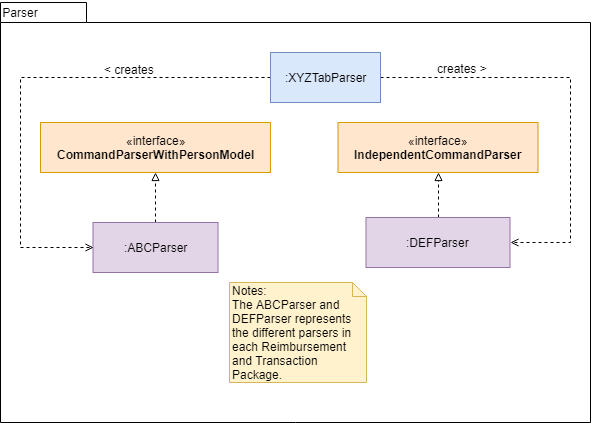
Parser for the Home and Reimbursements tab.
The XYZTabParser represents the TransactionTabParser for Home Tab and ReimbursementTabParser for the Reimbursements tab.
|
The parsers represented by the ABCParser and DEFParser are:
ABCParser:
-
Transaction Tab:
-
EditCommandParser -
AddCommandParser -
DeleteCommandParser
-
-
Reimbursements Tab:
-
FindCommandParser -
DoneCommandParser -
DeadlineCommandParser
-
DEFParser
-
Transaction Tab:
-
FindCommandParser -
SortCommandParser
-
-
Reimbursements Tab:
-
BackCommandParser -
ExitCommandParser -
SortCommandParser
-
In addition, the Logic object for Home and Reimbursements Tab contains the GetPersonByNameOnlyModel since Logic only uses the ModelManager#getPersonByName method in the person package.
2.3.2. Details on Logic Implementation for Members Tab
This section will show further details of the Logic Component of the Members Tab.
This is integrated from the existing AddressBook.
Given below is a Class Diagram showing the structure of Parser within the Logic Component:
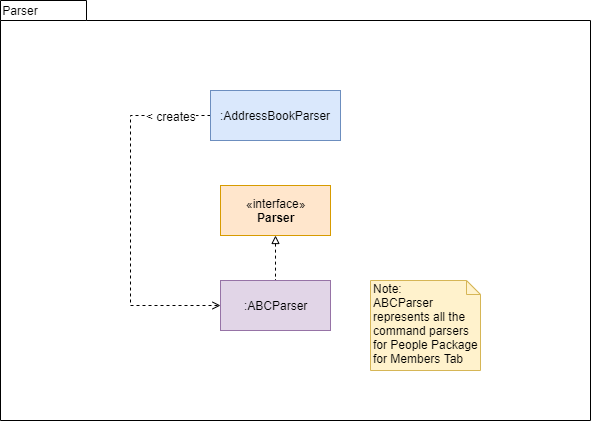
Parser for Members Tab.2.3.3. Details on Logic Implementation for the Inventory and Cashier Tab
This section will show further details of the Logic Component of the Inventory tab and Cashier tab.
Given below is a Class Diagram showing the structure of Parser within the Logic component:

Parser for the Inventory and Cashier tabs which is a reference for Figure 4, “Structure of the Generalised Logic Component”The XYZTabParser represents the InventoryTabParser for the Inventory tab and CashierTabParser
for the Cashier tab.
The parsers represented by the ABCParser are:
ABCParser:
-
Inventory Tab:
-
AddCommandParser -
DeleteCommandParser -
EditCommandParser -
SortCommandParser
-
-
Cashier Tab:
-
AddCommandParser -
EditCommandParser -
DeleteCommandParser -
SetCashierCommandParser -
CheckoutCommandParser -
ClearCommandParser
-
2.3.4. Details on Logic Implementation for the Members Tab
This section will show further details of the Logic Component of the Members tab.
This is integrated from the existing AddressBook.
Given below is a Class Diagram showing the structure of Parser within the Logic Component:
Parser for the Members tab.2.3.5. Details on Logic Implementation for the Overview Tab
This section will show further details of the Logic Component of the Overview tab.
Given below is a Class Diagram showing the structure of Parser within the Logic Component:
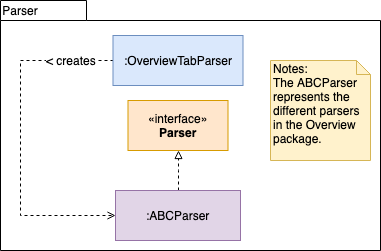
Parser for Overview Tab.The parsers represented by the ABCParser are:
-
SetCommandParser -
NotifyCommandParser
2.4. Model component
This section will show the structures of the Model Component of the different tabs.
The diagram below shows a generalised view of the Model component within the packages.
Model Component
XYZObjects are only present in the transaction, reimbursement, person, cashier and inventory packages.
|
2.4.1. Details on the Model Implementation for the Home Tab
The Model of the Home tab:
-
stores a
TransactionListobject that represents the list of all transactions data -
stores a
Predicate<Transaction>object to filter the list of all transactions -
stores another
TransactionListobject that represents the filtered list of transactions according to the predicate
API for transaction package : Model.java
2.4.2. Details on the Model Implementation for the Reimbursements Tab
The Model of the Reimbursment tab:
-
stores a
ReimbursementListobject that represents the list of all reimbursements data -
stores another
ReimbursementListobject that represents the filtered list of reimbursements according to the command
API for reimbursements package : Model.java
2.4.3. Details on the Model Implementation for the Members Tab
The Model of the Members tab:
-
stores a
UserPrefobject that represents the user’s preferences forpersonpackage. -
stores the Address Book data for
personpackage. -
exposes an unmodifiable
ObservableList<Person>that can be 'observed' e.g. the UI can be bound to this list so that the UI automatically updates when the data in the list change. -
does not depend on any of the other three components.
API for person package : Model.java
2.4.4. Details on the Model Implementation for the Inventory Tab
To be filled in :)
API for inventory package : Model.java
2.4.5. Details on the Model Implementation for the Cashier Tab
The Model of the Cashier tab:
-
stores an
InventoryListobject that represents the list of all items in the inventory -
stores a list of sales items present on the table of the Cashier tab
-
accesses the
TransactionListobject from transaction package that represents the list of all transactions data
This Inventory List is different from the one in the Model of inventory package.
This is so that the Inventory List in the Model of cashier package cannot add or delete any items in the inventory.
This means that Inventory List in cashier package access different set of methods which modifies only the quantity of the item.
|
API for cashier package : Model.java
2.4.6. Details on the Model Implementation for the Overview Tab
The Model of the Overview tab:
-
stores an array of 6 double values representing the budget goal, expense goal, sales goal, budget threshold, expense threshold and sales threshold respectively
-
stores three booleans indicating whether notifications for budget, expenses and sales have already been shown, valid for the current session only
-
exposes getter and setter method to read and write the goals and thresholds
-
does not depend on any of the other components
API for overview package : Model.java
2.5. Storage component
This section will show the structures of the Storage component of the different tabs.
The diagram below shows a generalised view of the Storage component within the person package.
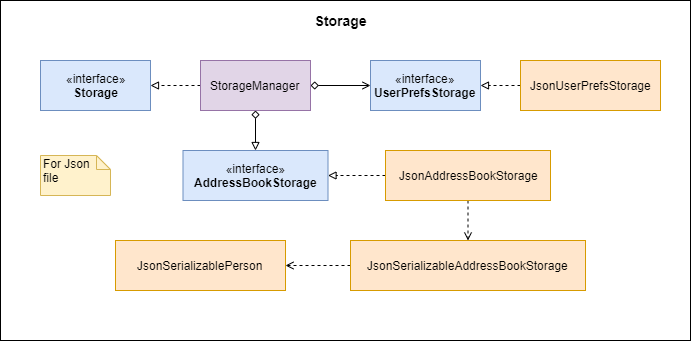
The following diagram shows a generalised view of the Storage component within the other packages for transaction, reimbursement, inventory, cashier and overview.
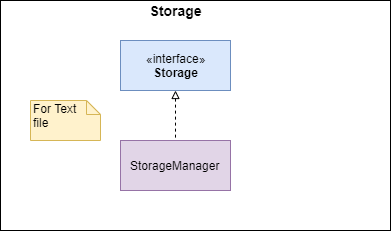
2.5.1. Details on the Storage Implementation for the Home Tab
-
can save a
TransactionListobject in text format and read it back
API for transaction package : Storage.java
2.5.2. Details on the Storage Implementation for the Reimbursements Tab
-
can save a
ReimbursementListobject in text format -
can take in a
TransactionListobject and read text file to get aReimbursementListobject
API for reimbursements package : Storage.java
2.5.3. Details on the Storage Implementation for the Members Tab
-
can save
UserPrefobjects in json format and read it back. -
can save the Address Book data in json format and read it back
API for person package : Storage.java
2.5.4. Details on the Storage Implementation for the Inventory Tab
To be filled in :)
API for inventory package : Storage.java
2.5.5. Details on the Storage Implementation for the Cashier Tab
-
accesses the
TransactionListfrom transaction package viaLogicto append new transactions to the list -
accesses the
InventoryListfrom inventory package viaLogicto update the current stock left
API for cashier package : Storage.java
2.5.6. Details on the Storage Implementation for the Overview Tab
-
can save Overview tab goals and threshold in txt format and read it back
API for overview package : Storage.java
2.6. Common classes
Classes used by multiple components are in the seedu.addressbook.commons package.
3. Implementation
This section describes some noteworthy details on how certain features are implemented and works.
There are a total of 6 tabs in our application for each feature: Home tab, Members tab, Reimbursement tab, Inventory tab, Cashier tab, Overview tab.
3.1. Home Tab
This tab will help to show records of individual transactions from miscellaneous spending, revenue from sales and cost of buying items to sell. Each transaction will require an input of its date, description, category, amount and member that is accountable for it.
Revenue from each cashier checkout will also be automatically inputted as a transaction with positive amount in this tab with the person being the cashier. The inputted transactions that corresponds to a spending with a negative amount will be tabulated for each member in the reimbursement tab to keep track of reimbursements.
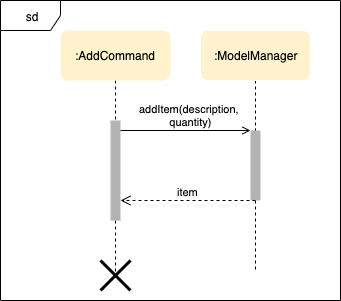
3.1.1. Add Command Feature
This section explains the implementation of the Add command feature in the Home tab.
This feature adds transaction to the table and data file.
All fields in the transactions are compulsory to be inputted by the user: date, description, category, amount, person full name.
The person’s name inputted has to match a name already existing in the AddressBook which is shown in the Members tab.
Thus, this feature requires access to the CheckAndGetPersonByNameOnlyModel#getPersonByName inside the person package which contains the AddressBook implementation to check for the validity of the name entered when inside AddCommandParser which creates the Transaction object.
The following Sequence Diagram shows how the Transaction object is created from AddCommandParser which is represented in 2.3. Logic component: Figure 5
as a generic parser:
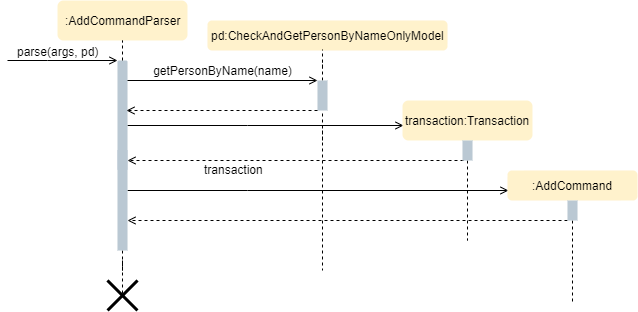
These are the definitions of the methods shown above:
-
AddCommandParser#parse(args, pd): It parses the given user input (args) and creates anAddCommandobject. -
CheckAndGetPersonByNameOnlyModel#getPersonByName(): It returns thePersonobject inAddressBookthat matches the given name.
The AddCommand is created and the newly created Transaction object is passed into its constructor.
The following Sequence Diagram is the reference from 2.3. Logic component: Figure 5:
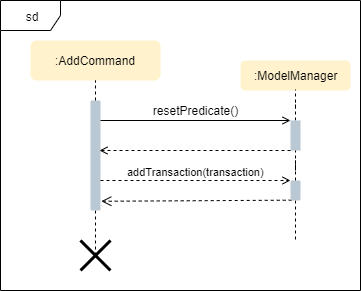
These are the definitions of the methods shown above:
-
Model#resetPredicate(): It resets thePredicateobject inModelManagerto evaluate allTransactionobjects to true. -
Model#addTransaction(transaction): It adds the given `Transactionobject to itsTransactionListobjects attributes.
Thus, when the Model#resetPredicate() method is called in the AddCommand, the UI table will immediately shows the full transaction list regardless of the list shown at the start of the Activity Diagram.
If the prior command was a Find command, then the list in the beginning of the Activity Diagram would be a filtered list but after the Add command is executed, the full list of transactions would be shown.
After the command is executed, the LogicManager updates the in-app list of transactions via the ModelManager and updates the data file via the StorageManager.
The following Sequence Diagram shows how the updating of the list of transactions in the app and in the data file:
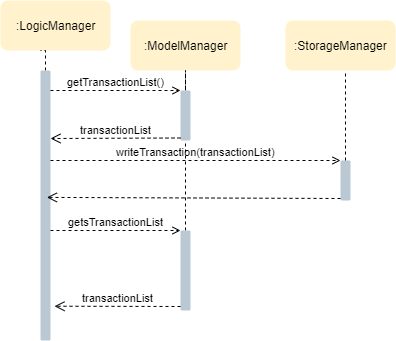
| This update of the list of transactions is done for every command that is executed successfully in the Home tab. |
Finally, the StorageManager and ModelManager inside the Reimbursement package will be updated with the latest TransactionList object to generate an updated list of reimbursements for the user to view in the Reimbursements tab.
The following Sequence Diagram shows how the Reimbursements tab is updated from the MainWindow:

| This update of the Reimbursements tab is done for every command after the list of transactions is updated (shown in 3.1.1. Add Command Feature: Figure 15) when there is a command executed successfully in the Home tab. |
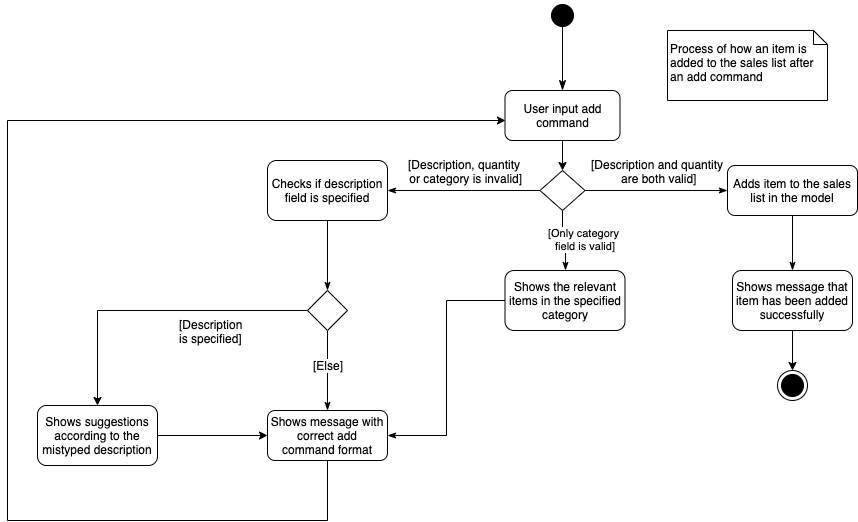
To better illustrate the flow of events from the moment a user inputs a command till the completion of the command, the Activity Diagram for the Add command is shown below:
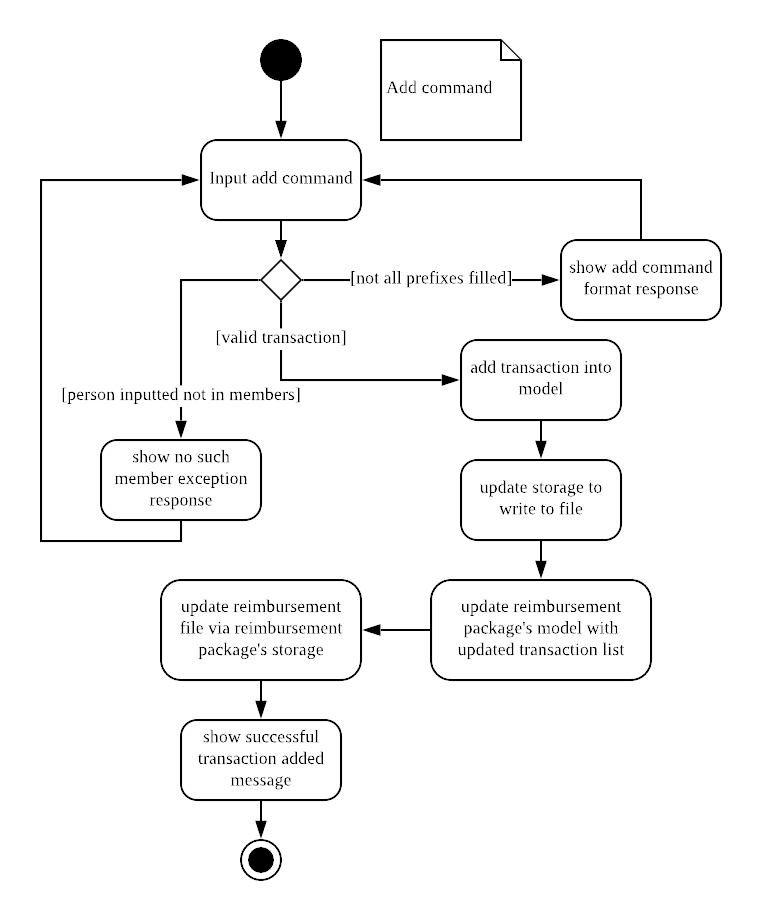
As shown, when a user does not input all the compulsory fields or input a name that does not match anyone in the AddressBook, a response to inform the user of the incorrect input is shown and when a successful addition is done, a response message is shown as well by our mascot, Leo.
Since the Reimbursements tab tabulates the amount to be reimbursed to a person, if the inputted amount is a negative amount to indicate a spending that needs to be reimbursed, the Reimbursements tab will update and show this record.
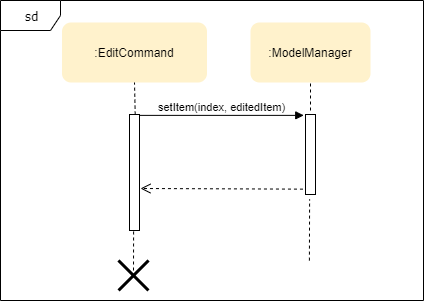
3.1.2. Delete Command Feature
This section explains the implementation of the Delete command in the Home tab. This feature allows for 2 types of deletion, by the index shown in the table or by the person’s name. Inputting the person’s name will cause all transactions linked to that person to be deleted.The following Activity Diagram shows the steps needed to delete a new transaction:
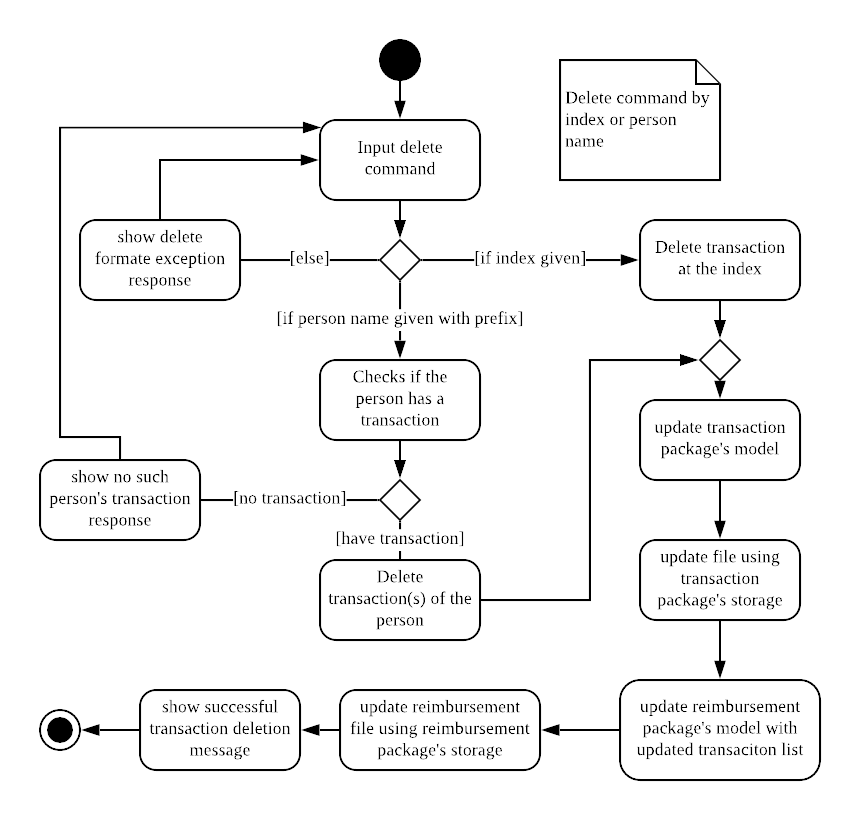
The above Activity Diagram assumes the index to be within the bounds of the table but if it is not, a response will be shown about the incorrect input. Also, as shown above, responses will be shown to indicate if an input is incorrect or when a successful deletion is done.
For the implementation, the DeleteCommandParser which is represented in 2.3. Logic component: Figure 5 as a generic parser creates either a DeleteIndexCommand or DeleteNameCommand object according to the user input.
The following Sequence Diagram shows how the DeleteNameCommand is created with the definition of CheckAndGetPersonByNameOnlyModel#getPersonByName defined in
3.1.1. Add Command Feature:
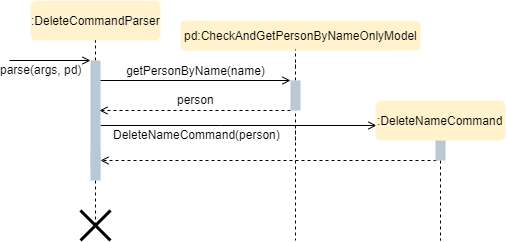
Person 's nameThe following Sequence Diagram shows how the command to delete transactions according to the specified name works after it is created which is referenced in 2.3. Logic component: Figure 5:
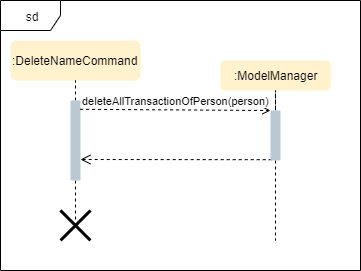
In addition, the Model#resetPredicate() method defined in 3.1.1. Add Command Feature is not called in the DeleteNameCommand.
If the prior input is a Find command and the list at the start of the Activity Diagram shows a filtered list, the table in the UI will continue to show the filtered list after the current Delete Command.
To view the full transaction list, the user would be required to enter the back command where BackCommand calls Model#resetPredicate().
The Sequence Diagram for the BackCommand is shown in the following section 3.1.3. Back Command Feature
After this, the list of transactions and the Reimbursement tab is updated as shown in 3.1.1. Add Command feature: Figure 16 and 3.1.1. Add Command feature: Figure 17 respectively.
The implementation of the command to delete transactions according to the specified index would be similar but does not require interaction with the CheckAndGetPersonByNameOnlyModel from the
AddressBook in the person package inside its branch in DeleteCommandParser.
In DeleteIndexCommand, it also calls the
Model#findTransactionInFilteredListByIndex(index) and Model#deleteTransaction(index) instead which deletes the Transaction object according to its position in the filtered transaction list.
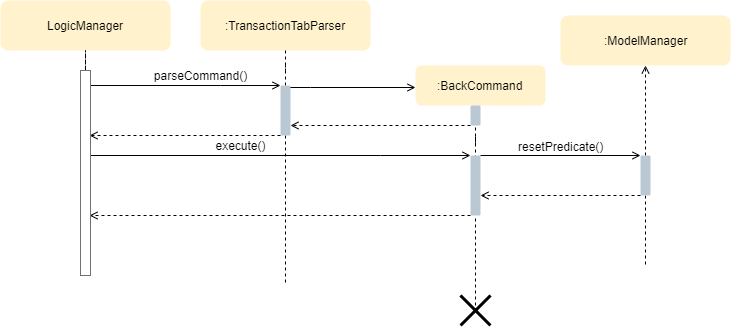
3.1.3. Back Command Feature
This section explains the implementation of the Back command feature in the Home tab.
The BackCommand is called to show the full list of transactions when the table is showing a filtered list.
It is not initialised by a specific command parser as shown in as shown in 2.3. Logic component: Figure 5
but initialised by the TransactionTabParser instead.
The following detailed Sequence Diagram shows how the Back command works:
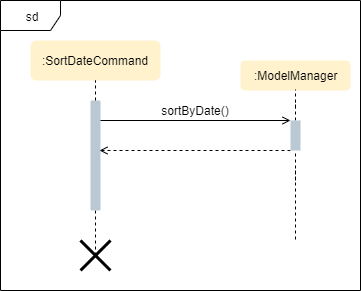
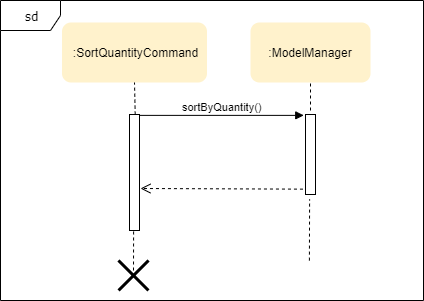
3.1.4. Sort Command Feature
This section explains the implementation of the Sort Command feature in the Home tab.
The SortCommand allows for 3 types of sort, by name in alphabetical order, by amount (from least to most) and by date (from oldest to most recent).
The following Sequence Diagram shows how the Sort command works which is referenced in 2.3. Logic component: Figure 5:
When a user inputs the Sort command, it is only checked that it is one of the 3 types or it will show a response about the incorrect user input. When it is successfully sorted, there will also be a response message shown.
Similar to the Delete command in 3.1.2. Delete Command Feature, the Model#resetPredicate() method is not called.
If the UI table is showing a filtered list of transactions, the back command has to be entered to call that method from BackCommand to reset the predicate.
3.1.5. Overall Design Considerations
This section’s table explains the design considerations for some implementations in the Home tab.
| Alternative 1 | Alternative 2 | Conclusion and Explanation |
|---|---|---|
|
|
Alternative 1 was implemented. Alternative 1 allowed exporting of the data file in the desired order anytime while treasurerPro was running while alternative 2 meant that the data file would be updated only when treasurerPro is exited. The implementation is shown in Figure 24, below the table. |
The Members tab’s |
A new interface is made to allow the only used method of Members tab’s |
Alternative 2 was implemented. The new interface acts as a facade for |
An |
A |
Alternative 1 was implemented. An |

ModelManager class with 2 TransactionList objects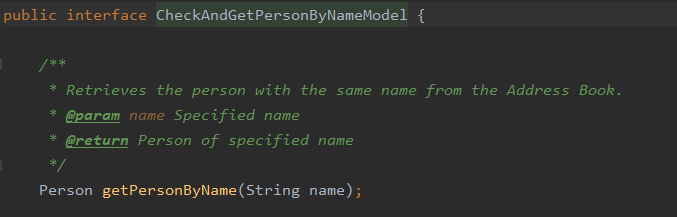
CheckAndGetPersonByNameOnly facade class for ModelManager from the Members tab3.2. Members Tab
This tab will help to keep track of the contact details of members in the club or society for the treasurer.
3.2.1. Delete Command Feature
This feature allows for deletion by the index shown in the the Members tab.
This tab integrates the existing AddressBook.
The following Sequence Diagram shows how the Delete command works:
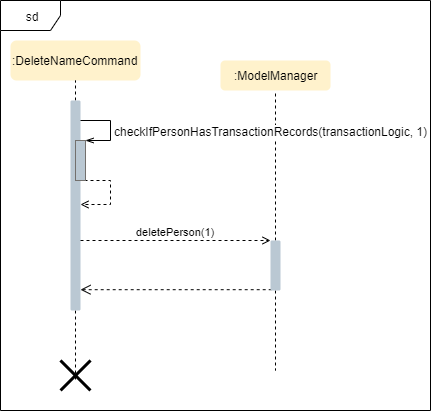
Before, the deletion is done, there will be a check to the TransactionModel to ensure that the member is not linked to any transaction records since every transaction must be linked to a Person in the Members Tab (AddressBook).
3.3. Reimbursements Tab
This tab helps to show reimbursements that the user has not paid to a person. Each reimbursement is auto extracted from transactions and grouped by person in transactions. So, each reimbursement shows the total amount that the user needs to reimburse a person. And there can not be two reimbursements that refer to the same person.
The user can add deadline to a reimbursement, mark a reimbursement, find a reimbursement and sort reimbursements.
The following is an overview class diagram for LogicManager in reimbursement tab:
And this is a general sequence diagram of command execution. The detailed implementations of command execution in reimbursement tab are in the following section.
3.3.1. Deadline Command feature
This command is used to add a deadline date to a reimbursement for a person.
Deadline command requires access to the Model of the person package which the AddressBook implementation is contained in.
Deadline field should be provided in a valid date format.
The person’s name inputted has to match a person’s name already existing in the Reimbursement which is shown in the Reimbursement tab.
The following Sequence Diagram shows the execution of Deadline command:
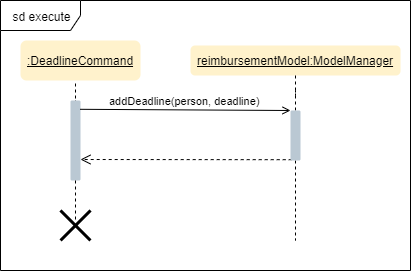
As shown, a user needs to add a deadline to a reimbursement by specifying the person’s name and providing a date.
The DeadlineCommandParser creates a DeadlineCommand with person and deadline date information.
This DeadlineCommand is returned back to LogicManager of reimbursement and is executed by calling addDeadline method in
ModelManager.
After the operations, LogicManager gets updated reimbursement list from ModelManager and displays the deadline in reimbursement list.
After that, the deadline is saved into a .txt file.
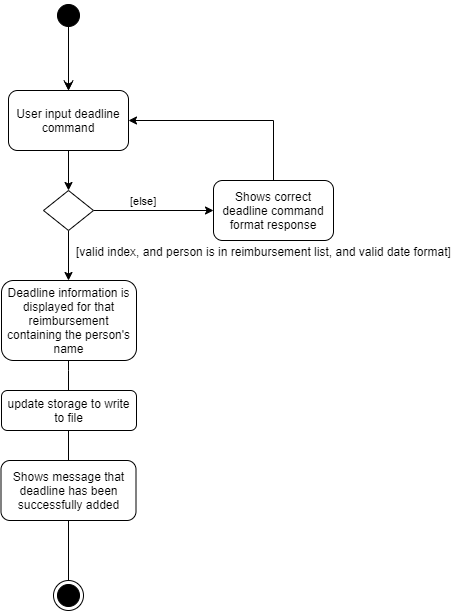
As shown by the above activity diagram, when a user inputs a person who does not exist in any reimbursement or keys in an invalid data format, our app displays the expected format of the deadline command. Otherwise, when the execution is successful, a response informs the user that deadline is successfully added to the reimbursement.
3.3.2. Find Command feature
This command is used to find a reimbursement that contains the person’s name.
The Find command requires access to Model of the person package which the AddressBook implementation is contained in.
Person field should be provided and the person’s name should exist in reimbursement list.
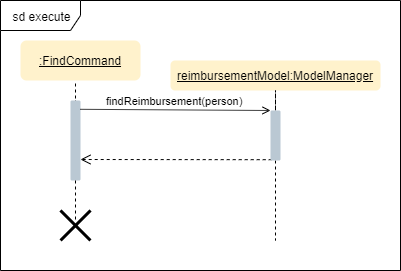
A user needs to find a reimbursement by providing the person’s name.
As shown in the above figure, FindCommand is executed by calling findReimbursement method in
ModelManager.
After the operations, that reimbursement is returned and reimbursement tab only shows a filteredList which contains this single reimbursement.
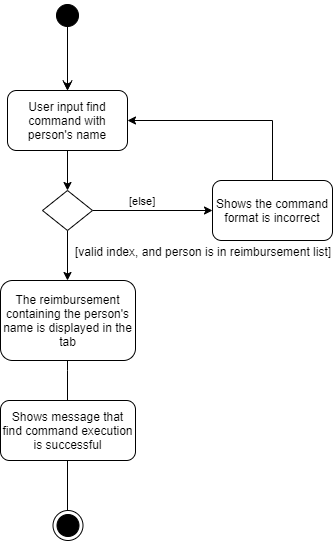
The above activity diagram shows the steps needed for Find command. The person’s name is checked whether it exists in reimbursement list. If not, our app informs the user that command is incorrect. If command is valid, the reimbursement is found and displayed in the tab.
3.3.3. Back Command feature
This command is used to return to the original list after executing Find command
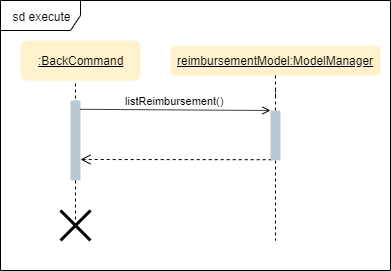
BackCommand execution updates filteredList inside ModelManager to the original full reimbursementList.
After the operations, the original full reimbursement list is displayed.
3.3.4. Done Command feature
This command is used to mark a reimbursement that has been done.
Done command requires access to Model of the person package.
Person field should be provided and the person’s name should exist in reimbursement list.
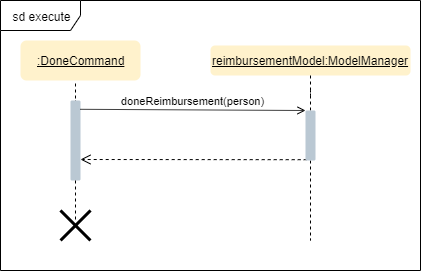
A user needs to mark a reimbursement as done by specifying the person’s name for the specific reimbursement.
The DeadlineCommandParser creates a DoneCommand with person’s information.
As shown in the above figure, DoneCommand is returned back to LogicManager
and it is executed by calling doneReimbursement method in
ModelManager.
After the operations, the status of transactions that consist of this reimbursement is updated to True
and that reimbursement is deleted from the reimbursement list.
Then the updated reimbursement list is displayed and this new list without that deleted reimbursement is saved.
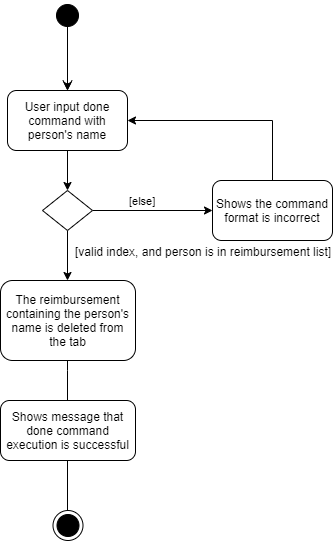
The following activity diagram shows the steps needed for done command. The person’s name is checked whether it exists in reimbursement list. If not, our app informs the user that command is incorrect. If command is valid, the reimbursement containing the provided person’s name is deleted from reimbursement list and will not be displayed.
3.3.5. Sort Command feature
This command is used to sort reimbursements and the user can choose to sort based on name, amount or deadline.
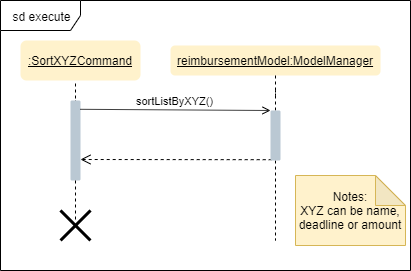
As shown in the above figure, SortXYZCommand is executed by calling sortListByXYZ method in
ModelManager.
And reimbursement list is sorted using SortByXYZ comparator.
For SortAmountCommand, the list will be sorted in descending order of absolute value of amount.
For SortNameCommand, the list will be sorted in descending alphabetical order of person’s name.
For SortDeadlineCommand, the list will be sorted in the order that nearest deadlines are at the front.
3.3.6. Overall design considerations
This section’s table explains the design considerations for some implementations in the reimbursement tab.
| Aspect | Alternative 1 | Alternative 2 | Conclusion and Explanation |
|---|---|---|---|
How |
The |
|
Alternative 2 is chosen.
|
How reimbursement records are saved and read from |
The reimbursement tab saves all the information of transactions that make up a reimbursement into |
The reimbursement tab only saves person’s name, amount and the deadline information into |
Alternative 2 is chosen.
Alternative 2 does not save duplicate information that has already been saved into |

transactionLogic facade class in MainWindow3.4. Inventory Tab
This tab will help to keep records of all items currently in the club’s possession.
Each item will require an input of its description, category, quantity, and cost per unit. Optionally, if the item is meant for sale, the price can be inputted as well.
The following Class Diagram shows the architectural design of the tab:
3.4.1. Add Item Feature
This section explains the implementation of the Add command feature of the Inventory Tab,
which allows the addition of items to the inventory. These items are represented by Item objects.
The addition of an Item to the inventory requires an input of the Item’s description, category, quantity, and cost.
The price field is optional and may be added only to an Item meant for sale.
The following Sequence Diagram shows how the AddCommandParser creates an Item:
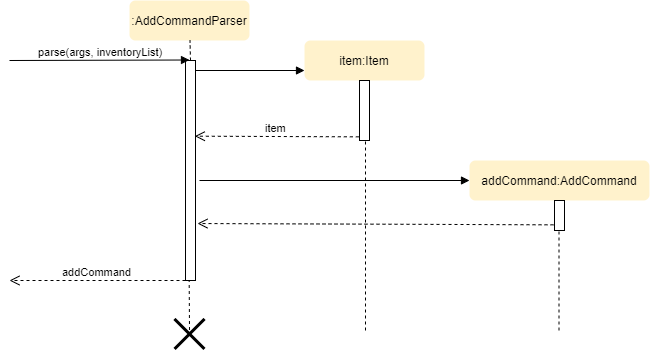
As seen in the above diagram, the parser takes in the user input as well as the existing InventoryList. Within the
parser, it will use the ArgumentTokenizer to tokenize the arguments using the prefixes. This creates an
ArgumentMultimap, allowing the system to retrieve the user input based on the prefixes that precede them. Thus, this
increases the accuracy of the parsing and allows the fields to be in any order in the user input.
If the description of the Item being added matches that of an existing Item, the new Item’s quantity is added to
that of the existing Item and the cost per unit is recalculated. This is handled within the AddCommandParser,
which also checks the validity of the input using the isValidNumericString(string) method.
The code for the AddCommandParser#isValidNumericString(String) can be seen in the code snippet below:

AddCommandParser#isValidNumericString(String) method in the Inventory tab (inventory package)Through this method, the application prohibits the addition of an Item with any value equivalent to or greater than
10,000. This includes the total cost and expected revenue of each Item. It also prohibits non-numeric inputs where
numeric inputs are expected. The AddCommandParser#isValidNumericString(String) method performs the aforementioned
checks and returns a boolean that represents the validity of the input.
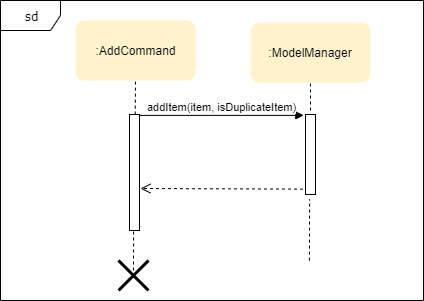
After the Item is created and the command is executed, the LogicManager updates the in-app InventoryList via the
ModelManager and saves to the data file via the StorageManager.
The following sequence diagram which is referenced in 2.3. Logic component: Figure 5, shows how the AddCommand works:
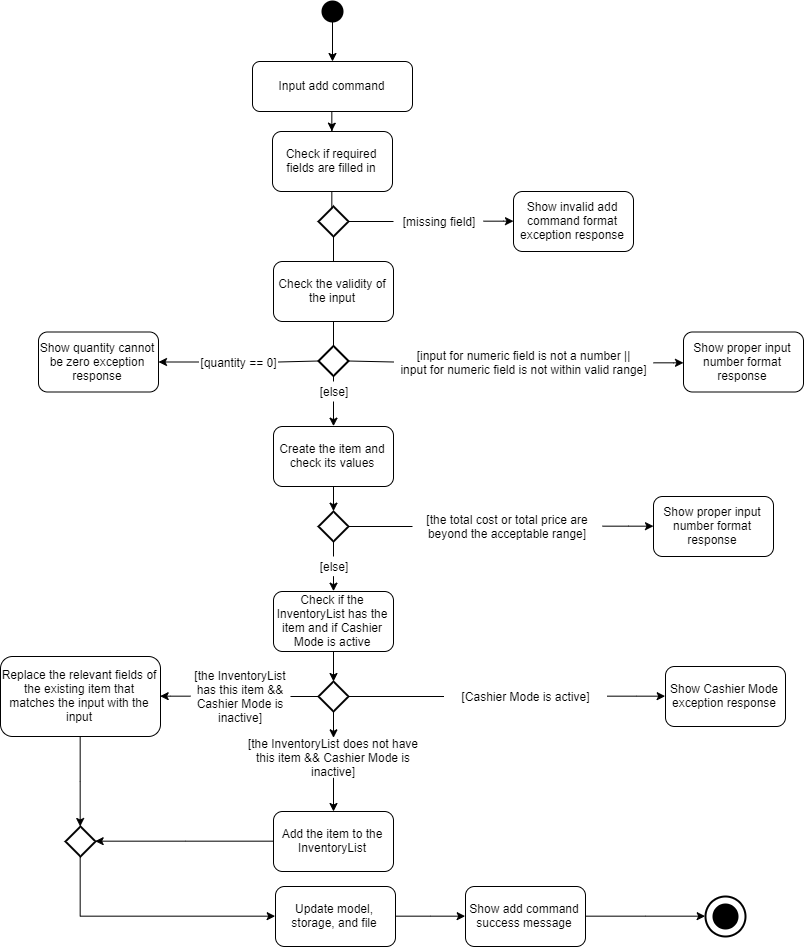
For a greater understanding of the flow of events and checks, you may consult the following activity diagram that shows the steps that follow the input of an Add command:
3.4.2. Delete Item Feature
This section explains the implementation of the Delete command feature of the Inventory Tab, which allows the deletion of items from the inventory. This feature requires only the command keyword and an index or description as input.
The following Sequence Diagram which is referenced in 2.3. Logic component: Figure 5, shows how the
DeleteCommand works:
The DeleteCommandParser is responsible for checking the validity of the input, and does not allow any indexes that
are less than 1 or greater than the largest index currently in the list. It can also take in a description as input and
compares it against existing Item s in the InventoryList. This comparison is case-insensitive.
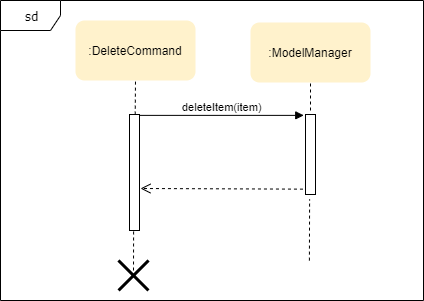
After the command is executed and the Item is deleted, the LogicManager updates the in-app InventoryList via the
ModelManager and saves to the data file via the StorageManager.
3.4.3. Edit Item Feature
This section explains the implementation of the Edit command feature of the Inventory Tab, which allows you to edit items in the inventory. This feature requires the command keyword, an index and at least one field as input.
The following Sequence Diagram which is referenced in 2.3. Logic component: Figure 5, shows how the
EditCommand works:
3.4.4. Sort Items Feature
This section explains the implementation of the Sort command feature of the Inventory Tab, which allows the sorting of items within the inventory. There are 3 ways items can be sorted - by description, category or quantity.
The following Sequence Diagram which is referenced in 2.3. Logic component: Figure 5, shows how the
SortCommand works:
3.4.5. Overall Design Considerations
This section explains the design considerations for some crucial implementations in the Inventory Tab.
| Alternative 1 | Alternative 2 | Conclusion and Explanation |
|---|---|---|
Pros: It is relatively fast. Cons: It takes up a lot of memory. |
Each Pros: Keeping one list is better for memory complexity. Cons: Sorting could be slightly slow. |
Alternative 2 has been chosen. The time complexity of sorting is not very high, but it has a much higher advantage in memory complexity. |
An ArrayList is used to store Pros: It retrieves most elements more efficiently. Cons: The head and tail are not retrieved as efficiently. |
A LinkedList is used to store Pros: The head and tail of the list can be retrieved via linear time complexity. Cons: Every other element would be slower to retrieve. |
Alternative 1 has been implemented. An ArrayList has better performance for the get and set methods than a LinkedList
for elements not in the head and tail.
As it is natural for the number of items in the inventory to be high, and the get and set methods would naturally be
frequently used in the |
3.5. Cashier Tab
This tab will act as a shopping cart to add and record sales items that are to be sold from the inventory.
Upon every successful checkout, all the sales items sold will recorded as one transaction, which will subsequently be appended to the list of transactions on the Home tab. In addition, the stock remaining in the inventory will be updated accordingly in the Inventory tab.
3.5.1. Add Sales Item Feature
This feature allows the addition of sales items to the cart.
Only sales items can be added to the cart. If the price of an item is zero, it is not available for sale. The system will prohibit any addition of such an item to the cart.
Adding of a sales item to the cart will require an input of its description and quantity.
An optional field for category is provided to guide the cashier to find the desired item.
If only the category field is inputted,
Model will search all the sales items in the Inventory List
according to the specified category and suggestions would be shown by Leo, the assistant.
If the description inputted does not match any valid item, the Model will call the getRecommendedItems(description) method, which will in turn call getCombination(arr, arr.length) method to return an ArrayList containing all subsets of the inputted description that are of at least length 3. These subsets are then compared with the actual description of all items in the inventory to check if either contains the other.
The following is a code snippet from getCombination(char[] arr, int n) method:
public ArrayList<String> getCombination(char[] arr, int n) {
    ArrayList<String> result = new ArrayList<>();
    for (int start = 1; start <= n; start++) {
        String word = "";
        for (int i = 0; i <= n - start; i++) {
            //  Adds characters from current starting character to current ending character
            int j = i + start - 1;
            for (int k = i; k <= j; k++) {
                word += String.valueOf(arr[k]);
            }
            result.add(word);
        }
    }
    return result.stream()
            .filter(str -> str.length() >= 3)
            .collect(Collectors
                    .toCollection(ArrayList::new));
}
getCombination(char[] arr, int n) method from Cashier package
The getCombination(arr, arr.length) method in the above snippet consists of 3 nested loops. The first loop decides the
starting character. The second loop takes each of the characters on the right of the starting character as the ending character.
The last loop appends all the characters from the starting character to the ending character. After iterating through the nested loops,
the ArrayList result is passed into a stream to filter out all subsets of length less than 3.
AddCommandParser will carry out multiple checks to check the validity of the inputs. hasItemInInventory(description)
and hasSufficientQuantityToAdd(description, quantity) methods will be called to ensure the item has sufficient stock left in the inventory.
There will also be checks to ensure that the item specified is available for sale.
If description and quantity are both valid, the ModelManager will add the item into the sales list as shown in Figure 2.
The following Sequence Diagram which is referenced in 2.3. Logic component: Figure 5, shows how the AddCommand works:
After every Add Command, the quantity of items in the Inventory tab will still remain the same. The remaining stock
will only be updated after the checkout command.
|
Once the item is added, boolean onCashierMode in ModelManager will be immediately set to true if it is initially false.
|
The following activity diagram shows the steps proceeding after the user input an Add command:
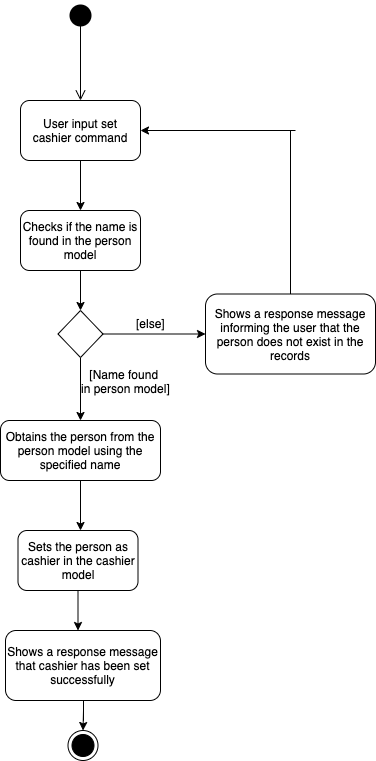
3.5.2. Setting the Cashier Feature
This feature allows an existing person in the Address Book to be set as a cashier.
The only field required is the name of an existing person.
To set a cashier, the person’s name inputted has to match an existing name in the AddressBook as shown on Members tab.
This means that SetCommandParser requires access to the Model of the Person package where the AddressBook implementation is.
If the person’s name cannot be found in the Model of the Person package, a response message will be shown by Leo, informing the user that there is no such person.
The following Sequence Diagram which is referenced in 2.3. Logic component: Figure 5, shows how the SetCashierCommandParser checks for an existing person:

If the specified name is valid, the Model of the cashier package will set the person as cashier.
The following Sequence Diagram which is referenced in 2.3. Logic component: Figure 5, shows how the set cashier command works:
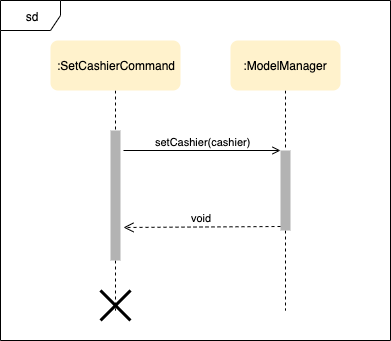
If the inputted name is invalid, the user will be prompted to enter a valid name.
The following activity diagram shows the steps after the user input a set cashier command:
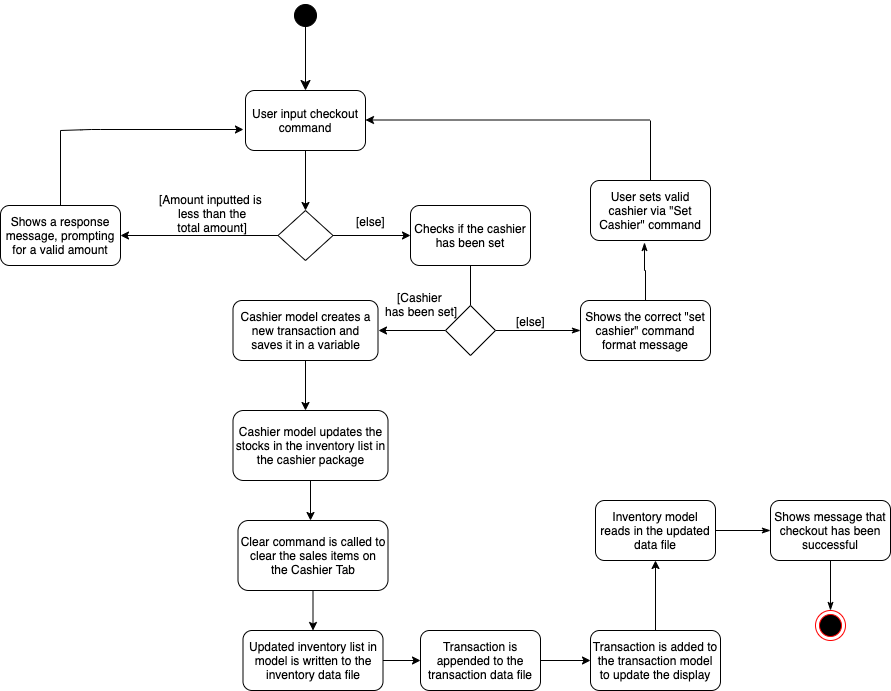
3.5.3. Checkout Feature
This feature records all the sales items in the table as one sales transaction under the Sales category.
The Home tab will be updated with the new transaction labelled as Items sold.
The remaining stock of the sales items will also be updated on the Inventory tab.
During the execution of the command, getCashier() method will be called which will return a person.
This person will be used to create a Transaction object.
If the cashier is null, the command cannot proceed and Leo will prompt the user to set a cashier.
If the amount inputted is valid and cashier has been set, the ModelManager will create a new transaction of the sales made.
| After the execution of the above methods, a clear command will then be called automatically to clear all the sales items on the tab. |
After checkout command is executed, boolean onCashierMode in ModelManager will be immediately set to false.
|
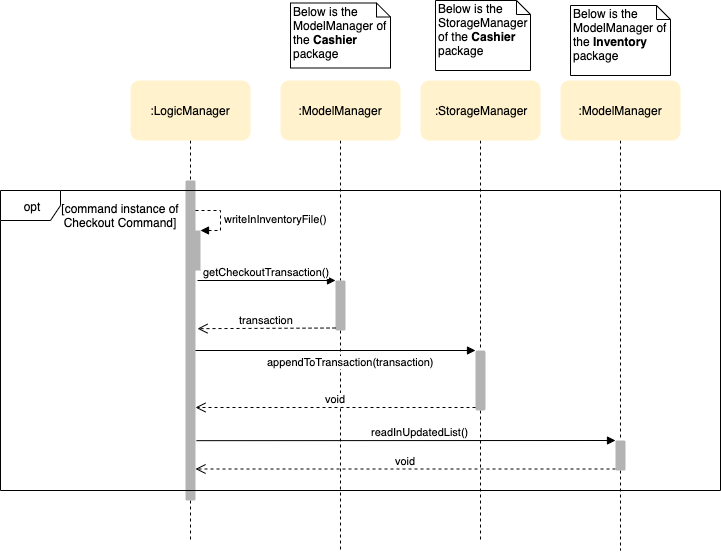
The following Sequence Diagram which is referenced in 2.3. Logic component: Figure 5, shows how the checkout command is executed:
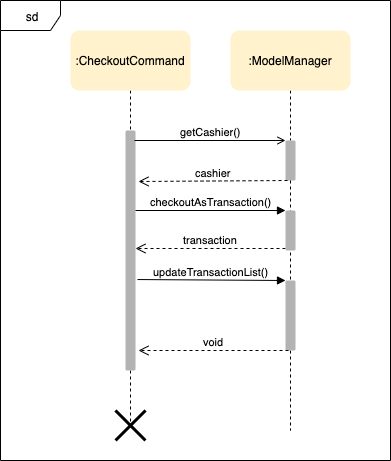
The Cashier Logic will call relevant methods to update the inventory list and newly-generated transaction to the respective .txt file.
To update the view on the Inventory tab and Transaction tab, transaction will be added to the transaction Model and
readInUpdatedList() method of inventory Model will called to read in the entire inventory data file.
The following Sequence Diagram shows how the transaction and inventory are updated:
If the amount inputted is less than the total amount of items, the user will be prompted to key in a valid value.
The following activity diagram shows the steps after the user input a checkout command:
3.5.4. Overall Design Considerations
This section explains the design considerations for some crucial implementations in the Cashier tab.
| Alternative 1 | Alternative 2 | Conclusion and Explanation |
|---|---|---|
An ArrayList is used to store the list of sales item shown on the Cashier tab. Pros: Elements are be accessed directly more efficiently. Cons: Adding and removing from the head of the list is less time-efficient for ArrayList. |
A LinkedList is used to store the list of sales item. Pros: Elements can be accessed from the head and tail of the list in constant time. Cons: When accessing directly via the index, performance is poor with respect to time. |
Alternative 1 is selected. An ArrayList has better performance with respect to time when accessing each elements directly. As the sales list will be updated and accessed regularly, an ArrayList is more fitting. |
The Transaction, Inventory and Person Pros: Cashier’s Logic can access all public methods in the respective Cons: It might result in unintended modification to some of the data in the Models. |
Interfaces that only contains the required methods are created. The methods are called via these interfaces to update the data. Pros: Prevents any unwanted changes through other methods. This adheres to the Facade Pattern. Cons: If more methods are needed, they need to be added to these interfaces. |
Alternative 2 was implemented as only a few methods are required from each |
The Cashier’s Pros: It can access the data file directly without any dependencies. Cons: The data files can be modified from 2 sources, increasing chances of bugs. |
The Cashier’s Pros: The data files are only modified from 1 source, ensuring cohesiveness in the format of data stored. Cons: It introduces more dependencies on the storage of other packages. |
Alternative 2 is implemented to enforce defensive programming, so that the data files are not modified via 2 different methods from different sources and eliminates any chances of uncoordinated data in the data files. |
3.6. Overview Tab
This tab displays various summary statistics for the data within treasurerPro. There are four main statistics shown:
-
Expense Summary: Pie chart of expenditure by category.
-
Inventory Summary: Pie chart of inventory by category.
-
Sales Summary: Bar chart of sales by months.
-
Budget Overview: Line chart of budget remaining by months.
The above summaries are automatically updated whenever new data is entered from any of the other tabs.
There are two main user features within this tab: a feature allowing the user to set goals, and a feature for the user to set percentage thresholds for notifications.
3.6.1. Set Command Feature
This feature allows the user to set a goal for their budget, expense or sales targets.
The following Sequence Diagram depicts how the Set Command operates, and is an extension of the general sequence diagram found in 2.3. Logic component: Figure 5:
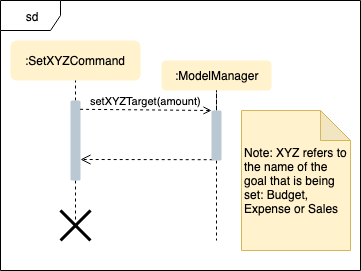
After execution of the command, the LogicManager also instructs the StorageManager to save the new information to
the data file.
3.6.2. Notify Command Feature
This feature allows the user to set a percentage threshold for notifications. Upon hitting that percentage for a particular financial goal, the user will automatically be notified of it with a message from Leo.
The following Sequence Diagram depicts how the Notify Command operates, and is an extension of the general sequence diagram found in 2.3 Logic component: Figure 5:
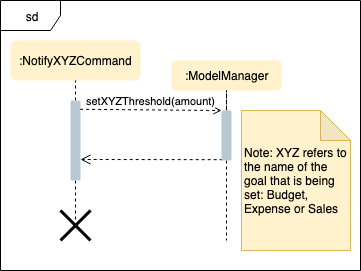
After execution of the command, the LogicManager also instructs the StorageManager to save the new information to
the data file. The full execution of the command is shown in the activity diagram below:

3.6.3. Design Considerations
In order to display the summary statistics shown to the user within the Overview tab, they must first be calculated. Several design considerations were made as to how these calculations would be made, as shown in the table below:
| Alternative 1 | Alternative 2 (Current Choice) | Conclusion and Explanation |
|---|---|---|
The summary statistics are calculated by retrieving the transaction and item lists. Each transaction or item is then read individually and their totals added up. Pros: This is a much simpler, straightforward implementation. Cons: It is difficult to filter the list by a given criteria, which is required for certain summary statistics. |
The Java Streams library is used to calculate the summary statistics, by retrieving the transaction list and item list as streams instead. Pros: It is much easier to filter the list from a given criteria with the built in Cons: Java Streams run slower than their iterative counterparts when the list is small, and are more complex to implement. |
Alternative 2 is selected as the performance difference is negligible for smaller lists, and will benefit the user in the long run as their lists of transactions and items become larger and larger. Additionally, it allows for future extensibility of summary statistics, as new statistics can be created simply by modifying or adding on new criteria. |
The following is a code snippet of the chosen implementation above:
public double getTotalExpenses() {
    Stream<Transaction> transactionStream = transactionLogic.getTransactionList().stream();
    return transactionStream
        .filter(transaction -> !transaction.getCategory().equals("Sales"))
        .filter(transaction -> transaction.isNegative())
        .flatMapToDouble(transaction -> DoubleStream.of(transaction.getAmount()))
        .sum() * -1;
}
A design consideration was also made for the implementation of the notifications that are to be displayed to the user upon hitting the notification threshold. These are shown in the table below:
| Alternative 1 | Alternative 2 (Current Choice) | Conclusion and Explanation |
|---|---|---|
A new class is created to act as a notifier, and is called after the execution of every command to check if any notifications need to be displayed to the user. Pros: All tabs can utilize this notifications feature and display messages to the user when needed. Cons: Extra program resources are needed to create such a class. |
A method within the Overview tab’s Pros: Easy to implement with minimal new resources required. Cons: It will be difficult to extend this functionality to other tabs if needed. |
Alternative 2 was implemented after a discussion held with the team revealed that this functionality was and would not be needed for any of the other tabs. Thus, it made more sense to stick with the simpler, less resource intensive implementation of this function, |
The following is a code snippet of the chosen implementation above:
private void checkIfNotify() {
    List<OverallCommandResult> notifications = overviewLogic.checkNotifications();
    for (OverallCommandResult notif: notifications) {
        lion.setResponse(notif.getFeedbackToUser());
    }
}
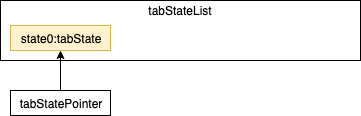
3.7. [Proposed] Undo/Redo feature
3.7.1. Proposed Implementation
The undo/redo mechanism is facilitated by VersionedtreasurerPro.
It extends each tab’s Model with an undo/redo history, stored internally as a tabStateList and tabStatePointer.
Additionally, it implements the following operations in each tab’s ModelManager:
-
ModelManager#commit()— Saves the current tab’s state in its history. -
ModelManager#undo()— Restores the previous tab’s state from its history. -
ModelManager#redo()— Restores a previously undone tab’s state from its history.
These operations are exposed in the Model interface of the tab as Model#commit(), Model#undo() and Model#redo() respectively.
Given below is an example usage scenario and how the undo/redo mechanism behaves at each step.
Step 1. The user launches the application for the first time.
Each package’s model will be initialized with their initial default state, and the
tabStatePointer of each package pointing to that state.
Step 2. The user executes a command that modifies the application state.
The command calls Model#commit(). The state after executing the command is saved in the tabStateList, and the
tabStatePointer is shifted to that new state.
Commands that do not modify the application state will not call Model#commit(), and thus no new state
will be created in tabStateList. The tabStatePointer will continue to point at the same state.
|
Step 3. The user executes undo to undo the last command.
The undo command calls Model#undo, which shifts the currentStatePointer to the previous state,
restoring it to that state.
If the tabStatePointer is already pointing to the first item in the list, an error will be returned to the
user and nothing will be done.
|
Step 4. The user executes redo to redo the last undo command.
The redo command calls Model#redo, which shifts the currentStatePointer to the next state,
restoring it to that state. In this case, it is identical to after Step 2.
3.7.2. Design Considerations
In order to implement the undo/redo command, several alternatives in design were considered before settling on the current implementation:
| Alternative 1 (Current Choice) | Alternative 2 | Conclusion and Explanation |
|---|---|---|
The state of the tab is saved after every command. Pros: This is much easier to implement. Cons: Extra memory is used to store each state after every command. |
Each command is capable of undoing/redoing itself. Pros: Less memory is required. Cons: The implementation of each command becomes more complex, as it must be able to correctly undo/redo itself. |
Alternative 2 is selected due to its ease of implementation. Most modern computers also have sufficient memory space to store extra states. |
3.8. Logging
We are using java.util.logging package for logging.
The LogsCenter class is used to manage the logging levels and logging destinations.
-
The logging level can be controlled using the
logLevelsetting in the configuration file (See Section 3.9, “Configuration”) -
The
Loggerfor a class can be obtained usingLogsCenter.getLogger(Class)which will log messages according to the specified logging level -
Currently log messages are output through:
Consoleand to a.logfile.
Logging Levels
-
SEVERE: Critical problem detected which may possibly cause the termination of the application -
WARNING: Can continue, but with caution -
INFO: Information showing the noteworthy actions by the App -
FINE: Details that is not usually noteworthy but may be useful in debugging e.g. print the actual list instead of just its size
3.9. Configuration
Certain properties of the application can be controlled (e.g user prefs file location, logging level) through the configuration file (default: config.json).
4. Documentation
Refer to the guide here.
5. Testing
Refer to the guide here.
6. Dev Ops
Refer to the guide here.
Appendix A: Product Scope
Target user profile:
-
has a need to manage a significant number of transactions, items in inventory and contacts
-
prefer desktop apps over other types
-
can type fast
-
prefers typing over mouse input
-
is reasonably comfortable using CLI apps
Value proposition: Provides money and reimbursement management specific for treasurers in a consolidated application
Appendix B: User Stories
Priorities: High (must have) - * * *, Medium (nice to have) - * *, Low (unlikely to have) - *
| Priority | As a … | I want to … | So that I can… |
|---|---|---|---|
|
new user |
add my CCA expenses with (when, where, how much, who`x) details |
better manage expense history |
|
user |
add a new transactions |
|
|
user |
add a new member |
|
|
user |
add a new inventory items |
|
|
user |
delete a transaction |
remove entries that I no longer need |
|
user |
delete a member |
remove members that left the CCA |
|
user |
delete an item from inventory |
remove items keyed in wrongly |
|
user |
edit entries when user mistype, or when updates are required |
not have to delete and make a new one |
|
user |
view an overview of all transactions and sales |
budget for new events and check financial health |
|
user |
find a person by name |
locate details of persons without having to go through the entire list |
|
user |
find a transaction by description |
locate details of transactions without having to go through the entire list |
|
user |
sort transactions by date, amount and alphabetical order of name of person who spent the amount |
view and prioritise reimbursements of transactions |
|
user |
an overview of the expenditure for each event |
that I can keep track for future purposes or reporting to the school |
|
user |
track individual sales at an event and tabulate total sales at the end of the day |
|
|
user |
find transactions by a single person and if reimbursment has been done |
locate total amount of money to reimburse the person and keep track of reimbursements |
|
user |
function to schedule goals and plan budget/spending |
|
|
user |
have information of the person I need to reimburse |
easily find information to contact the person for reimbursement |
|
user |
generate and export to print out overview reports of the financials |
present it during board meetings and give it to other board directors |
|
user |
have a cashier mode for another member who do sales input data directly in real time when the transaction is made |
not spend extra time to collate their sales and revenue and key it in myself |
|
user |
plan and estimate my budget for events by comparing with previous transactions |
|
|
user |
can tag and see who I have to reimburse back to most urgently |
|
|
user |
have a reminder pop up when I open the app of the reimbursements I have to do within this week from the current date |
|
|
user |
schedule deadlines in order to plan for events |
|
|
user |
auto complete for people already in database |
know if I have to get their contact details to fill into the database later |
|
user |
upload receipt proofs into the system |
better check for validity of transaction and for security |
|
user |
upload receipt proofs into the system |
better check for validity of transaction and for security |
Appendix C: Use Cases
(For all use cases below, the System is the treasurerPro (tP) and the Actor is the user, unless specified otherwise)
C.1. Overview Tab
Use Case 1: Sets goals for expenditure, budget and sales
Guarantees
-
Financial goals are only valid if they are a positive, non-zero amount
-
Financial goals are aligned within a time period
MSS
-
The user arrives on the Overview tab
-
The user chooses to update the expenditure, budget or sales goal
-
The user keys in the amount to be set as the goal
-
The user keys in the period to be set for the goal (week, month, year)
-
The user sets the reset day/date for the goal
-
The overview updates with the new data
Use case ends.
Extensions
-
2a. The user keys in an invalid goal to update
-
2a1. The system requests for a correct category to set goal for
-
2a2. User enters new category
-
Steps 2a1. and 2a2. are repeated until user keys in correct data
Use case resumes from step 3.
-
-
3a. The user keys in a negative amount
-
3a1. The system requests for a new, non-zero amount
-
3a2. User enters new amount
-
Steps 3a1. and 3a2. are repeated until user keys in correct data
Use case resumes from step 4
-
-
4a. The user keys in an invalid period
-
4a1. The system requests for a new response
-
4a2. User enters period for goal
-
Steps 4a1. and 4a2. are repeated until user keys in correct data
Use case resumes from step 5
-
-
5a. The user chooses an invalid reset day/date
-
5a1. The system requests for a new day/date
-
5a2. User enters new day/date
-
Steps 5a1. and 5a2. are repeated until user keys in correct data
Use case resumes from step 6
-
Use Case 2: Sets reminders for expenditure limit/sales targets Guarantees
-
Reminders are only valid if they are for a positive, non-zero amount
MSS
-
The user arrives on the Overview tab
-
The user chooses to set a reminder for their expense limits/sales targets
-
The user keys in the amount to be set as the goal
-
The overview updates with the new data
Use case ends
Extensions
-
2a. The user keys in an invalid goal to update
-
2a1. The system requests for a correct category to set goal for
-
2a2. User enters new category
-
Steps 2a1. and 2a2. are repeated until user keys in correct data
Use case resumes from step 3.
-
-
3a. The user keys in a negative amount
-
3a1. The system requests for a new, non-zero amount
-
3a2. User enters new amount
-
Steps 3a1. and 3a2. are repeated until user keys in correct data
Use case resumes from step 4
-
C.2. Home Tab
Use Case 3: Add a transaction
Preconditions
-
User inputs spending as a negative amount and sales revenue is inputted as a positive amount for the transaction.
MSS
-
User type in command field with Add command
-
Lion replies with success message
-
Table shows list of transactions
Extension
-
2a. Lion replies with wrong input message if input is invalid
Use Case 4: Delete a transaction by index
Preconditions
-
There is transactions shown in the table
MSS
-
User type command in command field with the index
-
Lion replies with success message and info on all transactions
-
Table shows list of transactions
Extension
-
2a. Lion replies with wrong input if invalid index inputted
-
3a. User input back command for table to show all transactions if Find command was prior to the Delete command
Use Case 4: Delete a transaction by the person’s name
Preconditions
-
There is transactions shown in the table
MSS
-
User type command in command field with the person’s name
-
Lion replies with success message and info on all transactions
-
Table shows list of transactions
Extension
-
2a. Lion replies with wrong input if invalid index inputted
-
3a. User input back command for table to show all transactions if Find command was prior to the Delete command
Use Case 5: Edit a transaction
Preconditions
-
User inputs spending as a negative amount and sales revenue is inputted as a positive amount for the transaction.
-
There is transactions shown in the table
MSS
-
Type in command field
-
Lion replies with message
-
Table shows transactions
Extension
-
2a. Lion replies with wrong input message if there is invalid index or person given
-
3a. User input back command for table to show all transactions if Find command was prior to the Delete command
Use Case 6: Sort transactions
MSS
-
Type in command field with Sort command
-
Lion replies with success message
-
List is sorted
Extension
-
2a. Lion replies with wrong input message if there invalid input
C.3. Reimbursements Tab
Use Case 7: Refresh and update reimbursement status
Preconditions
-
User is on Reimbursements Tab page
-
Reimbursements Tab page shows correct amount of reimbursement for each person by retrieving data from Transaction tab
Guarantees
-
Reimbursement status is updated to “Completed” if the user confirms to update
MSS
-
The user goes to the ‘Reimbursement’ tab.
-
Refresh Reimbursement records
-
The user chooses to update the reimbursement status for a person.
-
System asks for confirmation
-
Reimbursement status is updated
Use case ends
Extensions
-
4a. User agrees to confirm
Use case resumes from step 5
-
4b. User disagrees to confirm
Use case ends
C.4. Inventory Tab
Use Case 8: Edit an item
Guarantees
-
Index used must contain an item
MSS
-
Go to Inventory Tab
-
User types in the command line using the item’s index
-
Lion shows a success message and compares the old information to the new
Extension
-
1a. Add a cancel/undo function
-
2a. Add an error message if the index inputted does not have an item
Use Case 9: Calculate total profit
Guarantees
-
Item must exist in the inventory and have a cost price and price
MSS
-
Go to Inventory Tab
-
User type in the command line
Extension
-
2a. If typing “total” profit, the lion returns the sum of all price minus sum of all cost price
-
2b. If just typing the index, the lion returns the total profit for that item
C.5. Cashier Tab
Use Case 10: Stores the information of transactions
Guarantees
-
Transaction is valid only if the quantity in the inventory is more than or equal to the quantity keyed in.
-
The type of item bought is already listed in the inventory
MSS
-
The user arrives on the ‘Cashier’ tab.
-
The user chooses to update the purchases made.
-
CS requests for details of the purchase.
-
User enters the requested details.
-
CS process the purchase and displays the amount change, if valid.
Use case ends.
Extensions
-
4a. CS detects that the item is not listed in the inventory or quantity is insufficient
-
4a1. CS requests for valid item
-
4a2. User enters new item.
-
4a3. Steps 4a1 to 4a2 are repeated until data entered are correct.
-
4a4. Use case resumes from Step 5.
-
-
*a. At any time, User chooses to cancel the purchase made.
-
*a1. CS requests for confirmation.
-
*a2. User confirms the cancellation.
Use case ends.
-
Appendix D: Non Functional Requirements
-
Technical Requirements:
-
Should work on any mainstream OS as long as it has Java
11or above installed. -
Should work on both 32-bit and 64-bit environments.
-
Should be easy to navigate to other tabs
-
-
Quality Requirements:
-
Should be easy to pick up and intuitive for novice user
-
A user with above average typing speed for regular English text (i.e. not code, not system admin commands) should be able to accomplish most of the tasks faster using commands than using the mouse.
-
The messages the lion says should be understandable and not result in information overload
-
The GUI should look neat and organised
-
Should be intuitive and easy to understand and learn for a total novice
-
Our mascot should be original or not copied
-
Clear and grammatically correct English should be used throughout the program
-
-
Process Requirements:
-
Members should aim to do increments according to schedule
-
Members should sound out when help is needed in their increments
-
Members will be doing back-end first before proceeding to front-end designing
-
-
Data Requirements:
-
Should be able to store sufficient data for 1 year’s worth of transactions within a CCA
-
Should be as much resistant to data loss as possible
-
Should be able to read data quickly to prevent long loading times
-
Appendix E: Glossary
- Mainstream OS
-
Windows, Linux, Unix, OS-X
- Private contact detail
-
A contact detail that is not meant to be shared with others, such as email and phone numbers
- Transactions
-
All the expenses spent by the members and sales made from items sold from the inventory
- Inventory
-
Contains items that are stored either to be sold or to be used for functional purposes for the organisation
- Cashier Mode
-
Automatically switches on when there are sales items in the cart on the
Cashier Tab
Appendix F: Instructions for Manual Testing
Given below are instructions to test the app manually.
| These instructions only provide a starting point for testers to work on; testers are expected to do more exploratory testing. |
F.1. Launch and Shutdown
-
Initial launch
-
Download the jar file and copy into an empty folder
-
Double-click the jar file
Expected: Shows the GUI with an empty table for Home tab, Reimbursements tab, Inventory tab, Cashier tab and Overview tab. Shows a set of sample members in the Members Tab. The window size will be optimum and cannot be re-sized. The window position may not be optimum but can be moved.
-
-
Shutdown after adding data into the tabs
-
Type
exitto exit the application -
Re-launch the app by double-clicking the jar file.
Expected: The data of all the tabs except Cashier tab is retained.
-
F.2. Navigating Between Tabs
-
Navigating between tabs
-
Type
go [home] [members] [reimbursement] [inventory] [cashier] [overview]
Expected: The specified tab should be showing in the UI
-
F.3. Testing Home Tab Features
-
Adding transactions
-
Prerequisites: The member 'Alex Yeoh' is present in the Members Tab and 'Jack' is not present in the Members Tab.
-
Test case 1:
add dt/03-Sep-2019 d/grab ride c/transport a/-12 p/Alex Yeoh
Expected: The transaction with the specified parameters is added to the table. Leo responds with the details of the transaction that is a spending. -
Test case 2:
add dt/03-Sep-2019 d/grab ride c/transport a/-12 p/Jack
Expected: Leo responds with a message indicating that the person is not a valid member. Transaction is not added. -
Other incorrect Delete commands to try:
add,add p/Alex Yeoh
Expected: Leo responds with error and no transaction is added.
-
-
Deleting transactions
-
Prerequisites: There are at least one transaction at all times in the Home tab and there are some transactions linked to 'Alex Yeoh'.
-
Test case 1:
delete p/Alex Yeoh
Expected: The transaction with the 'Alex Yeoh' linked to it is deleted from the table. Leo responds with the number of transactions deleted. -
Test case 2:
delete 1
Expected: Transaction at ID 1 is deleted. Leo responds with details of the transaction deleted. -
Test case 2:
delete 0
Expected: No Transaction is deleted. Leo responds with details of the invalid index inputted. -
Other incorrect Delete commands to try:
delete,delete x(where x is more than the last ID in the table),delete p/Jack(Jack is not linked to any transactions)
Expected: Leo responds with error and no transaction is deleted.
-
-
Editing transactions
-
Prerequisites: There are at least one transaction at all times in the Home tab.
-
Test case 1:
edit 1 a/-15 d/mahjong paper
Expected: The transaction with ID 1 is edited with the specified parameters. Leo responds with the details of the transaction edited that is a spending. -
Test case 2:
edit 1 a/15
Expected: The transaction with ID 1 is edited with the specified parameters. Leo responds with the details of the transaction edited that is an earning. -
Other incorrect Edit commands to try:
edit,edit x a/12(where x is more than the last ID in the table),edit 1 p/Jack(Jack is not linked to any transactions)
Expected: Leo responds with error and no transaction is edited.
-
-
Finding transactions
-
Prerequisites: There are a few transactions at all times in the Home tab with some with linked to 'Alex Yeoh' and 'Alex Low'.
-
Test case 1:
find alex
Expected: The transactions linked to 'Alex Yeoh' and 'Alex Low' are shown. Leo responds with the number of matching transactions. -
Test case 2a:
find alex yeoh
Expected: The transactions linked to 'Alex Yeoh' are shown. Leo responds with the number of matching transactions. -
Test case 2b: Any other subsequent commands except Add command
Expected: The transactions linked to 'Alex Yeoh' are shown and the commands are carried out according to the filtered table. If a Sort command is entered, the filtered table is sorted. -
Test case 2c: Type
back
Expected: The full list of transactions are shown. If a Sort command was entered, the full list of transactions would be sorted.
-
-
Sorting transactions
-
Prerequisites: There are some transactions in the table with varied dates, person and amounts.
-
Test case 1:
sort name
Expected: The transactions are sorted by their names, without taking into account of upper or lower cases. -
Test case 2:
sort amount
Expected: The transactions are sorted by their amounts from the smallest (most negative) to largest amount. -
Test case 3:
sort date
Expected: The transactions are sorted by their dates from the oldest to the most recent.
-
F.4. Testing Members Tab Features
-
Adding a person
-
Test case 1:
add n/John Doe p/98765432 e/johnd@example.com a/John street, block 123, #01-01
Expected: Person with specified parameters are added into the list.
-
-
Deleting a person while all persons are listed
-
Prerequisites: List all persons using the
listcommand. Multiple persons in the list. -
Test case 1:
delete 1
Expected: First contact is deleted from the list. Details of the deleted contact shown in the status message. Timestamp in the status bar is updated. -
Test case 2:
delete 0
Expected: No person is deleted. Error details shown in the status message. Status bar remains the same. -
Other incorrect Delete commands to try:
delete,delete x(where x is larger than the list size) {give more}
Expected: Similar to previous.
-
-
Deleting a person when it has a transaction record
-
Prerequisites: The person in the list to be deleted to have transaction records in the Home tab.
-
Test case 1:
delete ID(where ID is the index of the person with a linked transaction)
Expected: Unable to delete the person.
-
-
Editing a person
-
Prerequisites: There is at least one person in the list.
-
-
Test case 1:
edit 1 p/91234567 e/johndoe@example.com
Expected: The person at the index of 1 is edited with the specified parameters. -
Test case 2:
edit 1
Expected: Nothing is edited and Leo responds to inform of this. -
Test case 3:
edit 0 p/91234567 e/johndoe@example.com
Expected: No person is edited and Leo responds to inform of this.-
Other incorrect Delete commands to try:
edit,edit x(where x is larger than the list size)
Expected: Similar to previous.
-
-
Finding a person
-
Prerequisites: There are a few people at all times in the Members tab. 'Alex Yeoh' and 'Alex Low' are present in the list.
-
Test case 1:
find alex
Expected: 'Alex Yeoh' and 'Alex Low' are shown. Leo responds with the number of matching person. -
Test case 2a:
find alex yeoh
Expected: The person 'Alex Yeoh' is shown. Leo responds with the number of matching person. -
Test case 2b: Any other subsequent commands except Add command
Expected: The person 'Alex Yeoh' is shown and the commands are carried out according to the filtered table. -
Test case 2c: Type
list
Expected: The full list of people are shown.
-
F.5. Testing Reimbursements Tab Features
-
Adding a deadline to a reimbursement
-
Prerequisites: The member 'Alex Yeoh' is present in reimbursement tab. And the member 'Jack' is not present in reimbursement tab.
-
Test case 1:
deadline p/Alex Yeoh dt/12-Dec-2019
Expected: deadline12-Dec-2019is added to the reimbursement forAlex Yeoh -
Test case 2:
deadline p/Alex Yeoh dt/32-Dec-2019
Expected: Leo responds with an error message that the date format is invalid -
Test case 3:
deadline p/Jack dt/12-Dec-2019
Expected: Leo responds with an error message that the person is not in reimbursement list.
-
-
Marking a reimbursement as done
-
Prerequisites: The member 'Alex Yeoh' is present in reimbursement tab. And the member 'Jack' is not present in reimbursement tab.
-
Test case 1:
done p/Alex Yeoh
Expected: The reimbursement forAlex Yeohis removed from the reimbursement list. -
Test case 2:
done p/Jack
Expected: Leo responds with an error message that the person is not in the reimbursement list.
-
-
Finding a reimbursement for a person
-
Prerequisites: The member 'Alex Yeoh' is present in reimbursement tab. And the member 'Jack' is not present in reimbursement tab.
-
Test case 1:
find p/Alex Yeoh
Expected: The reimbursement forAlex Yeohis displayed in the tab. -
Test case 2:
find p/Jack
Expected: Leo responds with an error message that the person is not in the reimbursement list.
-
-
Sorting reimbursements
-
Test case 1:
sort date
Expected: The reimbursements are sort based on the urgency of the deadline. -
Test case 2:
sort name
Expected: The reimbursements are sorted based on alphabetical order of the names. -
Test case 3:
sort amount
Expected: The reimbursements are sorted based on amount of money. -
Test case 4:
sort
Expected: Leo responds with an error message that Sort command is invalid. -
Test case 5:
sort amount date
Expected: Leo responds with an error message that Sort command is invalid.
-
-
Going back to display the full list
-
Prerequisites: The
findordeadlinecommands have been used. -
Test case 1:
back
Expected: The full reimbursement list is now displayed. -
Test case 2:
ba
Expected: Leo responds with an error message that the command is invalid.
-
F.6. Testing Inventory Tab Features
-
Adding an item
-
Prerequisites: The description, category, quantity and cost prefixes must be present. Quantity and cost must be a positive number less than 10,000. Quantity cannot be 0.
-
Test case 1:
add d/Shorts c/Clothing q/10 co/9 p/9
Expected: Leo responds with a success message with a brief description of the Item’s information. -
Test case 2:
add d/ c/ q/10 co/9
Expected: Leo responds with a success message with a brief description of the Item’s information, where the description and category are empty, and the price is absent. -
Test case 3:
add d/Shorts c/Clothing q/10 co/9999 p/9999
Expected: Leo responds with an error message that the total is too large. -
Test case 4:
add d/Shorts c/Clothing q/-1 co/9 p/9
Expected: Leo responds with an error message with the specifications for valid numbers (positive number less than 10,000). -
Test case 5:
add d/Shorts c/Clothing q/number co/99 p/99
Expected: Leo responds with an error message with the specifications for valid numbers (positive number less than 10,000). -
Test case 6:
add d/Shorts c/Clothing q/10 co/9 p/12
add d/shorts c/clothes q/50 co/8 p/9
Expected: Leo responds with a success message, stating that the item already exists and that the quantity, cost/unit and price have been updated. The item will have the following information:
Description: Shorts
Category: Clothing
Quantity: 60
Cost: 8.17
Price: 9.00
-
-
Deleting an item
-
Prerequisites: The index/description must exist in the list.
-
Test case 1:
delete 1
Expected: Leo responds with a success message and a brief description of the deleted item. -
Test case 2:
delete shorts
Expected: Leo responds with a success message and a brief description of the deleted shorts item, given that an item with the description shorts had existed in the list. -
Test case 3:
delete -1
Expected: Leo responds with an error message that there is no item at that index. -
Test case 4:
delete shirt
Expected: If the list does not contain an item with the description shirt, Leo responds with an error message that there is no such item.
-
-
Editing an item
-
Test case 1:
edit 1 d/new description
Expected: The item at index 1 now has the description "new description". Leo responds with a success message comparing the item before and after the edit. -
Test case 2:
edit 1 d/
Expected: The item at index 1 now has an empty description. Leo responds with a success message comparing the item before and after the edit. -
Test case 2:
edit
Expected: Leo responds with an error message detailing the correct Edit command format. -
Test case 2:
edit 1
Expected: Leo responds with an error message that the item was not edited and detailing the correct Edit command format.
-
-
Sorting the items
-
Test case 1:
sort description
Expected: Leo responds with a success message even if the list is empty. -
Test case 2:
sort category
Expected: Leo responds with a success message even if the list is empty. -
Test case 3:
sort quantity
Expected: Leo responds with a success message even if the list is empty.
-
F.7. Testing Cashier Tab Features
-
Adding an item
-
Prerequisites: There is an item with description "cup" and quantity of at least 3 in the inventory.
Test case:add d/cup q/3
Expected: 3 items of description "cup" are added into the cart on the Cashier tab. Response message that cup has been added successfully shown. -
Prerequisites: There is an item with description "cup" and quantity of at least 3 in the inventory.
Test case:add d/cup q/-1
Expected: No item is added into the cart. Response message prompting positive integer for quantity shown.
-
-
Deleting an item
-
Prerequisites: There are some sales items in the cart on the Cashier tab.
Test case:delete 1
Expected: First item on the cart is deleted. Response message that item has been deleted successfully shown. -
Prerequisites: There are no sales item in the Inventory tab.
Test case:delete 1
Expected: Response message that there is no item at the inputted index shown.
-
-
Editing an item
-
Prerequisites: There are some sales items in the Inventory tab.
Test case:edit i/1 q/2
Expected: Quantity of first item on the cart is updated to 2. Response message that item has been edited successfully shown. -
Prerequisites: There is an item with description "cup" in the cart.
Test case:edit d/cup q/1
Expected: Quantity of item "cup" on the cart is updated to 1. Response message that quantity of cup has been edited successfully shown.
-
-
Setting cashier
-
Prerequisites: There is an existing member called "Alice" on the Members tab.
Test case:cashier Alice
Expected: Cashier on the bottom row is updated to "Alice". Response message that cashier has been set successfully shown.
-
-
Clearing
-
Prerequisites: A cashier is set and there are some sales items in the cart.
Test case:clear
Expected: Cashier on the bottom row is reset and all items in the cart are cleared. Response message that table has been cleared successfully shown.
-
-
Checking out
-
Prerequisites: A cashier has been set and there are some sales item in the cart.
Test case:checkout 9
Expected: If amount inputted is sufficient, the total amount and change is shown. Cashier on the bottom row is reset and all items in the cart are cleared. Response message that items has been checked out successfully shown.
-
F.8. Testing Overview Tab Features
-
Setting goals
-
Test case 1:
set b/500
Expected: The budget goal is set to 500. -
Test case 2:
set e/500
Expected: The expense goal is set to 500. -
Test case 3:
set s/500
Expected: The sales target is set to 500.
-
-
Setting notification thresholds
-
Test case 1:
notify b/80
Expected: The budget notification threshold is set to 80%, and the application will notify you when you hit 80% of the goal. -
Test case 2:
notify e/80
Expected: The expense notification threshold is set to 80%, and the application will notify you when you hit 80% of the goal. -
Test case 3:
notify s/80
Expected: The sales notification threshold is set to 80%, and the application will notify you when you hit 80% of the goal.
-
F.9. Saving data
-
Dealing with missing/corrupted data files
-
Prerequisites: There is existing data in the various data files.
-
Before the application is open, corrupt some of the text files by deleting parts of it.
Then, open the application.
Expected: If the transactionHistory.txt file is changed, the Home and Reimbursements tab will start with an empty table. If the inventoryInformation.txt file is changed, the inventory list will be empty. If the overviewInformation.txt file is changed, the Overview tab lose the notification reminders set. If the addressbook.json file is changed, the Members tab will start with an empty list. On the other hand, if the addressbook.json file is deleted and not found, a sample list of members will be populated in the Members tab. If the reimbursementInformation.txt file is altered, all deadline data will be lost but the application will still start.
-