1. Introduction
This document serves as a project portfolio for treasurerPro. It outlines my contributions to the project and showcases the features that I have implemented.
1.1. About the team
My team of five members consists of four Year 2 Computer Science students, including me, and a Year 4 Computer Engineering student, all taking the module CS2103T Software Engineering.
1.2. About the project
This project was developed as part of the module - Software Engineering Project, CS2103T. We were tasked to develop a desktop application [1] with a Command Line Interface [2] by enhancing an existing AddressBook desktop application.
My team decided to morph and incorporate the AddressBook application as part of our all-in-one expense tracker. This application aims to enable treasurers and members of Co-Curricular Activities (CCA) Clubs and Societies to regulate their club expenses, manage the stocks in the inventory and retrieve records of reimbursements of its members easily.
In total, this project took place over a span of 8 weeks.
1.3. Typographical Conventions
This section covers the key icons and formatting used in this document.
| This symbol indicates important information or definition. |
command :
Text with blue font and grey highlight indicates a command that can be inputted into the command line by the user and
be executed by the application.
Model :
Text with grey highlight indicates a component, class, or an object in the architecture of the application.
1.4. Introduction of treasurerPro
This section briefly summarises the main features of treasurerPro.
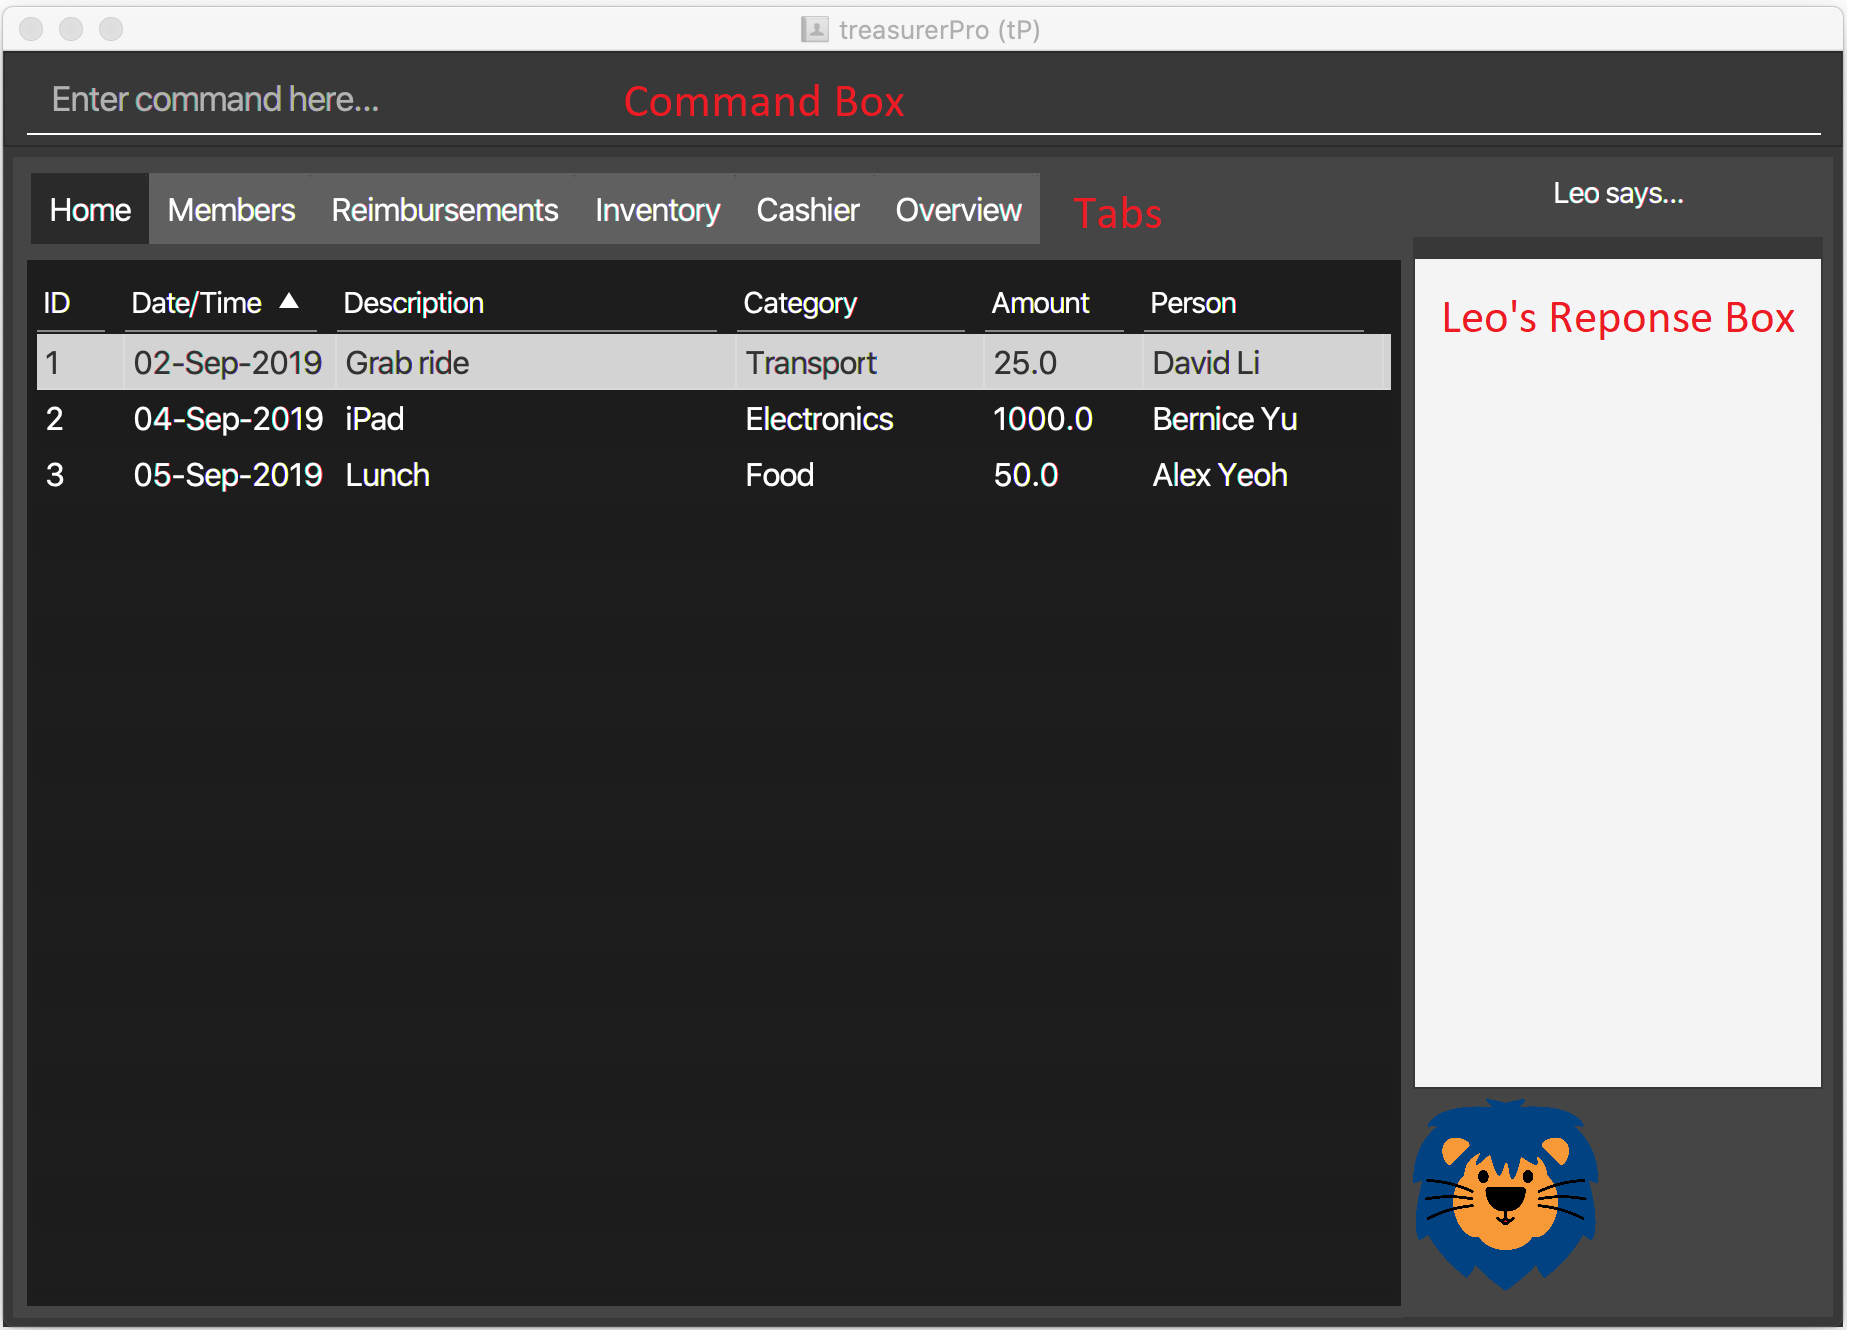
This desktop application consists of 6 tabs, a command box for user inputs and a response box for Leo, our lion mascot. Each tab serves a different purpose, but every tab aims to facilitate seamless and effortless managing of the organisation’s finances. The following shows the various tabs and their respective purposes:
-
Home Tab: keeps track of individual transactions
-
Members Tab: records contact details of all members
-
Reimbursement Tab: handles reimbursement records for members who fork in their money
-
Inventory Tab: keeps track of items in the inventory
-
Cashier Tab: supports cashiering duties and directly input sales into the system
-
Overview Tab: gives an analysis of the organisation’s finances for future planning
This is what the application looks like when it starts up:
2. Summary of contributions
My responsibilities include designing the layout, implementing the features for the Cashier tab and ensuring good code quality across all packages.
The following sections present the enhancements that I have implemented in greater details, as well as the relevant documentation I have done in the user guide and developer guide.
2.1. Main Enhancements
The following section illustrates some crucial enhancements that I have added for Cashier tab.
-
Adding, Deleting and Editing of Sales Items
-
What it does: It allows the user to add, delete and update the sales items in the table shown on the tab.
-
Justification: These feature incorporate the essential elements of a cash register and is fundamental for the Cashier tab. By expediting the process of calculating and recording the quantity of sales items, it enables the cashier-in-charge to perform cashiering duties more efficiently.
-
Highlights: It monitors the current stock in the inventory to ensure that the quantity keyed in does not exceed the stock available. This eliminates any hindrance involving manual checks for the availability of a certain item.
Furthermore, upon any mistyped words or descriptions that do not match an existing item in the inventory, suggestions will be offered. This further augments the hassle-free aspect of this tab.
-
-
Checking Out the Cart
-
What it does: This checkout feature calculates and displays the total amount and the change to be returned.
-
Justification: This feature allows the stock to be updated accordingly automatically on the Inventory tab and abolish any need for manual logging of the stock.
-
Highlights: This feature ensures accountability by prohibiting checkout if the cashier has not been set. Additionally, the sales made will be recorded on the Home tab as a transaction. This transaction will contribute towards the revenue and be used in the finance analysis.
-
-
Cashier Mode
-
What it does:
Cashier Modewill be automatically turned on when there are items in the table of the Cashier tab. When all the items in the table are cleared,Cashier Modewill automatically turn off. -
Justification: This feature prevents the users from modifying any of the existing items in the inventory whenever
Cashier Modeis turned on. This feature serves as a security measure to ensure that no one can tamper with the existing data in the inventory while a purchase is being made. -
Highlights: While on
Cashier Mode, only adding of items with new description is allowed in the inventory. Any changes to existing items are strictly prohibited. Users can only alter the items in the inventory after clearing all the items on the Cashier tab.
-
2.2. Code contributed
The code that I wrote for my features can be found in the following links: RepoSense, Functional Code, Test Code
2.3. Other contributions
The following section documents other contributions I have made and it includes relevant GitHub pull requests in relation to the relevant contributions.
-
Enhancements
-
Community
-
Created issue labels for milestones v1.4 on Github: (Issue #309)
-
Reviewed pull requests and offered suggestions (with non-trivial review comments): (PR #221), (PR #196)
-
Integrated
Cashierpackage with other packages, fixed and added someInventoryclasses: (PR #96) -
Standardized decimal places for all amounts attributes in all packages for calculation and display: (PR #297)
-
-
Documentation
-
Updated the developer guide with diagrams and information about
InventoryandCashierparsers: (PR #209) -
Added implementation details for the Cashier tab in Developer Guide: (PR #209), (PR #164), (PR #162)
-
Added guide to use Cashier tab in user guide: (PR #209), (PR #212)
-
Enhanced user guide to make it more user-friendly and updated Members tab: (PR #303), (PR #252)
-
Amended README document to make it more comprehensible with a better format: (PR #230)
-
Updated glossary and FAQ questions: (PR #301)
-
3. Contributions to the User Guide
The following section showcases my contribution to the user guide for features specific to the Cashier tab.
{Start of First Extract from User Guide}
5.5.1. Add a Sales Item to the Table
This command enables you to add a sales item into the table.
-
Command:
add [c/CATEGORY] d/DESCRIPTION q/QUANTITY
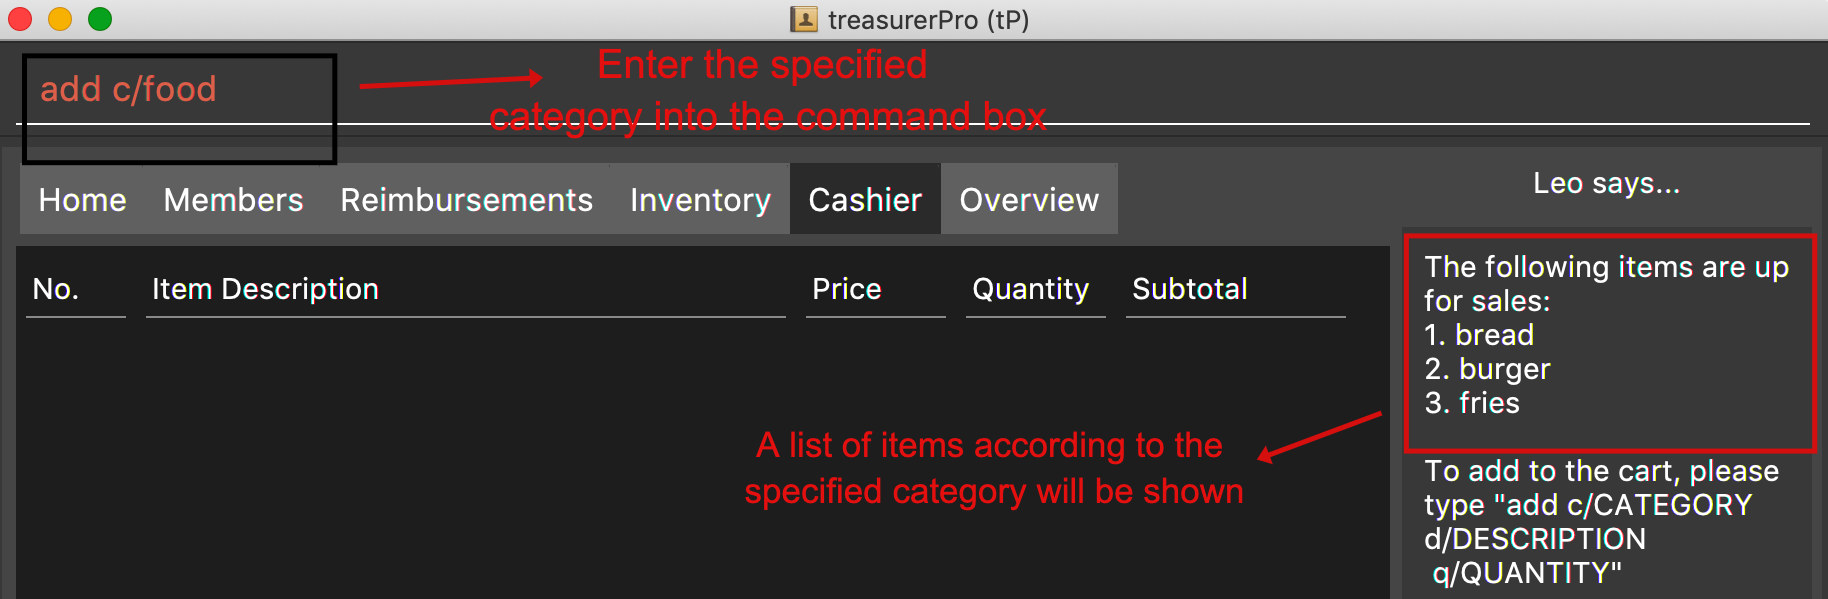
The quantity that you input must be less than or equal to the stock available in the Inventory tab. The category field is optional. If you are unsure about the description of the desired item, you can refer to the Inventory tab or simply key in the category without any other fields. Leo will display all the items in the specified category that are available for sale.
Additionally, if the description is misspelled or does not match any of the items in the inventory, Leo will recommend items with similar description that you might be looking for.
Examples:
-
add c/food- Displays all items that are under the 'food' category in the response box -
add c/stationary d/pancake q/3- Adds 3 similar items which have the description "pancake" -
add d/pancake q/3- Adds 3 similar items which have the description "pancake"
| The system will allow a valid item to be added even if the category of the item does not match with the specified category inputted. |
-
Steps:
-
If you do not remember the exact description of the item to add, you can type the command "add" with a category specified as shown in the screenshot below.
-
Then, you can enter the desired description and quantity according to the items suggested by Leo as shown below.

-
Now, you can hit
Enter.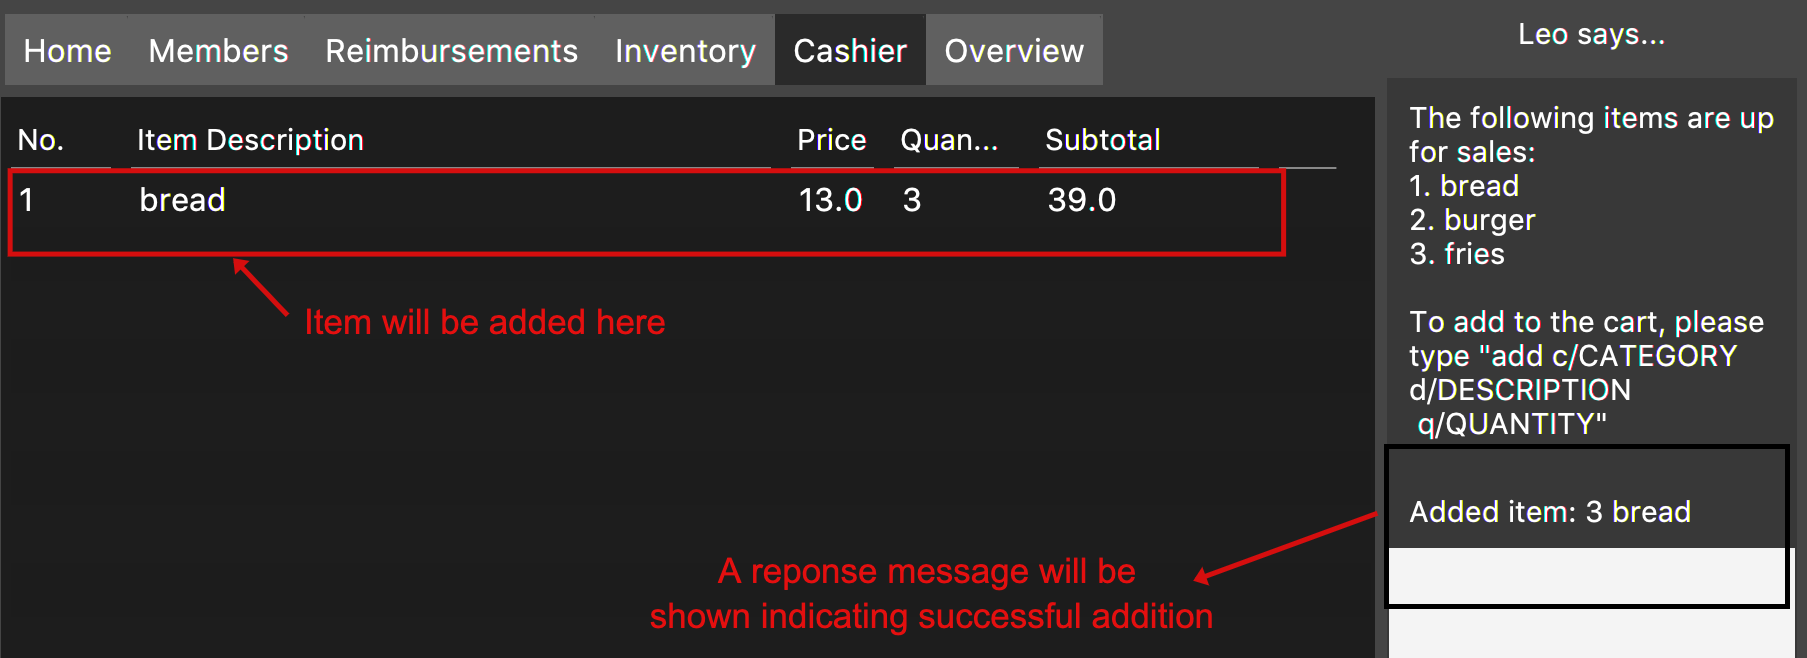
-
Leo will respond to the successful addition with a response message. The newly added item will be shown on the table.
{End of First Extract from User Guide}
{Start of Second Extract from User Guide}
5.5.5. Checkout All Sales Items
This command enables you to perform a checkout of all the sales items in the table.
-
Command:
checkout AMOUNT_PAID_BY_CUSTOMER
You should input the amount that the customer is paying. This amount must be greater than or equal to the total amount listed on the bottom row of the table. If the amount paid is greater than the total amount, Leo will display the amount of change that the cashier should return.
After checking out, all items in the table will be cleared and the cashier will be reset.
| You must set the cashier before checking out. Else, checkout cannot proceed. |
-
Example:
-
checkout 850- Customer pays $850 to cashier
-
-
Steps:
-
To checkout, you can type in the command "checkout" and specify the amount that the customer is paying as shown in the screenshot below.

-
Now, you can hit
Enter.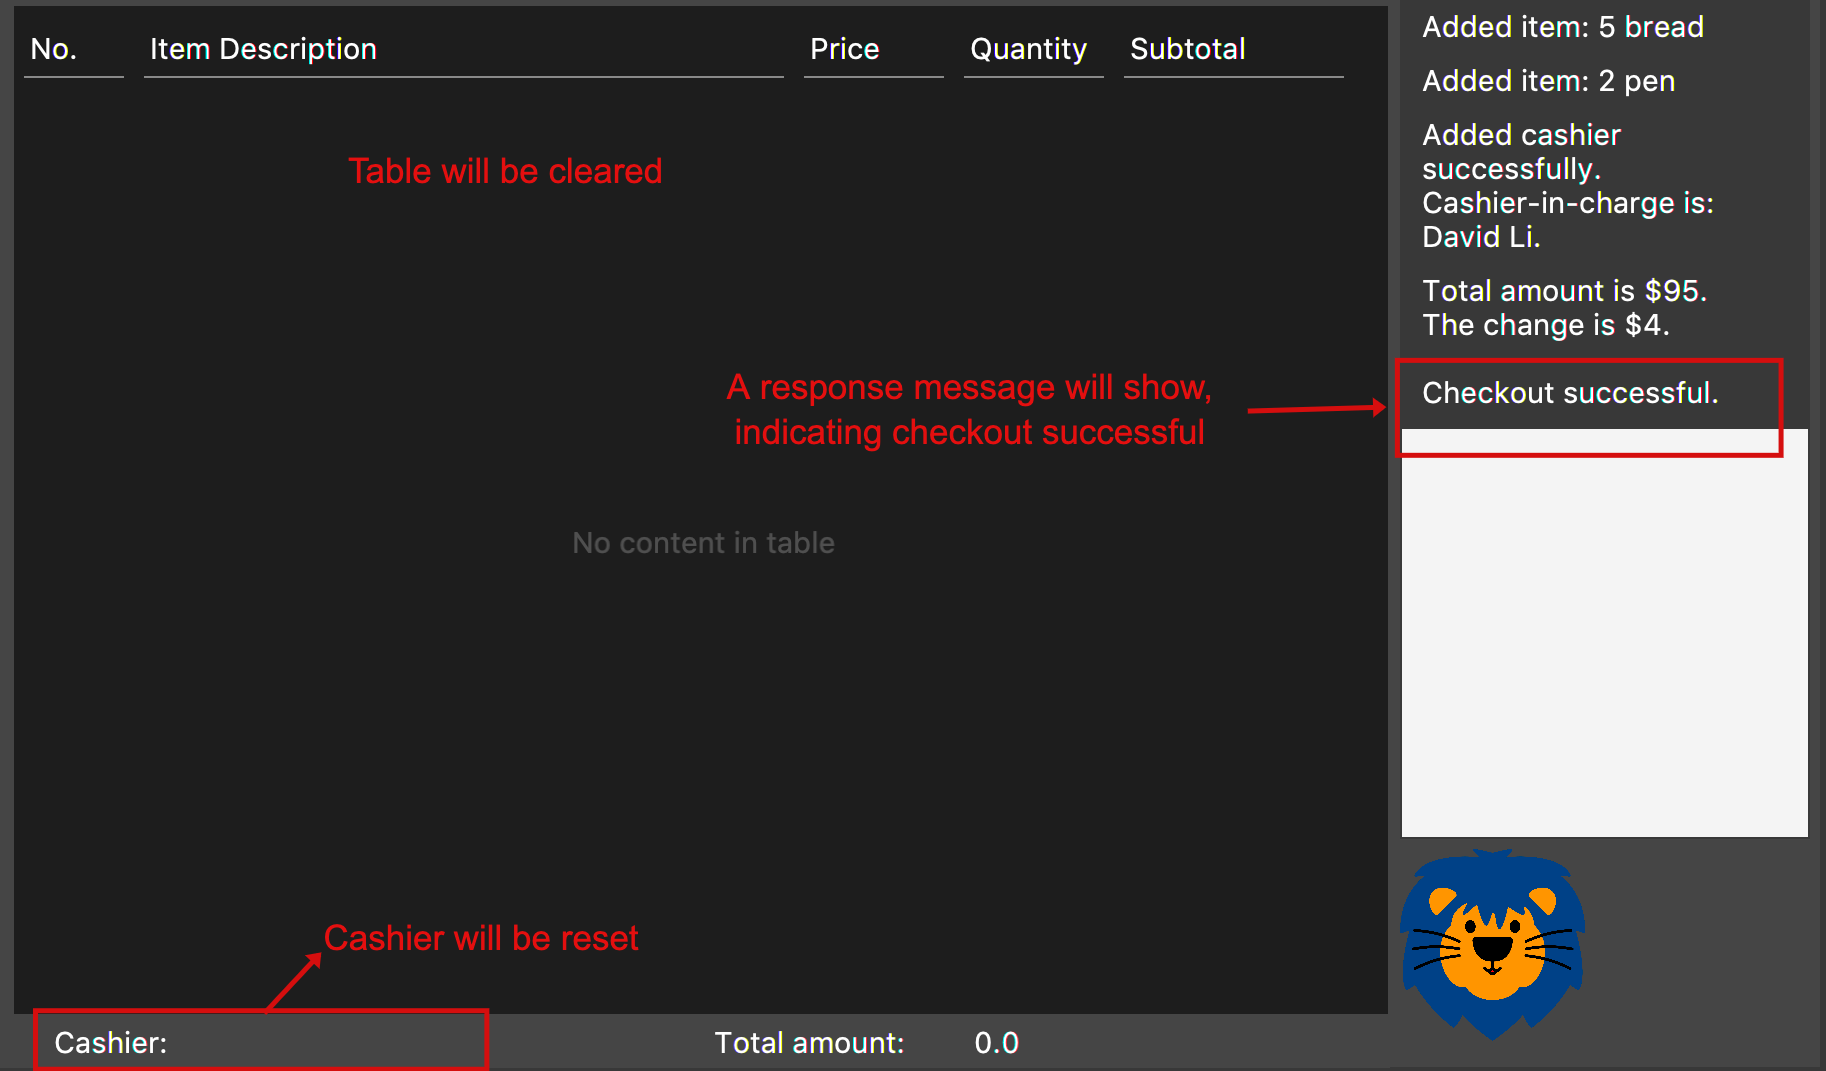
-
If checkout is successful, Leo will respond with a response message. The table will be cleared and the cashier will be reset.
The Home tab will be updated with this transaction and the remaining stock in the Inventory Tab will also be updated.
{End of Second Extract from User Guide}
Contributions to the Developer Guide
The following section showcases my contribution to the developer guide for features specific to the Cashier tab.
{Start of First Extract from Developer Guide}
2.3.3. Details on Logic Implementation for the Inventory and Cashier Tab
This section will show further details of the Logic Component of the Inventory tab and Cashier tab.
Given below is a Class Diagram showing the structure of Parser within the Logic component:

Parser for the Inventory and Cashier tabsThe XYZTabParser represents the InventoryTabParser for the Inventory tab and CashierTabParser for the Cashier tab. As seen above, the XYZTabParser which is the package tab parser, creates individual parser, ABCParser.
{End of First Extract from Developer Guide}
{Start of Second Extract from Developer Guide}
3.5.1. Add Sales Item Feature
This feature allows the addition of sales items to the cart.
Adding of a sales item to the cart will require an input of its description and quantity. If only the category field is inputted,
Model will search all the sales items in the Inventory List
according to the specified category and suggestions would be shown by Leo.
If the description inputted does not match any valid item, the Model will call the getRecommendedItems(description) method,
which will in turn call getCombination(arr, arr.length) method to return an ArrayList containing all subsets of
the inputted description that are of at least length 3. These subsets strings are then compared
with the actual description of all items in the inventory to check if either contains the other.
The following is a code snippet from getCombination(char[] arr, int n) method:
public ArrayList<String> getCombination(char[] arr, int n) {
    ArrayList<String> result = new ArrayList<>();
    for (int start = 1; start <= n; start++) {
        String word = "";
        for (int i = 0; i <= n - start; i++) {
            //  Adds characters from current starting character to current ending character
            int j = i + start - 1;
            for (int k = i; k <= j; k++) {
                word += String.valueOf(arr[k]);
            }
            result.add(word);
        }
    }
    return result.stream()
            .filter(str -> str.length() >= 3)
            .collect(Collectors
                    .toCollection(ArrayList::new));
}
getCombination(char[] arr, int n) method from Cashier Model
The getCombination(arr, arr.length) method in the above snippet consists of 3 nested loops. The first loop decides the
starting character. The second loop takes each of the characters on the right of the starting character as the ending character.
The last loop appends all the characters from the starting character to the ending character. After iterating through the nested loops,
the ArrayList result is passed into a stream to filter out all subsets strings that are of length less than 3.
If description and quantity are both valid, the ModelManager will add the item into the sales list as shown in Figure 2.
The following sequence diagram shows how the add command works which is referenced in 2.3. Logic component: Figure 5:
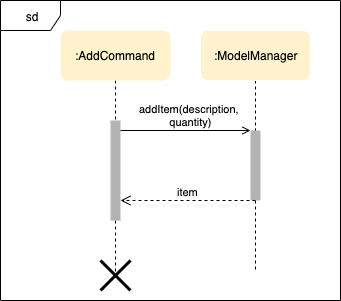
As seen below, multiple checks will be carried out by AddCommandParser to check the validity of the inputs. hasItemInInventory(description)
and hasSufficientQuantityToAdd(description, quantity) methods will be called to ensure the item has sufficient stock
left in the inventory. There will also be checks to ensure that the item specified is available for sale.
Once the item is added, boolean onCashierMode in ModelManager will be immediately set to true if
it is initially false.
|
The following activity diagram shows the steps proceeding after the user input an add command:
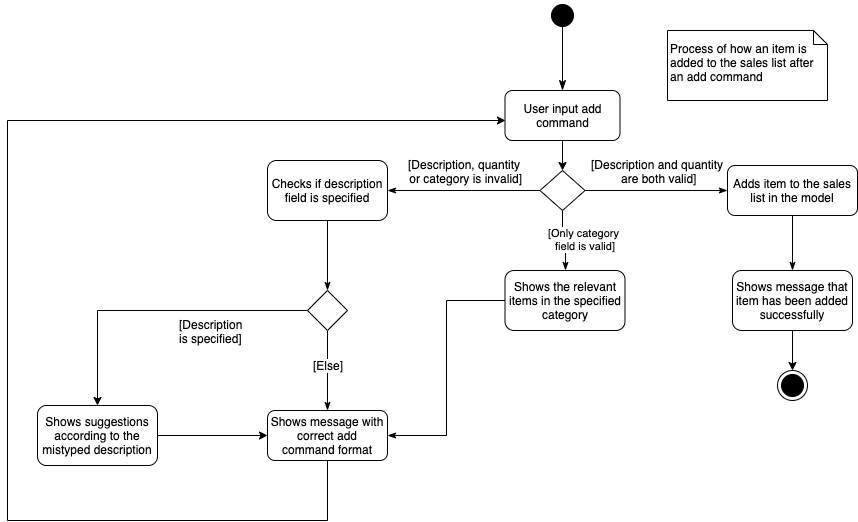
{End of Second Extract from Developer Guide}
{Start of Third Extract from Developer Guide}
3.5.3. Checkout Feature
This feature records all the sales items in the table as one transaction under the Sales category.
The Home tab will be updated with the new transaction labelled as Items sold. The remaining stock
will also be updated on the Inventory tab.
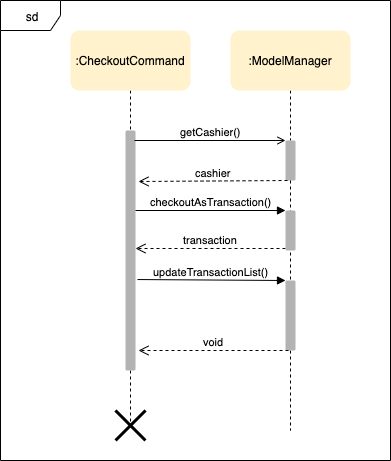
During the execution of the command, getCashier() method will be called which will return a person. This person will
be used to create a Transaction object. If the cashier is null, the execution of the command cannot proceed and Leo will
prompt the user to set a cashier.
Else, if the amount inputted is valid and cashier has been set, the ModelManager will create a new
transaction of the sales made.
| After the execution of the above methods, a clear command will then be called automatically to clear all the sales items on the tab. |
After checkout command is executed, boolean onCashierMode in ModelManager will be
immediately set to false.
|
The following sequence diagram shows how the checkout command is executed:
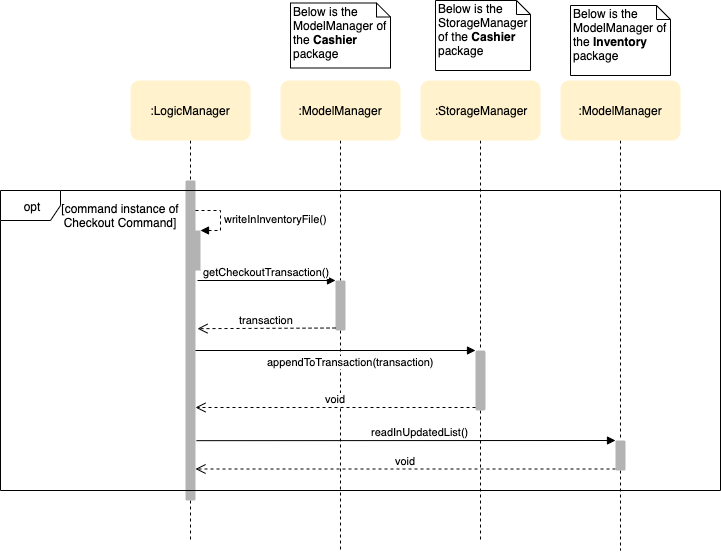
The Cashier Logic will call relevant methods to update the inventory list and newly-generated transaction
to the respective .txt file.
To update the view on the Inventory tab and Transaction tab,readInUpdatedList() method of inventory Model will
called to read in the entire inventory data file and transaction will be added to the transaction Model.
The following sequence diagram shows how the transaction and inventory are updated:
{End of Third Extract from Developer Guide}
{Start of Fourth Extract from Developer Guide}
3.1.5. Overall Design Considerations
This section explains the design considerations for some crucial implementations in the Cashier tab.
| Alternative 1 | Alternative 2 | Conclusion and Explanation |
|---|---|---|
An ArrayList is used to store the list of sales item shown on the Cashier tab. Pros: Elements are be accessed directly more efficiently. Cons: Adding and removing from the head of the list is less time-efficient for ArrayList. |
A LinkedList is used to store the list of sales item. Pros: Elements can be accessed from the head and tail of the list in constant time. Cons: When accessing directly via the index, performance is poor with respect to time. |
Alternative 1 is selected. An ArrayList has better performance with respect to time when accessing each elements directly. As the sales list will be updated and accessed regularly, an ArrayList is more fitting. |
The Transaction, Inventory and Person Pros: Cashier’s Logic can access all public methods in the respective Cons: It might result in unintended modification to some of the data in the Models. |
Interfaces that only contains the required methods are created. The methods are called via these interfaces to update the data. Pros: Prevents any unwanted changes through other methods. This adheres to the Facade Pattern. Cons: If more methods are needed, they need to be added to these interfaces. |
Alternative 2 was implemented as only a few methods are required from each |
The Cashier’s Pros: It can access the data file directly without any dependencies. Cons: The data files can be modified from 2 sources, increasing chances of bugs. |
The Cashier’s Pros: The data files are only modified from 1 source, ensuring cohesiveness in the format of data stored. Cons: It introduces more dependencies on the storage of other packages. |
Alternative 2 is implemented to enforce defensive programming, so that the data files are not modified via 2 different methods from different sources and eliminates any chances of uncoordinated data in the data files. |
{End of Fourth Extract from Developer Guide}